Tag Archive | 3M VHB – 2 sided tape

Aries Birthday


Sharing a card today that I made using the digital stamp called Aries (The Paper Shelter) for both the image and sentiment for a friend’s birthday. My friend is an Aries, so I thought this would be perfect for her.

To make this card, I printed out the image from my printer onto Copic Marker X-Press It Blending Card and then coloured it in.

I printed out the background paper from the same set and then mounted it onto  6″ x 6″ cardstock. Then, I popped up the coloured image using 3M VHB – 2 sided tape.

Card Recipe:

Stamp and Sentiment: Aries (The Paper Shelter)

Inks: HP Printer – High Quality GreyScale and full colour for the background

Paper: Copic Marker X-Press It Blending Card, Aries (The Paper Shelter), White Cardstock

Tools: 3M VHB – 2 sided tape

Image coloured with Copic Markers:

Skin: E000, E00, E04, E11, E21, R29, R24, R22, R20

Hair: E18, E08, YR18, YR14

Eyes: G14, G09, G07, C1, C0, Colorless Blender

Toga and Ram Top: E35, Y38, Y35, Y21, B04, B02, B000

Ram Horns and Hooves: E37, E35, E33, E31

Ram: E43, E42, E41, R24, R22, R20

Rope:  E44, E43, E41

Circle: E17, E15, E13, G03, G02, G00, Y38, Y35, Y21

Background: Y13, Y11, Colorless blender

Hope you like it and have a great week!

I Detect A Birthday!


Sharing a card that I made for my brother this week! For the main image and sentiment, I used It’s A Mystery (Kraftin Kimmie Stamps). My little brother retired from the OPP last year, so I thought this would be a fun card to make for him for his birthday this year.

To make the background for the card, I die cut multiple rectangles using Your Next Stamp – Stitched Rectangle Die Set (YNSD214) in various brown cardstocks and some white Copic Marker X-Press It Blending Cardstock.

For the brick background, I used Darice – Brick Wall Embossing Folder and then various Tim Holtz inks listed below to give the different colours for the texture.

I coloured in the main images with Copic markers and then fussy cut around them leaving a thin white border. I stamped the lamp post using My Creative Time – Wishing You Were Here and then used the co-ordinating die cut to cut it out.

I used Sentiment Label Dies (My Creative Time) to die cut the ribbon and then stamped the sentiment using VersaMark and Ranger Embossing Powder White – Extra Fine Detail. Which I heat set with Marvy Uchida – Embossing Heat Tool. Then I used the YNS die cut to trim off the edge so that it matched the rest of the card.

I layered all of the pieces together using 3M VHB – 2 sided tape to pop them up and then 2-sided tape to mount the final rectangles onto the 5.5″ x 4.25″ card base.

Card Recipe:

Stamp and Sentiment: It’s A Mystery  (Kraftin Kimmie Stamps)

Inks: Memento – Tuxedo Black, Tim Holtz Distress Ink – Brushed Corduroy, Tim Holtz Distress Ink – Rusty Hinge, Tim Holtz Distress Ink – Vintage Photo, Tim Holtz Distress Ink – Walnut Stain

Paper: Copic Marker X-Press It Blending Card, Park Lane 50 pk 8.5”x11” Value Papers-Browns, AC Cardstock – Autumn

Die Cuts: Your Next Stamp – Stitched Rectangle Die Set (YNSD214), My Creative Time – Wishing You Were Here, Sentiment Label Dies (My Creative Time)

Embossing Folder: Darice – Brick Wall

Tools: MISTI – Most Incredible Stamping Tool, Cuttlebug, Marvy Uchida – Embossing Heat Tool

Image coloured with Copic Markers:

Skin: E000, E00, E04, E11, E21

Detective: E39, E37, E35, E34, E33, E31, E89, E87, E84

Magnifying Glass: C1

Shadow and Sidewalk: C5, C3, C2, C1

My brother loved his card. I hope you like it too and have a fantastic week!


True Friends!


Welcome Back KLM Digital Designs Fans!

Today, I’m sharing a card that I made using Bunny and Butterfly Digital Stamp (KLM Digital Designs)! I fell in love with this beautiful image as soon as I saw it. I found this stamp to be so peaceful and serene and I love the sentiment that KLM Digital Designs created to go along with it.

To make the card, I printed out the image and sentiment with my HP printer using High Quality Grayscale onto Copic Marker X-Press It Blending Card. I found this is the best print setting so that your ink won’t smear when you start colouring. I die-cut the image with my Cuttlebug and My Creative Time -Stitched Squares Inside and Out and coloured it in using Copic markers. Next I mounted the image onto some purple cardstock and left a small border all around it. I cut the sentiment and did the same.

To complete the card, I used a white card base of 5.5″ x 4.25″ and used double-sided tape to mount the background paper from K&Company – Susan Wright – SW Botanical. I popped up the image and sentiment using 3M VHB – 2 sided tape and add some Kraftin’ Kimmie Pastel Krafty Dots.

Card Recipe:

Stamp and Sentiment: Bunny and Butterfly Digital Stamp (KLM Digital Designs)

Inks: HP Printer – Greyscale

Paper: Copic Marker X-Press It Blending Card, K&Company – Susan Wright – SW Botanical, Purple and White cardstock

Die Cuts: My Creative Time -Stitched Squares Inside and Out

Tools: Cuttlebug, 3M VHB – 2 sided tape, Kraftin’ Kimmie Pastel Krafty Dots

Image coloured with Copic Markers:

Bunny: W5, W3, W1, W0, RV32, R20, R11

Tulips, Leaves and Stems: G28, G24, G21, G12, V17, V15, V12, V01

Butterfly: E23, Y08, YR16, YR14, YR12

Background: B70, B01, B00, B000, B000, C0, Colorless Blender

Hope you like it and have a great week!

You can find more cards to inspire you at KLM DesignsKLM Digital Design Team and KLM Digital Designs on the Facebook Fan page from the rest of our design team.

Carrot Express!!!


It’s Wednesday, and Easter is quickly approaching. So for this week, I used Carrot Express – S055 (High Hopes Rubber Stamps) for the main image and Canadian Easter Greetings – H139 (High Hopes Rubber Stamps) for the sentiment.

To put this card together, I first die-cut some Copic Marker X-Press It Blending Card using my Cuttlebug and My Creative Time -Stitched Squares Inside and Out. Next, I stamped the image with Memento – Tuxedo Black ink using my MISTI to get a nice clean image. I put the die-cut back over the image again and used it for a template to get a nice clean white border. I created a mask out of the image and used the die-cut from Avery Elle – Custom Steel Dies – Made in the USA – D-05-01 PiercedCloudsDie and Tim Holtz Distress Ink – Salty Ocean to create the sky background.

I mounted the plaid paper from Recollections – Easter Paper onto a white card base of 5.5″ x 4.25″and then edged around the image and card with Tim Holtz Distress Inks and embossed the sentiment using Tim Holtz Distress Ink – Wilted Violet and VersaMark.

Lastly, I popped up the image onto the card using 3M – VHB 2-sided tape and added in some Kraftin’ Kimmie Pastel Krafty Dots.

Card Recipe:

Stamp: Carrot Express – S055 (High Hopes Rubber Stamps)

Sentiment: Canadian Easter Greetings – H139 (High Hopes Rubber Stamps)

Inks: Memento – Tuxedo Black, Tim Holtz Distress Ink – Wilted Violet, Tim Holtz Distress Inks – Shaded Lilac, VersaMark

Paper: Copic Marker X-Press It Blending Card, Recollections – Easter Paper

Embossing: Ranger – Clear Super Fine Detail embossing powder

Die Cuts: Avery Elle – Custom Steel Dies – Made in the USA – D-05-01 PiercedCloudsDie, My Creative Time -Stitched Squares Inside and Out

Tools: MISTI – Most Incredible Stamping Tool, Cuttlebug, 3M VHB – 2 sided tape, Kraftin’ Kimmie Pastel Krafty Dots

Image coloured with Copic Markers:

Rabbit: W5, W3, W1, R30, R02

Overalls: B26, B23, B21, R29, R27, R24

Carrots and Leaves: YR27, YR12, YR09, YR04, G14, G07, YG25, YG21

Wagon: E35, E33, E31, R29, R27, R24, W9, W7, W5, C2, C1, C0

Dirt: E37, E35, E33, E31

Hope you like it and have a fantastic week!

You can find lots of inspiration from the Design Team Divas at the High Hopes blog, and the High Hopes Rubber Stamps Facebook Fan page plus you can also follow us on
Instagram, Twitter and Pinterest.


Aged to Perfection!!!


Sharing a card today that I made using Big Birthday Wishes – SC0794 (AI Art Impressions) for both the image and sentiment.

To make this card, I used my MISTI to get a nice clean stamped image using Memento – Tuxedo Black and Copic Marker X-Press It Blending Card. Next I die-cut out the stamped image and background papers using my Cuttlebug and My Creative Time – Stitched Squares Inside and Out. I then inked around the edges using Tim Holtz Distress Ink – Picked Raspberry and Tim Holtz Distress Inks – Peacock Feathers.

I mounted the background paper from Doodle Bug Designs Inc. – Sugar Shoppe – 6″ x 6″ paper pad onto a card base of 5.5″ x 5.5″. Then, I popped up the next layer using 3M VHB – 2 sided tape. I mounted the main coloured image onto some Hotpink cardstock and then cut a narrow edge around it. Lastly, I popped up it up with 3M VHB – 2 sided tape.

Card Recipe:

Stamp and Sentiment: Big Birthday Wishes – SC0794 (AI Art Impressions)

Inks: Memento – Tuxedo Black, Versa Fine – Onyx Black, Tim Holtz Distress Ink – Picked Raspberry, Tim Holtz Distress Inks – Peacock Feathers

Embossing Powder: Ranger – Clear Super Fine Detail embossing powder

Paper: Copic Marker X-Press It Blending Card, Doodle Bug Designs Inc. – Sugar Shoppe – 6″ x 6″ paper pad, Hotpink cardstock

Die Cuts:  My Creative Time – Stitched Squares Inside and Out

Tools: MISTI – Most Incredible Stamping Tool, Cuttlebug, 3M VHB – 2 sided tape

Image coloured with Copic Markers:

Skin: E000, E00, E04, E11, E21, R22, R20

Hair: E47, E44, E43

Blouses, Earrings and Shoes: BG18, BG13, BG11, Y19, Y15, Y13

Pants: B26, B23, B21

Hats and Aprons:  BG13, BG11, RV04, RV02, C2, C1, C0, Colorless Blender

Cake: Y19, Y15, Y13, BG13, E29, E27, E25, R85, R83, R81

Candles: RV09, RV04

Cake Stand: E15, Y35, Y19

Background: B04, B02, B01, B00, N4, N2, N0

Hope you like it and have a great week!

Welcome Little One!


It’s Wednesday, and this week I used Stretch – R081 (High Hopes Rubber Stamps) for the main image and Welcome Little One Script – F239 (High Hopes Rubber Stamps) for the sentiment. This little giraffe is so adorable and sure to warm someone’s heart.

I decided to keep the card simple this week and stamped and coloured the image and then fussy cut around it. I layered all of the layers, except for the base with 3M VHB – 2 sided tape. I edged around all of the die cuts with Tim Holtz Distress Ink – Picked Rasberry. To finish off the card I added in a few hearts. The card base is 4.25″ x 5.5″.

Card Recipe:

Stamp:  Stretch – R081 (High Hopes Rubber Stamps)

Sentiment: Welcome Little One Script – F239 (High Hopes Rubber Stamps)

Inks: Memento – Tuxedo Black, Tim Holtz Distress Ink – Picked Rasberry

Paper: Copic Marker X-Press It Blending Card, Forever In Time – Baby Girl, Spare patterned papper

Die Cuts: My Creative Time – Scalloped Stitched Oval Dies.

Tools: MISTI – Most Incredible Stamping Tool, Cuttlebug, Kraftin Kimmie – Hearts Krafty Dots

Image coloured with Copic Markers:

Giraffe: E59, E57, E55, E50, E35, Y32, Y26, Y23, R30, R24, R20

Hope you like it and have a fantastic week!

You can find lots of inspiration from the Design Team Divas at the High Hopes blog, and the High Hopes Rubber Stamps Facebook Fan page plus you can also follow us on
Instagram, Twitter and Pinterest.


Eek! You’re How Old???


Today I’m sharing a birthday card that I made for my sister-in-law whose nickname is “Kitty”. I have a lot of fun trying to come up with new creations with cats for her birthday each year. This year, I decided to use Going Catty – DP1021 (Clearly Whimsy Stamps), for my main image on the front of the card. Shown below is how it looked before I placed the die cut from Peek A Boo Poppers (YNSD219) – (#Your Next Die) over top of it.

To create the die-cut, I first used Lifestyle Crafts Cutting Dies – Nesting Circles to cut out the main image and then again to cut out the pop-out die cut using Echo Park Paper Co. – Imagine That. I then added glue all around the outside of the circle and glued the two pieces together as shown below.

I created a card base 5.5″ x 4.25″ and then mounted paper from Doodle Bug Designs Inc. – Sugar Shoppe. I popped up the circle previously cut out with 3M VHB – 2 sided tape. I used the sentiment from the same Whimsy Stamp Set. I embossed it using VersaMark and Ranger Embossing Powder White – Extra Fine Detail. Then I cut it out using Ribbon End Dies – My Creative Time. Lastly, I edged around all of the edges using Tim Holtz Distress Ink – Picked Raspberry. Shown below is the card with the pop-up closed.

This is the front of the card with the pop-up open.

On the inside of the card, I used the image from Birthday Critters – 30-466 (Penny Black) and sentiment from
Whatnot Sentiments Set Twelve – CYNS638 (#Your Next Stamp).

All images were stamped onto Copic Marker X-Press It Blending Card using Memento – Tuxedo Black ink and my MISTI.

Card Recipe:

Stamps: Going Catty – DP1021  (Clearly Whimsy Stamps), Birthday Critters – 30-466 (Penny Black)

Sentiment: Going Catty – DP1021 (Clearly Whimsy Stamps), Whatnot Sentiments Set Twelve – CYNS638 (#Your Next Stamp)

Inks: Memento – Tuxedo Black, Tim Holtz Distress Ink – Picked Raspberry, Versa Fine – Onyx Black, VersaMark

Embossing Powder: Ranger Embossing Powder White – Extra Fine Detail, Ranger – Clear Super Fine Detail embossing powder

Paper: Copic Marker X-Press It Blending Card, Doodle Bug Designs Inc. – Sugar Shoppe – 6″ x 6″ paper pad, Echo Park Paper Co. – Imagine That 6″ x 6″

Die Cuts: Peek A Boo Poppers (YNSD219) – (#Your Next Die), Ribbon End Dies – My Creative Time, Lifestyle Crafts Cutting Dies – Nesting Circles

Tools: MISTI – Most Incredible Stamping Tool, Cuttlebug, 3M VHB – 2 sided tape, Marvy Uchida – Embossing Heat Tool

Image coloured with Copic Markers:

Cats: W9, W8, W6, W5, R30, R27, R24, R22, R02, Sakura Glaze – Black

Party Hat and Birthday Banner: BG13, BG11, YR16, YR12, RV66, RV63, Y17, Y08, BG05, BG02

Background: BG13, BG11, BG10

Hope you like it and have a great week!

You can find more cards to inspire you at Roberta Stevenson on my Facebook page.

Gone Fishing!


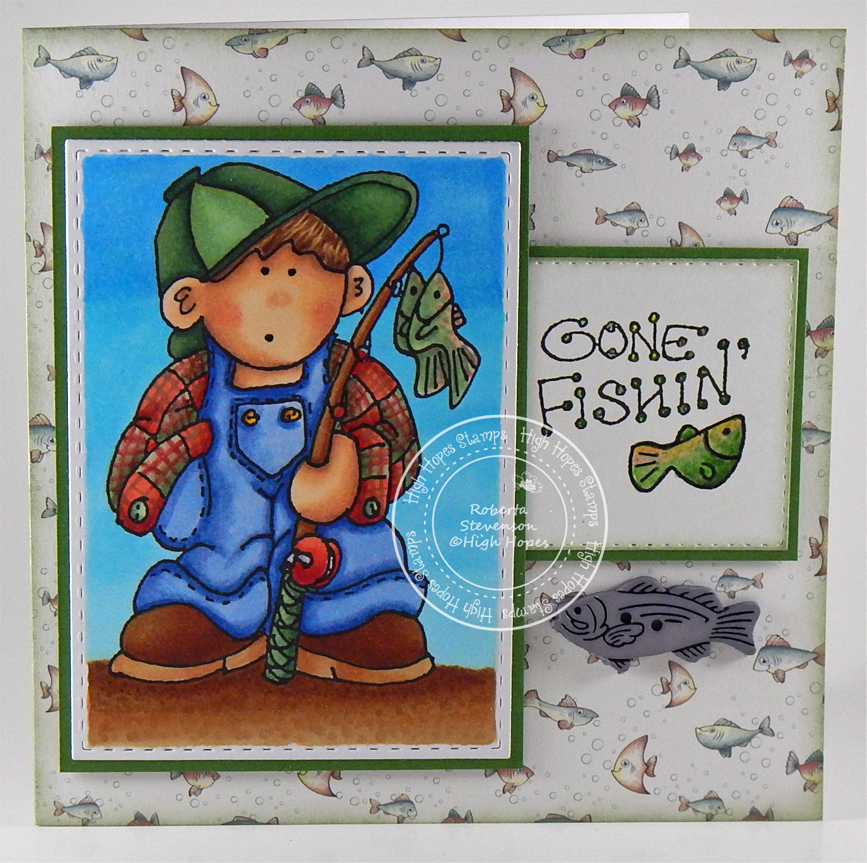
It’s Wednesday, and this week I used Anthony James – R022 (High Hopes Rubber Stamps) for the main image and Gone Fishing Sign – G103 (High Hopes Rubber Stamps) for the sentiment.

I come from a family that LOVES fishing. My dad has always loved fishing and now my older brother has fallen into his foot steps of loving to fish too. I remember going fishing with my dad and I thought I had a really, really big fish. We were all so excited until I pulled up a big chunk of grass reeds. LOL! The fish were jumping all around us, but we couldn’t seem to catch any that 1 day.

As soon as we were back on shore, you could see the huge fish playing all over the lake. I think they were just laughing at us. But I’m not a 100% sure. LOL!

To make the card, I first used Your Next Stamp – Stitched Rectangle Die Set (YNSD214) to cut out the main image from Copic Marker X-Press It Blending Card and My Creative Time – Stitched Squares Inside and Out to die cut the square out of some white cardstock. Then I used my MISTI and Memento – Tuxedo Black Ink to get a nice crisp image. I used various Copic markers listed below to colour in the image.

I decided to colour in the fish with PrismaColor pencils on the sentiment.

Next I ran both the coloured image and the sentiment through my Xyron Creative Station and placed both cuts over top of some green cardstock. Then I popped both up using 3M VHB – 2 sided tape.

The base of the card is 5.5″ x 5.5″. I edged around the card and sentiment with Tim Holtz Distress Ink – Bundled Sage. For a final touch, I added a little fish under the sentiment.

Card Recipe:

Stamp:  Anthony James – R022 (High Hopes Rubber Stamps)

Sentiment: Gone Fishing Sign – G103 (High Hopes Rubber Stamps)

Inks: Memento – Tuxedo Black, Tim Holtz Distress Ink – Bundled Sage

Paper: Copic Marker X-Press It Blending Card, ModaScrap – Under The Sea (6″ x 6″), Green cardstock

Die Cuts: Your Next Stamp – Stitched Rectangle Die Set (YNSD214), My Creative Time -Stitched Squares Inside and Out

Tools: MISTI – Most Incredible Stamping Tool, Cuttlebug, Xyron Creative Station, 3M VHB – 2 sided tape

Image coloured with Copic Markers:

Skin:  E21, E11, E04, E00, E000

Hair: E59, E57, E55

Overalls:  B26, B23, B21, E15, Y35, Y08

Shirt:  R27, R24, R22, G46, G43, G40, G24

Ball Cap: G82, G46, G43, G40, G28, G24, G21

Shoes: E39, E37, E35, E33, E31

Fishing Rod and Reel: R27, R24, R22, E39, E35, E31, G46, G40, G28, C3, C1

Fish:  RV21, R22, G46, G43, G40, G20

Ground: E37, E35, E33, E31

Sky: B02, B01, B00, B000

Sign: PrismaColor Pencils – Blush Pink (PC928), Sap Green Light (PC 120), Charteuse (PC989), Apple Green (PC912), Olive Green (PC911)

Hope you like it and have a fantastic week!

You can find lots of inspiration from the Design Team Divas at the High Hopes blog, and the High Hopes Rubber Stamps Facebook Fan page plus you can also follow us on
Instagram, Twitter and Pinterest.


Birthday Wishes!


Today I’m sharing a birthday card that I made for my mom using Yummy Cupcake Bunny (CYNS592) (#Your Next Stamp) on the front of the card and  Rosie Rabbit Gift (CYNS542) (#Your Next Stamp) on the inside of the card.

On the inside:

To make the card I stamped the images on to Copic Marker X-Press It Blending Card using Memento – Tuxedo Black and my MISTI – Most Incredible Stamping Tool to get a nice clean crisp image. After colouring the images, I fussy cut around them both. I then used My Creative Time – Scalloped Stitched Oval Dies to die cut an oval out of Doodle Bug Designs Inc. – Sugar Shoppe paper. I cut the remainder of the paper to be 4″ x 5.25″ and turned it over to the opposite side and mounted it onto a card base of 4.25″ x 5.5″. I used Tim Holtz Distress Ink – Picked Raspberry to ink around the edges.

For the sentiments I used Versa Fine Onyx Black and VersaMark ink and then embossed both with Ranger embossing powders listed below.

To complete the card, I mounted the bunny on the front with 3M VHB – 2 sided tape to pop it up as well as the sentiment.

Card Recipe:

Stamp and Sentiment: Yummy Cupcake Bunny (CYNS592) (#Your Next Stamp), Rosie Rabbit Gift (CYNS542) (#Your Next Stamp)

Inks: Memento – Tuxedo Black, Tim Holtz Distress Ink – Picked Raspberry, Versa Fine – Onyx Black, VersaMark

Embossing Powder: Ranger Embossing Powder White – Extra Fine Detail, Ranger – Clear Super Fine Detail embossing powder

Paper: Copic Marker X-Press It Blending Card, Doodle Bug Designs Inc. – Sugar Shoppe – 6″ x 6″ paper pad, Hot Pink cardstock

Die Cuts:  My Creative Time – Scalloped Stitched Oval Dies

Tools: MISTI – Most Incredible Stamping Tool, Cuttlebug, 3M VHB – 2 sided tape, Marvy Uchida – Embossing Heat Tool

Image coloured with Copic Markers:

Bunnies: E29, E27, E25, E23, R30, R02, R85, R83

Cupcake and Wrapper: BG18, BG15, BG11, BG10, YR18, YR16, RV09, RV04, RV02, RV00, E35, E33, E31

Presents and Ribbons: BG18, BG15, BG11, BG10, YR18, YR15, Y06, Y04, Y02, RV04, RV02, RV00

Background: B04, B02, B00

Hope you like it and have a great week!

You can find more cards to inspire you at Roberta Stevenson on my Facebook page.

Easter Masterpiece!


It’s Wednesday, and this week I used High Hopes Rubber Stamps Bunny Masterpiece – S063 for the main image and Egg-Stra Special -G243 for the sentiment. These little bunnies are getting prepared for Easter. I remember making painted eggs every year in the kitchen with my mom and brothers as a child. Do you have an Easter tradition of painting eggs too?

To create the card I coloured in the image and then popped it up using 3M VHB – 2 sided tape. I also popped up the sentiment. I found some old cardstock and cut out some of the little eggs and then edged around each of them with various Tim Holtz colours listed below. The card is 6″ x 6″.

Card Recipe:

Stamp:  Bunny Masterpiece – S063 (High Hopes Rubber Stamps)

Sentiment: Egg-Stra Special -G243 (High Hopes Rubber Stamps)

Inks: Memento – Tuxedo Black, Tim Holtz Distress Inks – Dusty Concord, Spun Sugar, Wilted Violet, Evergreen Bough, Shaded Lilac and Fossilized Amber

Paper: Copic Marker X-Press It Blending Card, Recollections – Blue Ombre Cardstock, Recollections – Purple Ombre Cardstock, Recollections – Easter Printed Cardstock

Die Cuts: My Creative Time -Stitched Squares Inside and Out

Tools: MISTI – Most Incredible Stamping Tool, Cuttlebug, 3M VHB – 2 sided tape

Image coloured with Copic Markers:

Bunnies: C3, C2, C1, C0, R30, R02, RV04

Overalls: B26, B23, B21, V09, V06, V04, BV04, BV02, BV01, BV000

Egg: Y08, Y06, Y02, BG13, BG11, BG10, RV04, RV02, RV00, G02, G00, G000, B41, B34, B32

Paintbrushes: N4, N0, E27, E23, BG13, BG11, BG10, B34, B41

Grass: G17, G14, G07

Sky: B02, B01, B00, B000

Hope you like it and have a fantastic week!

You can find lots of inspiration from the Design Team Divas at the High Hopes blog, and the High Hopes Rubber Stamps Facebook Fan page plus you can also follow us on
Instagram, Twitter and Pinterest.


Love Every Little Moment


Welcome Back Dreamerland Craft Fans!

Today, I’m sharing a card that I made using Mix and Match Clear Stamps (DC19095) (Dreamerland Crafts)!  Love the images for this stamp. There are so many different scenes that can be created. I chose to do a night scene with the 2 best friends sharing the serenity of the night sky.

To make this card, I first die cut some Bristol paper and then drew in the hills with light pencil and traced around the stamps to get the general idea of placement. I created a masked image of the bear and bunny using Inkadoo Stamping Mask Paper and Post-It Note for the hills and cut them both out. Next I erased all of the lines so that you could barely see them and stamped the bear and the bunny image directly onto the Bristol Paper. Next, I mounted the mask of the characters and hills that I had cut out previously over top of the stamped images so that they would be protected while I coloured in the sky.

To do the sky I used a mixture of Tim Holtz inks listed below and PrismaColor pencils. Then I blended all of the colours together using Gamsol and a blending paper stump. I repeated the process with the PrismaColor pencils several times.

Once the sky was completed, I removed the stencil for the grass and proceeded to colour it in using the same technique that I had used for the sky.

Lastly, I removed the mask for the bear and bunny and coloured them in. I added in some small trees using a Black Prismacolor pencil.

I popped my finished image, back into my MISTI again and stamped the sentiment using VersaMark. I also stamped in the stars in the sky and embossed everything with Ranger Embossing Powder White – Extra Fine Detail. I also used a brush and tapped some of the white embossing powder all over the sky. Then heated it with my Marvy Uchida – Embossing Heat Tool. Lastly, I stamped and embossed the seagulls using VersaFine – Onyx Black and Ranger – Clear Super Fine Detail embossing powder. I coloured them in using Black PrismaColor pencil and then added in some highlights on the wings.

I popped up the coloured image and blue cardstock with 3M VHB – 2 sided tape.

Card Recipe:

Stamp and Sentiment: Mix and Match Clear Stamps (DC19095) (Dreamerland Crafts)

Inks: Versa Fine – Onyx Black, Versa Mark, (Sky Base): Tim Holtz Distress Ink – Blueprint Sketch, Tim Holtz Distress Ink – Chipped Sapphire, Tim Holtz Distress Ink – Black Soot

Embossing Powder: Ranger Embossing Powder White – Extra Fine Detail, Ranger – Clear Super Fine Detail embossing powder.

Paper: Inkadoo Stamping Mask Paper, Blue and Green – Recollections paper, Bristol Paper

Die Cuts:  My Creative Time -Stitched Squares Inside and Out

Tools: MISTI – Most Incredible Stamping Tool, Cuttlebug, Marvy Uchida – Embossing Heat Tool, 3M VHB – 2 sided tape

Image coloured with PrismaColor Pencils:

Sky:  Indigo Blue (PC901), Indanthrone Blue (PC208), Violet Blue (PC933), Denim Blue (PC1101), Black (PC935)

Grass: Dark Green (PC908), Peacock Green (PC907), Marine Green (PC988), Grass Green (909)

Bear: Dark Brown (PC946), Dark Umber (PC947), Chocolate (PC1082), Burnt Ochre (PC943), Sienna Brown (PC945)

Rabbit: 30% Warm Grey (PC1052), 20% Warm Grey (PC1051), 10% Warm Grey (PC1050)

Seagull Wings Highlight: White (PC938), Denim Blue (PC933)

All colours were blended with paper stump and Gamsol blending fluid.

Hope you like it and have a great week!

You can find more cards to inspire you at Dreamerland Crafts on the Facebook Fan page from the rest of our design team.

Panda Party


Hi There! Today I’m sharing a card for my friend who absolutely LOVES Panda bears. Every year, I try to find a new panda image to make her card with and this year I used Party Like A Panda (Simon Says Stamps) to make this fun card.

I used my MISTI, Memento – Tuxedo Black ink and Copic Marker X-Press It Blending Card to get a nice clear image when interchanging the various stamps from this set. Then, I die cut the main image using Your Next Stamp – Stitched Rectangle Die Set. I coloured in the images with Copic Markers and then stamped the presents separately. After colouring the presents, I fussy cut around them and added them to the card. I inserted the image back into the MISTI and used Versa Fine – Onyx Black to stamp “Birthday” and Embossed with Ranger – Clear Super Fine Detail embossing powder.

Next I used a small stamping block and added in the extra confetti and coloured it in to complete the background. Lastly, I mounted the image with 3M VHB 2-sided tape onto a 5.5″ x 4.25″ Hot Pink cardstock base.

Card Recipe:

Stamp and Sentiments: Party Like A Panda (Simon Says Stamps)

Die Cut: Your Next Stamp – Stitched Rectangle Die Set (YNSD214)

Ink: Memento – Tuxedo Black, Versa Fine – Onyx Black

Paper: Copic Marker X-Press It Blending Card, Pink Cardstock

Embossing Powder: Ranger – Clear Super Fine Detail

Tools: MISTI – Most Incredible Stamping Tool, Cuttlebug, 3M VHB 2-sided tape, Marvy Uchida – Embossing Heat Tool

Images coloured with Copic Markers:

Panda Bears: W5, W3, W1, W0, E53, Sakura Glaze – Black

Balloons and Confetti: RV66, RV55, RV14, RV13, RV00, R81, V06, V04, V01, V000, BG57, BG53, B26, B24, B00, B000, G17, G14, G000, YG41

Cake and Icing: E29, E27, E25, E13, RV66, RV14, RV13, R81

Candles: R24, Y17, Y08, Y000, Y00, V04, V01

Plate: BV23, BV20, Colorless Blender

Hat: BG57, BG53, B26, B24, B21, B00

Horn: E15, Y35, Y17, Y08

Grass: G17, G14, G09, G07, YG41, YG23, YG21, YG13, YG11

Hope you like it and have a terrific week!

It’s No Mystery!


It’s Wednesday, and this week, I used Little Sleuth – R205 (High Hopes Rubber Stamps) for my main image and No Mystery – H204 (High Hopes Rubber Stamps). This little sleuth has uncovered the clue to why he is so in love with his special someone. This card could be used for Valentine’s Day, Anniversary or even a birthday!

To make the background for the card, I die cut multiple squares using My Creative Time – Stitched Squares Inside and Out in various brown cardstock and some white Copic Marker X-Press It Blending Cardstock.

For the brick background, I used Darice – Brick Wall Embossing Folder and then various Tim Holtz inks listed below to give the different colours for the texture.

I coloured in the main image with Copic markers and then fussy cut around it and used a black marker to go around all of the edges.

I layered all of the pieces together using 3M VHB – 2 sided tape to pop them up and then 2-sided tape to mount the final square onto the 6″ x 6″ card base.

To finish off the card, I used some brown twine and criss-crossed it to make a little bow and added in the question mark using some clear gems that I coloured with E23.

Card Recipe:

Stamp: Little Sleuth – R205  (High Hopes Rubber Stamps)

Sentiment: No Mystery – H204 (High Hopes Rubber Stamps)

Inks: Memento – Tuxedo Black, Tim Holtz Distress Ink – Brushed Corduroy, Tim Holtz Distress Ink – Rusty Hinge, Tim Holtz Distress Ink – Vintage Photo, Tim Holtz Distress Ink – Walnut Stain

Paper: Copic Marker X-Press It Blending Card, Park Lane 50 pk 8.5”x11” Value Papers-Browns, AC Cardstock – Autumn

Die Cuts: My Creative Time -Stitched Squares Inside and Out, My Creative Time – Sentiment Label Dies

Embossing Folder: Darice – Brick Wall

Tools: MISTI – Most Incredible Stamping Tool, Cuttlebug, AC Premium Ribbon

Image coloured with Copic Markers:

Skin: E000, E00, E04, E11, E21, R22, R20

Hair: E47, E44, E43

Detective: E39, E37, E35, E34, E33, E31, E89, E87, E84, C10, C5, C3, C2, C1

Shoes and Magnifying Glass: C10, C8, C7, C5, C3, C2, C1, C0, B0000

Shadow and Sidewalk: C5, C3, C2, C1

Gemstones: E23

Hope you like it and have a fantastic week!

You can find lots of inspiration from the Design Team Divas at the High Hopes blog, and the High Hopes Rubber Stamps Facebook Fan page plus you can also follow us on
Instagram, Twitter and Pinterest.


Sending Smiles!


Spring is just around the corner!

It’s Wednesday, and for today’s card I used Andreas Kitties – R202 (High Hopes Rubber Stamps) for the main image and Sending Smiles – G276 (High Hopes Rubber Stamps) for the sentiment. This cheery little girl is hoping to bring smiles to everyone she knows and hopefully put a smile on your face too. She’s already for Spring! Are you??? I know I am. LOL!

To make this card, I started out with a 6″ x 6″ card base and then mounted the background onto the card. I cut the ovals and scalloped oval using my Cuttlebug and die cut from My Creative Time – Scalloped Stitched Oval Dies. The sentiment was cut out using My Creative Time – Ribbon End Dies.

For the main image, I used Copic markers to colour it all in. I fussy cut around the image and then traced around all of the edges using my black Copic marker. I edged around all of the borders of the die cuts with various Tim Holtz distress inks. I assembled the card using 3M VHB – 2 sided tape.

To add the last finishing touch to the card, I added in some flowers along the side and a pearl in the centre for all of the yellow flowers.

Card Recipe:

Stamp:  Andreas Kitties – R202 (High Hopes Rubber Stamps)

Sentiment: Sending Smiles – G276 (High Hopes Rubber Stamps)

Inks: Memento – Tuxedo Black, Tim Holtz Distress Ink – Fossilized Amber, Tim Holtz Distress Ink – Wilted Violet, Tim Holtz Distress Ink – Twisted Citron

Paper: Copic Marker X-Press It Blending Card, American Crafts – Dear Lizzy – Day Dreamer 6″x6″ (15.2×15.2cm), Forever in Time – Dandelion Wish SP344-23, Purple Cardstock, Stamperia – Lilac Flowers

Die Cuts: My Creative Time – Ribbon End Dies, My Creative Time – Scalloped Stitched Oval Dies

Tools: MISTI – Most Incredible Stamping Tool, Cuttlebug, Prima Flowers – Ameruse Pastel Mix, Recollections – Handmade Flowers

Image coloured with Copic Markers:

Skin: E21, E11, E04, E00, E000, R22, R20

Hair: E47, E44, E43

Blouse and Socks: Y08, Y04, Y00

Dress: V09, V06, V04, V01

Shoes: W9, W7, W6, W5, W3, W1

Cats: C7, C5, C3, W5, W3, W1, E27, E25, E23, R20

Straw Basket: E34, YR23, Y23, Y21

Hope you like it and have a fantastic week!

You can find lots of inspiration from the Design Team Divas at the High Hopes blog, and the High Hopes Rubber Stamps Facebook Fan page plus you can also follow us on
Instagram, Twitter and Pinterest.


Super Tall Cake!


Welcome Back Dreamerland Craft Fans!

Today, I’m sharing a card that I made using Dreamerland Crafts Clear Stamps  Super Tall Cake – D19017 for the main image and Birthday Sentiments – Set 002 (DS163007) for the sentiment!  This adorable little bear made a cake for someone very special! Hmmm! I wonder who that could be. LOL!

To make the card I first die cut Copic Marker X-Press It Blending Card with Craftin Desert Diva’s – Inside Scalloped Squares. Then using my MISTI and Memento – Tuxedo Black ink, I stamped the image onto the paper. I coloured in the image using Copic markers.

Next I cut out used some tape to inlay the image back into the frame that I had previously die cut to make it one piece again. I also die cut the yellow and aqua paper with the same die cut twice. Then I used the yellow to be the inlay for the aqua frame and taped it back together on the reverse. After that, I used my MISTI and Versa Fine – Onyx Black to apply the sentiment. The sentiment was then embossed with Ranger – Clear Super Fine Detail embossing powder and heated up using Marvy Uchida – Embossing Heat Tool.

Next, I edged around the borders of both frames with Tim Holtz Distress Ink – Evergreen Bough. I ran the base frame through Xyron Creative Station to make it into a sticker and so that the entire frame would lay flat. I mounted this onto 5″ x 5″ white cardstock. Then I popped up the smaller frame and image using 3M VHB – 2 sided tape.

Card Recipe:

Stamp: Super Tall Cake – D19017 (Dreamerland Crafts Clear Stamps)

Sentiments: Birthday Sentiments – Set 002 (DS163007) (Dreamerland Crafts Clear Stamps)

Inks: Memento – Tuxedo Black, Versa Fine – Onyx Black, Tim Holtz Distress Ink – Evergreen Bough

Embossing Powder: Ranger – Clear Super Fine Detail embossing powder

Paper: Copic Marker X-Press It Blending Card, Momenta – Cardstock, Recollections – Blue Ombre Cardstock, Recollections – White Cardstock

Die Cuts: Craftin Desert Diva’s – Inside Scalloped Squares

Tools: MISTI – Most Incredible Stamping Tool, Cuttlebug, 3M VHB – 2 sided tape, Marvy Uchida – Embossing Heat Tool, Xyron Creative Station

Image coloured with Copic Markers:

Bear: E53, E51, E50, E37, E35, E33, E31, R30, R22, R20, R02

Hat, Apron and Cart: C3, C2, C1, C0, Colorless Blender

Cake: E29, E27, E25, E23, B04, B02, Y35, Y08

Tablecloth: Mitts and Boots: B04, B02, B000

Icing: BG49, BG45, BG11

Bunny: C3, C1, C0, R22, R20

Whistle: G17, G14

Base: E15, E13, E11

Background: Y19, Y18, Y15, Y11


Hope you like it and have a great week!

You can find more cards to inspire you at Dreamerland Crafts on the Facebook Fan page from the rest of our design team.

Mystery Birthday???


Hi There! Today I’m sharing a simple card that I made using the images and sentiments from It’s A Mystery (Kraftin’ Kimmie Stamps). It is always hard to think of a male card, but I believe this stamp set was perfect to achieve this.

To make the card, I stamped both images and then coloured them in. Next, I fussy cut around them and then used a Black marker all around the outside of the images before adding them onto the card.

Once completed, I used VersaMark ink and Ranger Embossing Powder White – Extra Fine Detail. I heated up the embossing powder with my Marvy Uchida – Embossing Heat Tool.

Using my Cuttlebug, I cut out various sizes of the brown cardstock with Your Next Stamp – Stitched Rectangle Die Set (YNSD214). Then, I mounted the largest piece onto the base with 2-sided tape and popped up the other layers with 3M VHB – 2 sided tape.

Card Recipe:

Stamp and Sentiment: It’s A Mystery (Kraftin’ Kimmie Stamps)

Ink: Memento – Tuxedo Black, VersaMark

Paper: Copic Marker X-Press It Blending Card, Park Lane – 8.5”x11” Value Papers-Browns

Die Cut: Your Next Stamp – Stitched Rectangle Die Set (YNSD214)

Embossing Powder: Ranger Embossing Powder White – Extra Fine Detail

Tools: MISTI – Most Incredible Stamping Tool, Cuttlebug, Marvy Uchida – Embossing Heat Tool, 3M VHB – 2 sided tape, Xyron Create a Sticker

Image coloured with Copic Markers:

Skin: E000, E00, E04, E11, E21

Detective: E35, E34, E33, E31, E89, E87, E84

Dog: E35, E34, E33, E31

Hope you like and have a great week!

Sweets for my Sooeet!!!


Valentine’s Day Is Almost Here!!! Who Wants Chocolate???

It’s Wednesday, and since Valentine’s Day is almost here, I thought I’d share this adorable little piggy called  Sow Soo-Eet Piggy (S091) from High Hopes Rubber Stamps! He sure does love his chocolate and so do I. LOL! I’m a choc-o-holic and so is my husband! I can give up many things, but not my chocolate. No way! LOL! And the sentiment Sweets for my Sooeet (G197) by High Hopes Rubber Stamps is the perfect fit for this card.

I decided to keep the card simple this week. I started off with a base of 5.5″ x 5.5″. I used double side tape and added the pretty heart ribbon to both the top and bottom of the card.

The die cuts for the main image are both from Craftin Desert Diva’s – Fancy Frames. I edged around the large die cut with Tim Holtz Distress Ink – Aged Mahagony to deepen the red. It was then attached to the card using 2 sided tape.

The main image was stamped onto Copic Marker X-Press It Blending Card and then coloured in with Copic Markers. I left the die cut metal frame on while I coloured the image. Once, the coloured image was done, I was ready to add some clouds. To do this, I stamped the image again onto some Post-It paper and then cut it out to create a masked image. I layered this on top of the pig and Valentine’s boxes and then created the clouds in the background using various blues from Tim Holtz Ranger Distress Ink and a stencil that I created using Avery Elle – D-05-01 PiercedCloudsDie.

Lastly, I stamped the sentiment onto white card stock. I die cut the frame for the sentiment with Craftin Desert Diva’s – Flag Banner Dies out of red cardstock. Then I used the same red cardstock, which I had just cut the banner out of to use as a stencil to trace around my sentiment.  I then used the trace marks as a guide to cut the sentiment out, moving just slightly inwards from my tracing to create the inner banner. This allowed me to have a nice red frame around the sentiment.

To finish the card I popped up the coloured image and sentiment with 3M VHB – 2 sided tape and added a couple of hearts.

Card Recipe:

Stamp: Sow Soo-Eet Piggy (S091) (High Hopes Rubber Stamps)

Sentiment: Sweets for my Sooeet (G197) (High Hopes Rubber Stamps)

Inks: Memento – Tuxedo Black, Tim Holtz Distress Ink – Salty Ocean, Tim Holtz Ranger Distress Ink – Broken China, Tim Holtz Distress Inks – Tumbled Glass, Tim Holtz Distress Ink – Aged Mahagony

Paper: Copic Marker X-Press It Blending Card, Red and White Cardstock

Die Cuts: Avery Elle – Custom Steel Dies – Made in the USA – D-05-01 PiercedCloudsDie, Craftin Desert Diva’s Fancy Frames, Craftin Desert Diva’s – Flag Banner Dies

Tools: MISTI – Most Incredible Stamping Tool, Cuttlebug

Miscellaneous: Kraftin Kimmie – Heart Krafty Dots, American Crafts Premium Ribbon

Image coloured with Copic Markers:

Pig: R22, R20, R000, R00, E93, E44, E43, E41, E04, E37, E35, E34

Shirt: B18, B16, B14, B12, R29, R27, R24

Valentine boxes: R29, R27, R24, R22, R17, R14, C1, C0

Chocolate Wrappers: E37, E34, E29, E25, E23

Ground: E99, E97, E33, E31, E30

Hope you like it and have a fantastic week!

You can find lots of inspiration from the Design Team Divas at the High Hopes blog, and the High Hopes Rubber Stamps Facebook Fan page plus you can also follow us on
Instagram, Twitter and Pinterest.


Nuts About You!


Welcome High Hopes Rubber Stamps Fans!

It’s Wednesday, and this week at High Hopes Rubber Stamps love is in the air! LOL! This week, I used this adorable little elephant called  Peeking Ellie With Heart – P127 for the main image and Nuts About You – F128 for the sentiment!

The card base is 5-1/2″ x 4-1/4 inches on white cardstock. I stamped the image using Memento – Tuxedo Black ink and then coloured in the image with Copic markers. Then I fussy cut around the image only leaving a thin slice of white in a few areas. Where I had trimmed the paper closest to the image, I outlined it with black marker.

Next, after running scrap pieces of paper through my Xyron Create a Sticker, I die cut the heart border using Sizzix Framelets by Stephanie Barnard – 562676 – Hearts Dotted. I also used the same die cut to cut out the big heart. Then I taped the metal die cut and the paper down onto a piece of cardboard so that I could colour the big heart and still leave a white border. Once the heart was coloured, I covered “about you” with some Scotch Tape and then stamped “I’m nuts”. I repeated the process only this time, I covered “I’m nuts” with the Scotch Tape and then stamped “about you” below it. Of course, I removed the tape each time before stamping.

I cut out the red contrasting paper and patterned paper with Your Next Stamp – Stitched Rectangle Die Set (YNSD214).

Now it was time to put it all together. I mounted the red rectangle directly onto the base. I mounted the patterned rectangle onto some white cardstock and used my cutter to create a thin white border all the way around it. Then, I popped up the rectangle, Ellie and the big heart with 3M VHB – 2 sided tape.

Lastly, to finish it off, I added the border sticker to the bottom of the first rectangle and hearts that I created earlier.

Card Recipe:

Stamp: Peeking Ellie With Heart – P127 (High Hopes Rubber Stamps)

Sentiment: Nuts About You – F128 (High Hopes Rubber Stamps)

Inks: Memento – Tuxedo Black

Paper: Copic Marker X-Press It Blending Card, K&C Company – Kelly Panacci – KP Valentine – 30-599345, K&C Company – Kelly Panacci – KP Valentine – 30-599338

Die Cuts: Sizzix Framelets by Stephanie Barnard – 562676 – Hearts Dotted, Your Next Stamp – Stitched Rectangle Die Set (YNSD214)

Tools: MISTI – Most Incredible Stamping Tool, Cuttlebug, Xyron Create a Sticker

Image coloured with Copic Markers:

Elephant: C5, C3, C2, C1, R30, R22, R20, R01, B00

Hearts: R29, R27, R24, R22

Hope you like it and have a fantastic week!

You can find lots of inspiration from the Design Team Divas at the High Hopes blog, and the High Hopes Rubber Stamps Facebook Fan page plus you can also follow us on
Instagram, Twitter and Pinterest.


Be My Valentine???


Welcome KLM Digital Design Fans!!

Hi There! Katy the owner of KLM Digital Designs asked me to join her Design Team. YAY!


So today, I’m sharing my first creation that I made using several of KLM Digital Designs’ new stamps.

I decided to create a little love scene using Girl Window Gnome and Bouquet Gnome. The sentiment is from Cupid Gnome set. I thought these 2 little Gnomes made such an adorable couple and it looks like love is in the air. LOL!

I made the card on 5″ x 5″ red card base and then for the background, I die cut paper from 49 and Market – Tattered Garden using My Creative Time -Stitched Squares Inside and Out. I loved the way the paper resembled a building wall. Next I fussy cut around all of the images and sentiment and popped them up on the card using 3M VHB – 2 sided tape. For the sentiment, I ran it through my Xyron Create a Sticker and then placed it on the card.

For the final step, I used Sizzix Framelets by Stephanie Barnard – 562676 – Hearts Dotted to die cut Crafts – Sparkling Stickers – 02-3068629 and then added the little hearts above the male Gnome.

Recipe for Card:

Stamps: Girl Window Gnome (KLM Digital Designs), Bouquet Gnome (KLM Digital Designs)

Sentiment: Cupid Gnome (KLM Digital Designs)

Paper: Copic Marker X-Press It Blending Card, 49 and Market Tattered Garden – 6 x 6 Collection Pack, Crafts – Sparkling Stickers – 02-3068629, Recollections – Cranberry

Die Cuts: Sizzix Framelets by Stephanie Barnard – 562676 – Hearts Dotted, My Creative Time -Stitched Squares Inside and Out

Miscellaneous: 3M VHB – 2 sided tape, Cutttlebug

All images coloured with Copic Markers:

Skin: E21, E11, E04, E00, E000

Gnome – Male

Beard: W3, W1, W0

Hat: R59, R37, R35

Shirt: B28, B26, B23

Pants: E27, E25, E23

Shoes: C10, C8, C6, C4, C2

Flowers and Leaves: G17, G14, G07, R43, R34, R24, R20, N34, B21

Gnome – Female

Hair: E47, E44, E43

Inside Window and Frame: Y19, Y18, Y15, W3, W2, W1

Dress and Bows: B28, B26, B24, B23, Gelly Roll Sakura #5 Pen

Hope you like it and have a great week!!

You can also find more inspiration on KLM Digital Designs and KLM Digital Designs Facebook page.


And They Lived Happily Ever After!


It’s Wednesday, and I am back to share a wedding card with you. Love is in the air and who doesn’t love weddings? LOL! This week, I used Just Married – S070 for my main image and Lived Happily Ever After – G012 for the sentiment.

I decided to create a scene of the couple driving down the road as they are beginning their new journey as newlyweds. No worries, except a long open road and green pastures ahead.

To create the card I first stamped the image onto Copic Marker X-Press It Blending Card and then used My Creative Time -Stitched Squares Inside and Out to die cut it out. Then I took a lead pencil and lightly drew in the lines for a road. I wanted the road to curve in order to imitate the couple going on a long journey. I coloured the image in with Copic markers. For the grass, I used various shades of green and then Copic Colourless blending solution and an old face cloth that had ridges on it. I added some of the blending solution to the cloth and lightly tapped it everywhere over the grass. I did this first as I didn’t want the solution to go over the main image.

After the image was all coloured in I mounted the image onto Recollections – Cranberry Cardstock and cut around it to make it square. Next I used 3M VHB – 2 sided tape to pop it up over the gold paper that I had die cut earlier using the same die cuts from My Creative Time.

The card is 6″ x 6″ AC White cardstock. I die cut K&C Company – Kelly Panacci – KP Valentine – 30-599345 with Heartfelt Creations – Fleur Border Basics – HCD1-7120 and the ran the die cuts through my Xyron Creative Station which enabled me to make stickers out of the die cuts. Then I mounted them on the card. I love the effect that they created. I also die cut some hearts using Sizzix Framelets by Stephanie Barnard – 562676 – Hearts Dotted using Recollections – Cranberry Cardstock. I ran the cardstock through the Xyron – Create A Sticker first to make it easier to just peel off the backs for the hearts and place them on the card.

I stamped the sentiment and mounted it on top of the gold paper and then popped it up on the card.

Card Recipe:

Stamp: Just Married – S070 (High Hopes Rubber Stamps)

Sentiment: Lived Happily Ever After – G012 (High Hopes Rubber Stamps)

Inks: Memento – Tuxedo Black

Paper: Copic Marker X-Press It Blending Card, Recollections – Cranberry Cardstock, K&C Company – Kelly Panacci – KP Valentine – 30-599345, Hot Buy Craft Smart – Holiday Glitz Glitter Paper 12″ x 12″, AC Cardstock – White

Die Cuts: My Creative Time -Stitched Squares Inside and Out, Sizzix Framelets by Stephanie Barnard – 562676 – Hearts Dotted, Heartfelt Creations – Fleur Border Basics – HCD1-7120

Tools: MISTI – Most Incredible Stamping Tool, Cuttlebug, Xyron Creative Station, Xyron Create a Sticker

Image coloured with Copic Markers:

Hair: E49, E47, E45, E43, E29, E27, E25, E23

Skin: E11, E01, E00

Car: R59, R37, R35, R27, R24, C3, C1

Daisies and Leaves: Y08, G14, G09, G07, C0

Tires and Jacket: Black, W9, W7, W5

Grass: G17, G14, G09, G07, YG13, YG07. YG03

Road: C5, C4, C3, C2, C1

Cans: R59, R37, R35, B26, B24, B23

Boot: E27, E25, E23

Shoe: B29, B23, B04, B02

Hope you like it and have a fantastic week!

You can find lots of inspiration from the Design Team Divas at the High Hopes blog, and the High Hopes Rubber Stamps Facebook Fan page plus you can also follow us on
Instagram, Twitter and Pinterest.