Tag Archive | 3M VHB – 2 sided tape

Hang in There!


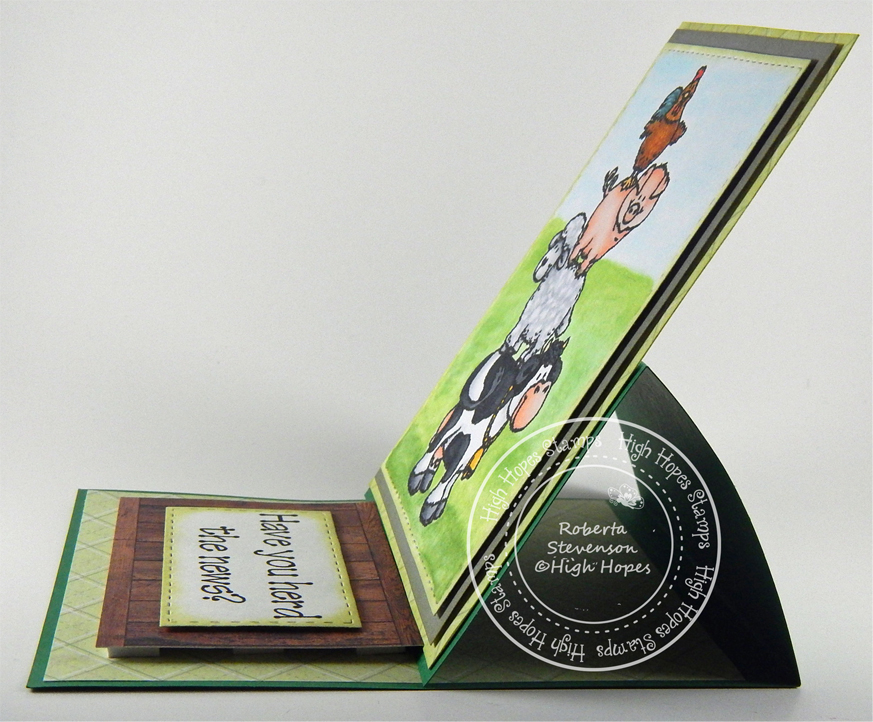
It’s Wednesday, and this week, I thought I’d make an inspirational card to share with you using Raggedy Ann-ouncement – R044 (High Hopes Rubber Stamps) for the main image and Hang In There – D278 (High Hopes Rubber Stamps) for the sentiment.

To make my card this week, I started off with a card base of 5.5″ x 4.25″.  I created the background on Hammermill – Premium Colour cardstock using various stencils, Picket Fence Studio Blender Brushes and Tim Holtz inks which I have listed below. I thought the sun rays reflected a ray of hope for everyone and I hope that we will all be seeing better days soon. Once the background was finished, I used 2 sided tape and mounted it onto the base card.

I stamped the image  and sentiment onto Copic Marker X-Press It Blending Card and coloured in the main image with Copic markers. I ran the coloured image through my Brother Scan and Cut to create a slim border around it and then went around the edges with Y06 – Yellow and YG25 – Celadon Green to make it blend into the background. Lastly, I popped up the image using 3M VHB – 2 sided tape and created a small shadow below Raggedy Ann.

Card Recipe:

Stamp:  Raggedy Ann-ouncement – R044  (High Hopes Rubber Stamps)

Sentiment: Hang In There – D278 (High Hopes Rubber Stamps)

Inks: Memento – Tuxedo Black, Tim Holtz Distress Ink – Squeezed Lemonade, Tim Holtz Distress Ink – Mustard Seed, Tim Holtz Distress Ink – Mowed Lawn, Tim Holtz Distress Ink – Crushed Olive, Tim Holtz Distress Inks – Peeled Paint

Paper: Copic Marker X-Press It Blending Card, Hammermill – Premium Colour 100 lb.

Stencil: Kraftin’ Kimmie – Starburst, Lawn Fawn – Lawn Cut dies (Made into Stencil), Kraftin’ Kimmie – Krafty Scenery 2

Tools: MISTI – Most Incredible Stamping Tool, 3M VHB – 2 sided tape, Picket Fence Studio Blender Brushes

Image coloured with Copic Markers:

Skin: E21, E11, E04, E00, E000, R22, R20

Hair: R35, R17, R14, R08

Dress: R59, R37, R35

Patch: B52, B41, B12

Apron and Socks: C-2, C-1, C-0

Shoes: C10, C8, C5, C3

Sign: E37, E35, E33, E31, E30

Shadow below feet: YG25, YG06, YG03

Hope you like it and have a fantastic week!

You can find lots of inspiration from the Design Team Divas at the High Hopes blog, and the High Hopes Rubber Stamps Facebook Fan page plus you can also follow us on
Instagram, Twitter and Pinterest.


Birthday Banner Gnome


Today I’m sharing Banner Gnome (KLM Digital Designs) from KLM Digital Designs new release. I thought it would be fun to put the new banner stamp inside a banner. This was such an awesome stamp to play with and it comes with 3 different sentiments, “Happy Birthday” as shown here, “Your Awesome” and “Congratulations”.

When I first started colouring this card, I had something totally different in mind for how I was going to colour the scroll. But, once I created the background, I decided to colour it using bluish green tones for the top and bottom of the large scroll.

I printed out the main image twice onto Copic Marker X-Press It Blending Card using my HP Printer. I always print using Grayscale because the image won’t smudge when you go to colour. I found that printing out in black sometimes did. I used my brother Scan N’ Cut to cut around 1 of the images. Then fussy cut it where I still needed to. As I mentioned, once before, I’m still learning how to use my new machine.

For the other image, I die cut around it using Penny Black – Paper Scroll and my Cuttlebug. I coloured in the main image with copics. Then I placed the other image that I had cut around earlier over top of it to use it as a mask. I also used some Post-It Note paper to mask off the top and bottom of the main scroll. I used a Picket Fence Studio’s brush and went over the entire background inside the scroll with Tim Holtz Distress Inks – Tumbled Glass. Then, I placed Kraftin’ Kimmie – Confetti Stencil over top of everything. I have a large magnetic mat, so I just used some strong magnets to hold everything in place. Then, using the various sized Picket Fence Studio brushes which I labelled in various colours, I used a mixture of Tim Holtz inks to create the background. All of the colours are listed below.

I removed all of the masked pieces and then completed the colouring of the large scroll.

Lastly, I attached the entire image to some Recollections Purple Passions cardstock cut at 5.5″ x 4.25″ and added some small balloons which I had die cut previously using Your Next Stamp – Mini Balloon Trio Set.

Card Recipe:

Stamp and Sentiment: Banner Gnome (KLM Digital Designs)

Inks: HP Printer Greyscale, Tim Holtz Distress Inks – Tumbled Glass, Tim Holtz Distress Inks – Peacock Feathers, Tim Holtz Distress Ink – Wilted Violet, Tim Holtz Distress Ink – Mermaid Lagoon, Tim Holtz Distress Ink – Evergreen Bough, Tim Holtz Distress Ink – Cracked Pistachio

Paper: Copic Marker X-Press It Blending Card, Recollections – Purple Passions 8.5″ x 11″

Die Cuts: Penny Black – Paper Scroll 51-458, Your Next Stamp – Mini Balloon Trio Die Set (YNSD241)

Stencil: Kraftin’ Kimmie – Confetti

Tools: Cuttlebug

Image coloured with Copic Markers:

Skin: E000, E00, E04, E11, E21

Beard: W5, W4, W3, W2, W1, W0, W00

Hat: BG49, BG15, BG13, BG11

Boots: E29, E27, E25, E23

Pants: B26, B23, B21

Shirt: G43, G24, G21, G20

Pencil: YR31, YR21, YR20, YR14, Y19, Black

Paintbrush: B69, B18, B16, C3, C2, C1, Y15, Y11, BG02, BG01, BG00

Banners: BG05, BG02, BG01, BG00, BG000

Hope you like it and have a great week!

You can find more cards to inspire you at KLM Designs, KLM Digital Design Team and KLM Digital Designs on the Facebook Fan page from the rest of our design team.

BBQ King


Sharing a birthday card I made using Good In The Woods Accessories and Good in the Woods (Kraftin’ Kimmie Stamps) for the images. A friend of mine is a BBQ King and has won multiple awards for his prowess at BBQing. I thought these stamps matched him perfectly.

To make the card I started with a base of 5.5″ x 4.25″ white cardstock. Next, I cut the background paper from Your Next Stamp Designer Paper Pad – For the Boys at the same size. I adhered it to the base with double-side tape and then edged around the entire card with Kraftin’ Kimmie – Stormy Sky ink.

I die-cut Copic Marker X-Press It Blending Card using my Cuttlebug and Your Next Stamp – Stitched Rectangle Die Set. I stamped the images onto the die cut using my MISTI and Memento – Tuxedo Black Ink. Next I coloured in the image with Copic Markers and then ran it through my Xyron Creative Station. I adhered this to some red cardstock and created a thin border around it. Lastly, I popped up the image using 3M VHB – 2 sided tape and applied it on top of the background paper.

Card Recipe:

Stamps:  Good in the Woods Accessories (Kraftin’ Kimmie Stamps), Good in the Woods (Kraftin’ Kimmie Stamps)

Inks: Memento – Tuxedo Black, Kraftin’ Kimmie – Stormy Sky

Paper: Copic Marker X-Press It Blending Card, Your Next Stamp Designer Paper Pad – For the Boys – 6″ x 6″

Die Cuts: Your Next Stamp – Stitched Rectangle Die Set (YNSD214)

Stencil: Kraftin’ Kimmie – Wonderful Waves

Tools: MISTI – Most Incredible Stamping Tool, Cuttlebug, 3M VHB – 2 sided tape, Xyron Creative Station

Image coloured with Copic Markers:

Skin: E21, E11, E04, E00, E000

Hair: E29, E25, E21

Apron and Shoes: E37, E35, E33

Shirt: YG95, YG991, E52, E51, E50

Socks: C1, C0, Colorless Blender

BBQ and Meat: Y08, R24, YR16, E99, E97, E35, E19, E18, E17, E15, E09, E08, R39, R37, R24, C10, C7, C4

Spatula: C5, C3, C1, E55, E53, E51

Sky: B02, B01, B00, B000, Colorless Blender

Lawn: YG17, YG13, YG03, YG01

Hope you like it and have a great week!

Happy Bird Day!


It’s Wednesday, and this week, I used Party Girl Florence – S098 (High Hopes Rubber Stamps) for the main image and Happy Bird Day – F098 (High Hopes Rubber Stamps) for the sentiment. Florence is all dolled up and ready for a Bird Day party! She’s the centre of attention with all of her bling, balloons, party hat and musical whistle. She’s also has some fancy moves in store for the Flamingo party dance! LOL!

To make my card this week, I started off with a white card base of 6″ x 6″. For the background paper, I used Forever in Time – Flamingo – Perfect Prints. I coloured the little party hats onto the Flamingos using PrismaColor Premier Pencils. Then I added some white pearls around their necks with Sharpie Water Based Paint – White – Extra Fine Point. Lastly, I edged around the paper with Tim Holtz Distress Ink – Cracked Pistachio.

I used my Cuttlebug and My Creative Time – More Stitched Circles MCT-D136 to die cut Copic Marker X-Press It Blending Card Stock and then my MISTI and Memento – Tuxedo Black ink to stamp the image. I coloured in the image with Copic markers and then used Lifestyle Crafts Cutting Dies – Nesting Circles to cut out the pink and aqua circles. I ran the coloured image through a Xyron Creative Station to make it into a sticker and then mounted it onto the pink cardstock. Then I popped up this piece and the aqua circle with 3M VHB – 2 sided tape. I went around the edge of the pink circle with Hibiscus – Stickles and used Crystal – Stickles for the necklace around Florence’s neck.

I stamped the sentiment onto Yellow cardstock and the ran it through my Xyron Create a Sticker. I mounted that onto some pink cardstock and then popped up this piece and the aqua cardstock with 3M VHB – 2 sided tape. I went around the pink cardstock with Hibiscus Stickles. To finish off the card, I added some Crafts – pop dots.

Card Recipe:

Stamp:  Party Girl Florence – S098  (High Hopes Rubber Stamps)

Sentiment: Happy Bird Day – F098 (High Hopes Rubber Stamps)

Inks: Memento – Tuxedo Black, Tim Holtz Distress Ink – Cracked Pistachio

Paper: Copic Marker X-Press It Blending Card, Forever in Time – Flamingo – Perfect Prints (6″x6″\15cmx15cm)

Die Cuts: Lifestyle Crafts Cutting Dies – Nesting Circles, My Creative Time – More Stitched Circles

Tools: MISTI – Most Incredible Stamping Tool, Cuttlebug, 3M VHB – 2 sided tape, Xyron Creative Station, Xyron Create a Sticker, Sharpie Water Based Paint – White – Extra Fine Point, Hibiscus – Stickles, Crystal – Stickles, Crafts – Pop Dots

Image coloured with Copic Markers:

Flamingo: RV09, RV06, RV04, RV00, RV000, C5, C8, PrismaColor Premier White Pencil

Balloons: RV19, RV17, RV09, RV000, Y15, Y08, Y04, Y00, PrismaColor Premier White Pencil

Hat: B29, B26, B16

Hats on Background Paper: PrismaColor Premier Pencils – PC905 (Aquamarine), PC1006 (Parrot Green), PC1002 (Yellowed Orange), PC994 (Process Red)

Water and Sky: BG13, BG11, BG10, BG01, B01, B00, B000, B0000

Hope you like it and have a fantastic week!

You can find lots of inspiration from the Design Team Divas at the High Hopes blog, and the High Hopes Rubber Stamps Facebook Fan page plus you can also follow us on
Instagram, Twitter and Pinterest.


Enjoy Your Special Day!


Welcome Back Dreamerland Craft Fans!

Today, I’m sharing a birthday card that I made using Dreamerland Crafts stamps called A Restful Afternoon – D19014 for the main image. For the sentiments I used a combination of Birthday 07 – DS17058 and Birthday 08 – DS17059. These 2 friends are sharing a nice peaceful afternoon in the sun just relaxing. What a wonderful way to spend a gorgeous day in the sun.


To make this card I used a base card of 4.25″ x 5.5″. I die cut the rectangle using Copic Marker X-Press It Blending Card using my Cuttlebug and Your Next Stamp – Stitched Rectangle Die Set. Then I stamped the image using Memento – Tuxedo Black ink and my MISTI. The grass border was stamped with Memento – New Sprout. I coloured in the image and background with Copic markers.

For the background paper, I used Recollections – Petite Floral and green cardstock. I stamped the sentiments using Versa Fine – Onyx Black ink and my MISTI. I used Ranger – Clear Super Fine Detail embossing powder and then heat embossed the powder with Marvy Uchida – Embossing Heat Tool. Next, I edged around all of the background pieces with Tim Holtz Distress Ink – Mowed Lawn. I layered the image directly onto the green cardstock. Then, I popped up the image with 3M VHB – 2 sided tape and added a few Kraftin’ Kimmie – Springy Dots.

Card Recipe:

Stamp and Sentiment:  A Restful Afternoon – D19014 (Dreamerland Crafts), Birthday 08 – DS17059 (Dreamerland Sentiments Clear Stamps), Birthday 07 – DS17058 (Dreamerland Sentiments Clear Stamps)

Inks: Memento – Tuxedo Black, Versa Fine – Onyx Black, Memento – New Sprout, Tim Holtz Distress Ink – Mowed Lawn

Embossing Powder: Ranger – Clear Super Fine Detail embossing powder

Paper: Copic Marker X-Press It Blending Card, Recollections – Petite Floral (12 x 12 in – 30.4 x 30.4 cm), Green Cardstock

Die Cuts: Your Next Stamp – Stitched Rectangle Die Set (YNSD214)

Tools: MISTI – Most Incredible Stamping Tool, Cuttlebug, Marvy Uchida – Embossing Heat Tool, 3M VHB – 2 sided tape, Kraftin’ Kimmie – Springy Dots

Image coloured with Copic Markers:

Bear: E53, E51, E50, E29, E27, E25, E23, R22, R20

Pig:  E93, E44, E43, R22, R20, R00, R000

Lounge Chairs: BG18 BG15, BG13, BG11

Books: B05, B04, B02, V06, V04, V01, C1

Drinks and Table: YR09, YR07, YR04, Y08, Y06, Y02, B05, C3, C1, C0, Colorless Blender

Sky: B01, B00, B000

Grass: YG17, YG13, YG05, YG03

Hope you like it and have a great week!

You can find more cards to inspire you at Dreamerland Crafts and Pointer Scrapbooking on the Facebook Fan pages from the rest of our design team.

Birthday Gnome Farmer


KLM Digital Designs released some brand new stamps this month, and today I’m sharing Farmer Gnome (KLM Digital Designs)!  He’s taking a break from his busy farm chores just to wish you an extra special birthday!

To put the card together, I printed out the main image onto Copic Marker X-Press It Blending Card and the sentiment onto some white cardstock.

I die cut another piece using the Copic paper with Your Next Stamp – Stitched Rectangle Die Set and my Cuttlebug. I coloured in the main image with copics and then tested out my new Brother Scan’ Cut machine for the first time to cut around the image. I think I need a little more practice, as I still had to fussy cut a bit when it was done. LOL! But, it was still pretty cool to see the cutter in motion. I designed my own background and coloured in the haystack, sky and grass. Then, I popped up the coloured image with 3M VHB – 2 sided tape and placed it onto the background.

For the sentiment, I used Microsoft  Word to layer “Herd it was your” on top of each other, as the original was too long for my card. After printing it out, I fussy cut around it and then ran it through my Xyron Create a Sticker and attached it to some black cardstock. I fussy cut a small border around that piece and then ran it also through the Xyron. I attached this to my coloured image.

Lastly, I attached the entire background to some blue cardstock cut at 5.5″ x 4.25″.

Card Recipe:

Stamp and Sentiment: Farmer Gnome (KLM Digital Designs)

Inks: HP Printer Greyscale

Paper: Copic Marker X-Press It Blending Card, Blue and Black Cardstock

Die Cuts: Your Next Stamp – Stitched Rectangle Die Set (YNSD214)

Tools: 3M VHB – 2 sided tape, Cuttlebug, Xyron Create a Sticker

Image coloured with Copic Markers:

Skin: E000, E00, E04, E11, E21

Beard: W5, W4, W3, W1, W0, W00

Hat: E89, E87, E84

Boots: E29, E27, E25, E23

Rake: E29, E25, E23, C5, C3, C1

Overalls: B26, B23, B21, C7, C5, C3

Shirt: G24, G21, G20

Hay: E15, YR21, YR23, YR24, Y38, Y21, Y08, Y000

Grass: YG17, YG13, YG05, YG03

Sky: B01, B00, B000, B0000, Colorless Blender Re-Inker and a Q-Tip to blend

Hope you like it and have a great week!

You can find more cards to inspire you at KLM Designs, KLM Digital Design Team and KLM Digital Designs on the Facebook Fan page from the rest of our design team.

You are Mer-Mazing!


Sharing a card I made today using You are Mer-Mazing (Kraftin’ Kimmie Stamps) for the images and sentiments. For the background I used Kraftin’ Kimmie – Mermaid Scales Stencil.

To make this card, I first created the background using some texture paste mixed with Kraftin’ Kimmie – Mermaid Melody and Kraftin’ Kimmie – Lovely Lagoon Inks. Once it was all dry, I used my brushes with the same 2 colours to fill in all of the white on the background. Just love how this turned out.

I stamped my images using Memento – Tuxedo Black onto Copic Marker X-Press It Blending Card using my MISTI to get nice clean images. The images were then coloured in with Copic markers and I added some Wink of Stella – Clear to the fins, bikini top and starfish in the mermaids hair. To finish off the card, I fussy cut around all of the images and them popped them up on the background using 3M VHB – 2 sided tape. As a final touch, I added 3 Kraftin’ Kimmie – Springy Dots that lead up to the sentiment from the Seahorse.

Card Recipe:

Stamp and Sentiment:  You are Mer-Mazing (Kraftin’ Kimmie Stamps)

Inks: Memento – Tuxedo Black, Versa Fine – Onyx Black, Kraftin’ Kimmie – Mermaid Melody, Kraftin’ Kimmie – Lovely Lagoon

Embossing Powder: Ranger – Clear Super Fine Detail embossing powder

Paper: Copic Marker X-Press It Blending Card, Recollections – Blue Ombre Cardstock

Stencil: Kraftin’ Kimmie – Mermaid Scales

Tools: MISTI – Most Incredible Stamping Tool, Cuttlebug, 3M VHB – 2 sided tape, Wink of Stella – Clear, Kraftin’ Kimmie – Springy Dots

Image coloured with Copic Markers:

Skin: E21, E11, E04, E00, E000

Hair: E99, E09, YR24, YR14, Y21

Fin: B99, B18, B16, B14, B12, BG49, BG45, G23, YG41, Clear – Wink of Stella

Starfish: Y38, Y19, Y13, E31

Seahorse: BV20, BV13, BV11, V01, V000, C0, BG13, BG11, BG10

Hope you like it and have a great week!

Wade Goes To The Beach!


It’s Wednesday, and this week, I used Wade – 132 (High Hopes Rubber Stamps) for the main image and Summer’s Day Saying – L031 (High Hopes Rubber Stamps) for the sentiment. Wade couldn’t wait to go the beach. He’s enjoying the waves and the beautiful beach and sunshine. It will be wonderful when we can all join him with our friends and families too!

To make my card this week, I started off with a white card base of 6″ x 6″. I cut out another piece of paper using Hammermill – Premium Colour 100 lb. cardstock the same size as the base card. Then I ran it through my Cuttlebug using Stampin’ Up – Sizzix Big Shot – Seaside. I loved the wavy pattern it created. Next, I used multiple Tim Holtz shades of blue to create the water effect. All colours are listed below.

I used my Cuttlebug and Your Next Stamp – Stitched Rectangle Die Set to die cut Copic Marker X-Press It Blending Card and white cardstock for my image and sentiment. I stamped the sentiment and image onto the die cuts and then coloured in the main image with Copic markers. The background was coloured in using a variety of Copic Refill inks, Colorless Blender and a Q-Tip. For the water, I wisped several colours back and forth and then added some Copic Colorless Blender and wisped the colours one last time. Once everything was completed, ran the image through my Xyron Creative Station so that it would lay completely flat on the blue cardstock I mounted it onto. I cut a thin border all away around the image and inked around the edges of the sentiment with Tim Holtz Distress Ink – Brushed Corduroy.  Then popped the image and the sentiment using 3M VHB – 2 sided tape onto the base card. I added in a some sea shells from Dress It Up – Beach Collection and Craftin’ Desert Divas – Seashells Sequence. I just removed the button portion and then used glue dots to attach to the card.

Card Recipe:

Stamp:  Wade – S132  (High Hopes Rubber Stamps)

Sentiment: Summer’s Day Saying – L031 (High Hopes Rubber Stamps)

Inks: Memento – Tuxedo Black, Tim Holtz Distress Ink – Salty Ocean, Tumbled Glass, Mermaid Lagoon, Broken China, Evergreen Bough and Brushed Corduroy

Paper: Copic Marker X-Press It Blending Card, Hammermill – Premium Colour 100 lb., Blue carstock

Die Cuts: Your Next Stamp – Stitched Rectangle Die Set (YNSD214)

Embossing Folder: Stampin’ Up – Sizzix Big Shot – Seaside

Tools: MISTI – Most Incredible Stamping Tool, Cuttlebug, 3M VHB – 2 sided tape, Xyron Creative Station, Dress It Up – Beach Collection – #452, Craftin’ Desert Divas – Seashells Sequence

Image coloured with Copic Markers:

Dragon: G85, G82, G21, G20, YR15, YR12, YR02, V17, V15, V12

Swim Trunks: C10, C8, C1, Y15, Y08, Y06, R39, R37, R35

Floaties and Fins: B29, B26, B16

Rubber Ducky Tube: Y38, Y19, Y08, YR18, YR15, YR12, BG18, BG13, BG11, BG07, BG05, BG02

Water: BG72, BG70, BG13, BG10, B93, B91, B52, B41, B000, , B0000, C3

Used Copic Refills and Q-Tip to Create Background:

Sand: E30, E31, Colorless Blender

Sky: B0000, B000, Colorless Blender

Hope you like it and have a fantastic week!

You can find lots of inspiration from the Design Team Divas at the High Hopes blog, and the High Hopes Rubber Stamps Facebook Fan page plus you can also follow us on
Instagram, Twitter and Pinterest.

Check out the High Hopes Website for something else to give you a big smile!

Over on the High Hopes Website there is a Store Wide sale, save 20% off right now when you use the coupon Code Love at the checkout!


Never Grow Old!


Welcome Back Dreamerland Craft Fans!

Today, I’m sharing an anniversary card that I made using Dreamerland Crafts stamps called We Will Never – D19077. My husband has always been my best friend and we are often told that we are still kids at heart. So, this sentiment and stamp were the perfect combination for us.


To make this card I used a base card of 4.25″ x 5.5″. I die cut a heart out of Copic Marker X-Press It Blending Card using my Cuttlebug and Sizzix Framelets by Stephanie Barnard – 562676 – Hearts Dotted. Then I stamped the image using Memento – Tuxedo Black ink and my MISTI. I coloured in the image and background of the heart with Copic markers.

For the background, I used Stampin’ Up! – Have a Cuppa paper. I stamped the sentiment using Versa Fine – Onyx Black ink and my MISTI. I used Ranger – Clear Super Fine Detail embossing powder and then heat embossed the powder with Marvy Uchida – Embossing Heat Tool. I then coloured the top half with Tim Holtz Distress Ink – Worn Lipstick and Tim Holtz Distress Ink – Evergreen Bough. Next, I edged around all of the background pieces with Tim Holtz Distress Ink – Evergreen Bough. I layered the centre background cardstock onto the base first and then the next 2 layers directly on top of it. Lastly, I popped up the image with 3M VHB – 2 sided tape and added a few pop dots from Kraftin’ Kimmie.

Card Recipe:

Stamp and Sentiment:  We Will Never – D19077 (Dreamerland Crafts)

Inks: Memento – Tuxedo Black, Versa Fine – Onyx Black, Tim Holtz Distress Ink – Worn Lipstick, Tim Holtz Distress Ink – Evergreen Bough

Embossing Powder: Ranger – Clear Super Fine Detail embossing powder

Paper: Copic Marker X-Press It Blending Card, Stampin’ Up! – Have a Cuppa – 6″ x 6″

Die Cuts: Sizzix Framelets by Stephanie Barnard – 562676 – Hearts Dotted

Tools: MISTI – Most Incredible Stamping Tool, Cuttlebug, Marvy Uchida – Embossing Heat Tool, 3M VHB – 2 sided tape, Kraftin’ Kimmie – Rainy Day Dots, Kraftin’ Kimmie – Hearts Krafty Dots

Image coloured with Copic Markers:

Skin: E000, E00, E04, E11, E21, R22, R20, C3 (Glasses)

Hair:  E47, E44, E43, E15, Y38, Y21, YR23

Skirt and Pants: B26, B23, B21

Shirt and Vest: G46, G43, G40, E29, E27, E25, E23

Boots: E57, E55, E53, E51

Heart: BG57, BG45, BG34, R85, R83, R81, C3, C2, C1

Hope you like it and have a great week!

You can find more cards to inspire you at Dreamerland Crafts and Pointer Scrapbooking on the Facebook Fan pages from the rest of our design team.

Greatest Fisherman


It’s Wednesday, and this week, I used Norman – Q038 (High Hopes Rubber Stamps) for the main image and Worlds Greatest Fisherman – H159 (High Hopes Rubber Stamps) for the sentiment. Norman is very happy today as he caught a magnificent Lobster. My dad LOVES fishing and can’t wait to go fishing again. Hopefully, that time will come soon and then he’ll be smiling just like Norman with his big catch of the day!

To make my card this week, I started off with a card base of 5.5″ x 4.25″. I used Belle Blvd – Secrets of the Sea paper for the main background.

I stamped the image onto Copic Marker X-Press It Blending Card and then die cut it with my Cuttlebug and My Creative Time – More Stitched Circles. I cut a slightly larger circle out of Orange cardstock with Lifestyle Crafts Cutting Dies – Nesting Circles and glued it down on top of the background paper. I coloured in the background using a variety of Copic Refill inks, Colorless Blender and a Q-Tip which I used to apply the colours. For the water, I wisped several colours back and forth and then added some Copic Colorless Blender and wisped the colours one last time. Lastly, I added some white caps by dabbing Sharpie Water Based Paint – White – Extra Fine Point onto the surface. I completed colouring in the rest of the image with Copic markers and then popped it and the sentiment using 3M VHB – 2 sided tape. The sentiment was die cut with Die-Namics MFT-489 PCD Fishtail Figs STX.

Card Recipe:

Stamp:  Norman – Q038  (High Hopes Rubber Stamps)

Sentiment: Worlds Greatest Fisherman – H159 (High Hopes Rubber Stamps)

Inks: Memento – Tuxedo Black,

Paper: Copic Marker X-Press It Blending Card, Belle Blvd – Secrets of the Sea – 6″x8″, Orange Cardstock

Die Cuts: My Creative Time – More Stitched Circles, Die-Namics MFT-489 PCD Fishtail Figs STX, Lifestyle Crafts Cutting Dies – Nesting Circles

Tools: MISTI – Most Incredible Stamping Tool, Cuttlebug, 3M VHB – 2 sided tape

Image coloured with Copic Markers:

Skin: E21, E11, E04, E00, E000, R22, R20

Hair: C10, C8, C3, PrismaColor  Premier Pencils Black and White

Coat, Pants and Hat: Y17, Y15, Y13, Y11, C3

Hoody: B26, B23, B21

Shirt: G99, G85, G82

Boots: C10, C8, C5, C4, C3

Lobster: R17, YR18, YR09, YR04

Water: BG72, BG70, B93, B91, B52, B41, B000, C3, Colorless Blender, Q-Tip, Sharpie Water Based Paint – White – Extra Fine Point

Used Copic Refills and Q-Tip to Create Background:

Sand: E30, E31, Colorless Blender

Sky: B0000, B000, Colorless Blender

Hope you like it and have a fantastic week!

You can find lots of inspiration from the Design Team Divas at the High Hopes blog, and the High Hopes Rubber Stamps Facebook Fan page plus you can also follow us on
Instagram, Twitter and Pinterest.

Check out the High Hopes Website for something else to give you a big smile!

Over on the High Hopes Website there is a Store Wide sale, save 20% off right now when you use the coupon Code Love at the checkout!


Happy Father’s Day Gnomes


KLM Digital Designs released some brand new stamps this month, and today I’m sharing Dad and Kid Gnomes (KLM Digital Designs)!  This new stamp contains adorable images of a dad, his children and 3 loving sentiments for your father. This stamp allows you to create your card to represent all of your siblings with your dad or just 1 if it is a special card.

For this card, I decided to create a card from a son to his dad.

To put the card together, I printed out the main image onto Copic Marker X-Press It Blending Card and the sentiment onto Hammermill Premium Colour paper.

I die cut the Hammermill paper with Your Next Stamp – Stitched Rectangle Die Set. Then using stencils that I made with Avery Elle – PiercedCloudsDie, I created the sky using Tim Holtz Distress Ink – Salty Ocean. For the grassy hillsides, I created stencils using Lawn Fawn – Stitched Hillside Borders and Lawn Fawn – Simple Stitched Hillside Borders – Lawn Cuts. Then I used Tim Holtz Distress Inks – Bundled Sage, Mowed Lawn, Crushed Olive and Peeled Paint to create the colour variations of the hills.

I coloured in the main image with copics and then fussy cut around them. Then I used a black marker to go around all of the edges. I attached the background to some AC White cardstock cut at 5.5″ x 4.25″. Then to finish off the card, I popped up the 2 coloured images with 3M VHB – 2 sided tape and placed them onto the background.

Card Recipe:

Stamp and Sentiment: Dad and Kid Gnomes (KLM Digital Designs)

Inks: HP Printer Greyscale

Paper: Copic Marker X-Press It Blending Card, Hammermill – Premium Colour 100 lb., AC White Cardstock

Die Cuts: Your Next Stamp – Stitched Rectangle Die Set (YNSD214), Avery Elle – Custom Steel Dies – Made in the USA – D-05-01 PiercedCloudsDie, Lawn Fawn – Stitched Hillside Borders, Lawn Fawn – Simple Stitched Hillside Borders – Lawn Cuts

Background Inks:

Sky:Tim Holtz Distress Ink – Salty Ocean

Grass: Tim Holtz Distress Ink – Bundled Sage, Tim Holtz Distress Ink – Mowed Lawn, Tim Holtz Distress Ink – Crushed Olive, Tim Holtz Distress Inks – Peeled Paint

Tools: 3M VHB – 2 sided tape, Cuttlebug

Image coloured with Copic Markers:

Skin: E000, E00, E04, E11, E21, R22, R20

Hair: E47, E44, E43

Beard: W5, W4, W3, W1, W0, W00

Pants and Hat – Dad: E89, E87, E84

Coat – Dad: YG95, YG93, YG91

Boots: C10, C8, C5, C3

Cane: E29, E25, E23

Overalls – Boy: B26, B23, B21. E15, Y28, Y26, Y19

Shirt – Boy: YG95, YG93, YG91

Hat and Socks – Boy: E89, E87, E84

Hope you like it and have a great week!

You can find more cards to inspire you at KLM Designs, KLM Digital Design Team and KLM Digital Designs on the Facebook Fan page from the rest of our design team.

Have You Herd The News???


It’s Wednesday, and this week, I couldn’t wait to colour up this super adorable image called Funny Farm – T065 by High Hopes Rubber Stamps.  I also thought that the sentiment – Have You Herd The News – G080 (High Hopes Rubber Stamps) was perfect for these little characters. Their facial expressions, just make you wonder what it is that is so secret that they can’t wait to tell you!! Hmmmm! Could it be a birthday surprise, or maybe a new baby is coming? or someone is retiring??? or someone just graduated???? This combo could be use for so many possibilities and that is why it was so much fun to play with.

Above is the card from the front angle and below is the card from the top angle.

To make my card this week, I started off with a green cardstock base of 5.5″ x 11″. Then I scored it at 5.5″ and 2.75″ on one side from the edge to make it a pop-up card. I also cut another piece of cardstock at about 4-1/8″ x 5.25″. I added some patterned paper from DCWV – Fashion District to this piece and to the inside bottom of the card, cut to the same size. Next, used My Mind’s Eye – Lost & Found paper cut at 3.75″ x 5″ which I popped up with 3M VHB – 2 sided tape. Before attaching the background papers, I edged around them with Tim Holtz Distress Ink – Shabby Shutters.

I die-cut the main image out of Copic Marker X-Press It Blending Card using my Cricut and Your Next Stamp – Stitched Rectangle Die Set. Then I stamped the image using my MISTI and Memento – Tuxedo Black ink. After that, I coloured in the image using Copic markers. For the background, I used a new technique that I learned. First I used a Q-Tip to moisten the background with some Copic Colorless Blender and then I used a mixture of Copic Re-inkers listed below with a Q-Tip to create the sky and grass. Love this technique, as it is quick and easy. After colouring the image, I inked around the edges with the same Tim Holtz ink and then popped up the image using some 3M VHD – 2 sided tape.

I die cut the sentiment using the same die set that I used for the main image and then stamped the sentiment with Memento – Tuxedo Black Ink. I mounted it with 3M VHB – 2 sided tape onto Joy Crafts – Artist Trading Card Wood Texture cardstock. Then, I popped up the entire base background and sentiment with Forever in Time – Pop-Dot Adhesives onto the inside base of the card.

I attached the finished image that was mounted onto the background papers onto the lower half of the card that had been scored at 2.75″ earlier, leaving the top half empty.

Card Recipe:

Stamp:  Funny Farm – T065  (High Hopes Rubber Stamps)

Sentiment: Have You Herd The News – G080 (High Hopes Rubber Stamps)

Inks: Memento – Tuxedo Black, Tim Holtz Distress Ink – Shabby Shutters

Paper: Copic Marker X-Press It Blending Card, DCWV – Fashion District (6×6″, 15.2×15.2cm), Joy Crafts – Artist Trading Card – Wood Texture (2-3/8×3-3/8″ – 85mm x 60mm), My Mind’s Eye – Lost & Found (6×6″)

Die Cuts: Your Next Stamp – Stitched Rectangle Die Set (YNSD214)

Tools: MISTI – Most Incredible Stamping Tool, Cuttlebug, 3M VHB – 2 sided tape, Forever in Time – Pop-Dot Adhesives

Image coloured with Copic Markers:

Pig: E93, E44, E43, E40, R20, R000, R00

Sheep: C5, C3, C1, C0, B60

Cow: R20, R02, R00, R000, E93, C10, C9, C8, C6, C5, C3, C2, C1, Y17, Y15, Y13, Colorless Blender

Rooster: E99, E97, E23, E09, R24, BG53, BG78, BG75, BG72, Y06, YR21

Sky: B000, B00, Colorless Blender

Grass: YG17, YG13, YG11, Colorless Blender

Hope you like it and have a fantastic week!

You can find lots of inspiration from the Design Team Divas at the High Hopes blog, and the High Hopes Rubber Stamps Facebook Fan page plus you can also follow us on
Instagram, Twitter and Pinterest.

Check out the High Hopes Website for something else to give you a big smile!

Over on the High Hopes Website there is a Store Wide sale, save 20% off right now when you use the coupon Code Love at the checkout!


Father’s Day – Come Sail Away!


Today I’m sharing a Father’s Day card that I made using  Come Sail Away (KLM Digital Designs).  It comes with multiple sentiments, but I decided to choose the sentiment from Father Gnome and Kids & Sentiments (KLM Digital Designs). You could also use this image to make a Special birthday card, Bon Voyage or Inspirational card too!

For this card, I printed out the image with my HP Printer onto Copic Marker X-Press It Blending Card using Grayscale. I used Copic markers to colour in the image. For the water, I used a variety of markers and created the movement of the water by just wisping them over the paper very gently. Then I added in some white caps using Sharpie Water Based Paint – White – Extra Fine Point. I did this by just dabbing the paper with tight dots of ink.

For the sand and sky, I used a special technique that I saw on-line, using a Q-Tip and Colorless blender Re-Inker to wet my background and then adding in the colours also using a Q-Tip and Copic Re-inkers. This was the first time I ever tried this and I just love how it turned out.

After the image was coloured in, I went around the edges of both the card and the image with Sharpie – Gold Medium Point – Water Based Paint. Then I mounted the image on top of the background on a 5.5″ x 4.25″ card base using some 3M VHB – 2 sided tape.

Card Recipe:

Stamp: Come Sail Away (KLM Digital Designs)

Sentiment: Father Gnome and Kids & Sentiments (KLM Digital Designs)

Inks: HP Printer Grayscale, Sharpie – Gold Medium Point – Water Based Paint, Sharpie Water Based Paint – White – Extra Fine Point

Paper: Copic Marker X-Press It Blending Card, KaiserCraft – High Tide – 6.5″ Paper Pad

Die Cuts:  Your Next Stamp – Stitched Rectangle Die Set (YNSD214)

Tools: 3M VHB – 2 sided tape, Cuttlebug

Image coloured with Copic Markers:

Water: BG72, BG70, B93, B91, B52, B41, B000, C1, Y000, Colorless Blender, Sharpie Water Based Paint – White – Extra Fine Point

Rocks: N4, N2, N1, N0, E30

Sky: B0000, B000, Colorless Blender

Sand: E30, E31, Colorless Blender

Cloud: BG70, C0, Colorless Blender

Sailboat: B39, B37, C1, C0, E23, Colorless Blender

Hope you like it and have a great week!

You can find more cards to inspire you at KLM Designs, KLM Digital Design Team and KLM Digital Designs on the Facebook Fan page from the rest of our design team.

4 Alarm Birthday!!!


It’s Wednesday, and this week, I used Fireman Matthew – S017 (High Hopes Rubber Stamps) for the main image and 4 Alarm Day – H059 (High Hopes Rubber Stamps) for the sentiment. Fireman Matthew is prepped and ready to put out the fire from all of those flames rising up from the birthday candles on your cake! He even has a lot of little firetrucks on standby too, just in case! LOL!

To make my card this week, I started off with a card base of 6″ x 6″. I used Echo Park – Scoot by Deena Rutter paper for the background. I just loved those little firetrucks. My older brother used to be a fireman, so I was always looking for background paper to go with the Fireman stamps I would find to make his cards.

I created the brick background by embossing some brown tan paper, using my Cuttlebug and Darice – Brick Wall Embossing Folder. Then I used a mixture of Tim Holtz brown inks listed below to create the texture for the wall. I stamped the image onto Copic Marker X-Press It Blending Card using my MISTI and Memento Tuxedo Black Ink and then coloured the image in with Copic Markers. Once it was coloured in, I fussy cut around it and went along all of the edges with a black marker.

The sentiment was long and I wanted to make it square, so I did it in several steps. Using my MISTI and Memento Tuxedo Black Ink, I covered the portion of the stamp with tape that I didn’t want to stamp. Inked the portion that I wanted and then removed the tape. Then I stamped it, cleaned it off and moved the tape to the next portion that I didn’t want to stamp. I did this 3 times to get the result seen in this photo. This allowed me to make the sentiment into a square. Once this was done, I die cut it out using my Cuttlebug and My Creative Time – Stitched Squares Inside and Out.

I ran both the die-cut sentiment and finished coloured image through my Xyron Creative Station. Then I mounted the image onto the brick wall and the sentiment onto some red cardstock. I used my cutter to create a nice square for the sentiment. Next I went around the entire card with Tim Holtz – Fired Brick Distress Ink and popped up the brick wall and sentiment using 3M VHB – 2 sided tape. I added in some water droplets using Stickles – Ice Blue to finish off the card.

Card Recipe:

Stamp:  Fireman Matthew – S017  (High Hopes Rubber Stamps)

Sentiment: 4 Alarm Day – H059 (High Hopes Rubber Stamps)

Inks: Memento – Tuxedo Black, Tim Holtz – Fired Brick, Tim Holtz Distress Ink – Gathered Twigs, Tim Holtz Distress Ink – Rusty Hinge, Tim Holtz Distress Ink – Vintage Photo

Paper: Copic Marker X-Press It Blending Card, Echo Park – Scoot by Deena Rutter (6″x6″ – Double-sided), Red Cardstock, Tan Cardstock

Die Cuts: My Creative Time -Stitched Squares Inside and Out

Embossing Folder: Darice – Brick Wall Embossing Folder

Tools: MISTI – Most Incredible Stamping Tool, Cuttlebug, Xyron Creative Station, 3M VHB – 2 sided tape

Image coloured with Copic Markers:

Skin: E21, E11, E04, E00, E000, R22, R20

Hair: E47, E44, E43

Coat and Pants: E53, YR21, Y21, Y04, C3, C2, C1

Hat: E53, YR21, Y21, R46, R29, R24

Boots: C10, C8, C6, C5, C3

Hose: R46, R29, R24, C3, C2, C1, E53, YR21, Y21

Water: Stickles – Ice Blue

Shadow: C3, C2, C1

Hope you like it and have a fantastic week!

You can find lots of inspiration from the Design Team Divas at the High Hopes blog, and the High Hopes Rubber Stamps Facebook Fan page plus you can also follow us on
Instagram, Twitter and Pinterest.

Check out the High Hopes Website for something else to give you a big smile!

Over on the High Hopes Website there is a Store Wide sale, save 20% off right now when you use the coupon Code Love at the checkout!


Day Wrapped in Happiness


Welcome Back Dreamerland Craft Fans!

Today, I’m sharing a birthday card that I made using Dreamerland Crafts stamps called You Are A Blessing – D19085 for the main image and  Birthday Sentiments 002 – DS163007. This little girl looks so peaceful sitting on her swing with her sweet companion next to her.


To make this card I used a base card of 4.25″ x 5.5″. I die cut a square out of Copic Marker X-Press It Blending Card using my Cuttlebug and My Creative Time – Stitched Squares Inside and Out. Then I stamped the image using Memento – Tuxedo Black ink and my MISTI. I coloured in the image with Copic markers and then drew in the tree, grass, clouds and sky.

I stamped the sentiment using VersaMark ink and my MISTI. I used Ranger Embossing Powder White – Extra Fine Detail and then heat embossed the powder with Marvy Uchida – Embossing Heat Tool. I layered the sentiment onto aqua cardstock and the coloured image onto purple cardstock and then popped up both the image and the sentiment with 3M VHB – 2 sided tape.

Card Recipe:

Stamps:  You Are A Blessing – D19085 (Dreamerland Crafts)

Sentiment: Birthday Sentiments 002 – DS163007 (Dreamerland Crafts)

Inks: Memento – Tuxedo Black, VersaMark

Embossing Powder: Ranger Embossing Powder White – Extra Fine Detail

Paper: Copic Marker X-Press It Blending Card, White Card Stock, Purple cardstock, Aqua Cardstock

Die Cuts: My Creative Time – Stitched Squares Inside and Out

Tools: MISTI – Most Incredible Stamping Tool, Cuttlebug, Marvy Uchida – Embossing Heat Tool

Image coloured with Copic Markers:

Skin: E000, E00, E04, E11, E21, R22, R20

Hair:  E47, E44, E43

Dress: V09, V06, V04

Cat: C10, C8, C5

Swing and Tree: E37, E35, E33

Grass and Leaves: YG13, YG11, G24

Sky and Clouds: B01, B00, B000, B000, B60, C0, Colorless Blender

Book: BG13, BG11, C0

Hope you like it and have a great week!

You can find more cards to inspire you at Dreamerland Crafts and Pointer Scrapbooking on the Facebook Fan pages from the rest of our design team.

Herd It Was Your Birthday!!!


KLM Digital Designs has just released some brand new stamps this month, and today I’m sharing Woman Farmer Gnome (KLM Digital Designs)! She’s taking some time out from her chores on this beautiful sunny day to wish you a Happy Birthday.

For this card, I printed out the image with my HP Printer onto Copic Marker X-Press It Blending Card using Greyscale. Then I coloured it in with Copic markers and fussy cut around it. I used a  black marker to go around all of the image to hide the white paper from where I fussy cut it. I couldn’t cut out the portion between the girl and the shovel, so I used my copics to match the background that I created with the Tim Holtz inks.

For the background, I used Your Next Stamp – Stitched Rectangle Die Set die and my Cuttlebug to cut Strathmore Bristol Paper (100 lb. – 270 g/m2). Next I created some stencils from Avery Elle – Pierced Clouds Die and Lawn Fawn – Stitched Hillside Borders. I used these stencils to create the cloudy background and the fields behind the farm girl using Tim Holtz Distress Inks.

I had a small scrap strip of patterned paper from Doodle Bug Designs Inc. – Down on the Farm and thought it would go perfectly with this card. I applied this to a 5.5″ x 4.25″ card base from AC Cardstock – Autumn collection. I printed out the sentiment and fussy cut it to split it up and attached it on top of the base background. I then popped up the colored image using 3M VHB – 2 sided tape onto the background that I created earlier. Then I popped up the entire background onto the base card. I added in a few Party Time dots from Kraftin’ Kimmie Dots and inked around the entire card with Tim Holtz Distress Inks – Peeled Paint to finish it off.

Card Recipe:

Stamp and Sentiment: Woman Farmer Gnome (KLM Digital Designs)

Inks: HP Printer Greyscale, Tim Holtz Distress Ink – Salty Ocean, Tim Holtz Distress Ink – Crushed Olive, Tim Holtz Distress Ink – Mowed Lawn, Tim Holtz Distress Inks – Peeled Paint

Paper: Copic Marker X-Press It Blending Card, Doodle Bug Designs Inc. – Down on the Farm – 6″ x 6″ paper pad, AC Cardstock – Autumn, Strathmore Bristol Paper (100 lb. – 270 g/m2)

Die Cuts: Your Next Stamp – Stitched Rectangle Die Set (YNSD214), Avery Elle – Custom Steel Dies – Made in the USA – D-05-01 Pierced Clouds Die, Lawn Fawn – Stitched Hillside Borders

Tools and Miscellaneous: Cuttlebug, 3M VHB – 2 sided tape, Kraftin’ Kimmie Party Time Dots, Xyron Create a Sticker

Image coloured with Copic Markers:

Skin: E000, E00, E04, E11, E21, R22, R20

Hair: E18, E08, YR18, YR14

Pants: B26, B23, B21

Shirt: YG95, YG93, YG91

Hoe: C5, C3, C1, E39, E35, E31

Boots and Hat: E29, E27, E25, E23

Background: YG61, YG03, YG01, B000, Tim Holtz Distress Ink – Salty Ocean, Tim Holtz Distress Ink – Crushed Olive, Tim Holtz Distress Ink – Mowed Lawn, Tim Holtz Distress Inks – Peeled Paint

Hope you like it and have a great week!

You can find more cards to inspire you at KLM Designs, KLM Digital Design Team and KLM Digital Designs on the Facebook Fan page from the rest of our design team.

Butterfly Kisses!!!


It’s Wednesday, and this week, I used Bessie Buggies Bloom – S173 (High Hopes Rubber Stamps) for the main image and Butterfly Kisses – D007 (High Hopes Rubber Stamps) for the sentiment. Bessie is all set for Spring and flowers blooming. I’m not very good with flowers, but my husband has a green thumb and is really good at keeping our flower garden looking beautiful every year.

To make this card I started off with a base card of 6″ x 6″. I fell in love with this background paper as it suited the sentiment and the darling little butterfly “Bessie” so well. I tried to colour Bessie’s wings and outfit to match the colours of the other butterflies in the background.

Once the image was coloured, I added some Wink of Stella – Clear to the wings. Unfortunately, it doesn’t show up in the picture. I die cut the finished image using my Cuttlebug and circle dies and then I die cut a black circle to layer it onto. I thought this made the image pop. I stamped the sentiment and also layered that onto some black cardstock. I then popped up the sentiment and the image with 3M VHB – 2 sides tape. To finish off the card, I inked around all of the edges with Tim Holtz Distress Ink – Pine Needles.

Card Recipe:

Stamp: Bessie Buggies Bloom – S173 (High Hopes Rubber Stamps)

Sentiment: Butterfly Kisses – D007 (High Hopes Rubber Stamps)

Inks: Memento – Tuxedo Black, Tim Holtz Distress Ink – Pine Needles

Paper: Copic Marker X-Press It Blending Card, Postcards from Paris II – Webster’s Pages – 6″ x 6″

Die Cuts: Lifestyle Crafts Cutting Dies – Nesting Circles

Tools: MISTI – Most Incredible Stamping Tool, Cuttlebug, 3M VHB – 2 sided tape

Image coloured with Copic Markers:

Butterfly Wings: BG78, BG49, BG18, BG15, YG13, Wink of Stella – Clear

Butterfly Body: E34, E33, E31, E30, R22, R20

Buttefly Outfit: Y17, Y08, Y04, R08, YR14

Shoes and Buttons: E29, E27, E25, E23, Y17

Flower, Stem, Leaves: Y17, Y08, Y04, E23, YG67, YG63, YG61, R85, R83, R81

Sky: B01, B00, B000, B0000

Grass: YG17, YG13, YG03, YG01

Hope you like it and have a fantastic week!

You can find lots of inspiration from the Design Team Divas at the High Hopes blog, and the High Hopes Rubber Stamps Facebook Fan page plus you can also follow us on
Instagram, Twitter and Pinterest.

Here’s something else to help you celebrate Spring!!!

Over on the High Hopes Website there is a Store Wide sale, save 20% off right now when you use the coupon Code Love at the checkout!


Wine Birthday Divas!!!


Sharing a birthday card today that I made for my aunt using Wine Divas – SC0677 (AI Art Impressions) for both the images and sentiments. My aunt is into crafts and cardmaking too and sometimes when I stay over at her house, we like to share a bottle of wine together, talk and laugh. That is why when I saw this stamp set, I knew I had to make this special card for her birthday. LOL!

To make this card, I used my MISTI to get a nice clean stamped image using Memento – Tuxedo Black and Copic Marker X-Press It Blending Card. Next I die-cut out the stamped image using my Cuttlebug and Your Next Stamp – Stitched Rectangle Die Set (YNSD214). I cut the background paper from Doodle Bug Designs Inc. – Sugar Shoppe at 5.5″ x 4.25″ and mounted it onto top of a white card base 5.5″ x 4.25″. I then inked around all of the edges using Tim Holtz Distress Ink – Picked Raspberry. Before, popping up the base image onto the background with 3M VHB – 2 sided tape, I used my MISTI, Versa Fine – Onyx Black and Ranger – Clear Super Fine Detail embossing powder to add in the sentiment. I heat set the embossing powder with my Marvy Uchida – Embossing Heat Tool.

For the inside of the card, I mounted the background paper from Doodle Bug Designs Inc. – Sugar Shoppe – 6″ x 6″ paper pad onto a card base of 5.5″ x 4.25″. Then, I fussy cut around the image and attached it to the card base using 2 sided tape. I embossed the sentiment to finish off the inside.

Card Recipe:

Stamp and Sentiment: Wine Divas – SC0677 (AI Art Impressions)

Inks: Memento – Tuxedo Black, VersaFIne – Onyx Black, Tim Holtz Distress Ink – Picked Raspberry

Embossing Powder: Ranger – Clear Super Fine Detail embossing powder

Paper: Copic Marker X-Press It Blending Card, Doodle Bug Designs Inc. – Sugar Shoppe – 6″ x 6″ paper pad

Die Cuts:  Your Next Stamp – Stitched Rectangle Die Set (YNSD214)

Tools: MISTI – Most Incredible Stamping Tool, Cuttlebug, 3M VHB – 2 sided tape, Marvy Uchida – Embossing Heat Tool

Image coloured with Copic Markers:

Skin: E000, E00, E04, E11, E21, R29, R24, R22, R20

Hair Combos: E47, E44, E43, E18, E08, YR18, YR14, E29, E25, E21, E15, YR23, Y21

Blouses, Dress, Earrings and Shoes: BG15, BG11, BG10, BV04, BV02, BV01, BV00, E35, E34, E33, Colorless Blender

Pants: B26, B23, B21

Table and Chairs:  W3, W2, W1, W0

Big Chair: E37, E35, E34, E33

Wine: R29, R17, R14

Wine Bottle: R29, R17, R14, E15, Y38, Y17, Y08

Purse: E15, Y38, Y17, Y08, YR27

Background: R85, R83, R81, Y08, Y04, Y02

My Aunt loved her card and I hope that you do too! Hope you like it and have a great week!

Sunny Days Ahead


It’s Wednesday, and this week, I used Sunny Days Ahead – P004 (High Hopes Rubber Stamps). I searched to find colours that represented each word going around the image and found the following: Faith – Pink, Courage – Red, Hope – Blue and Victory – Purple and so this is how I coloured this image. I believe these words speak for themselves and in the days to come, we will all see the sun shining brighter days upon us all.

The card base is 5″ x 5″. I layered each of the papers and coloured image on black cardstock to pop the colours. I chose the paper of the children holding hands to represent the day when we can all get back to normal and hold hands and play together with our loved ones again. The chain link patterned paper represents how we are all linked together in doing our part to stay strong and healthy, and to give each other the hope, faith and courage to be victorious in the sunny days ahead. I popped up the final layer with 3M VHB – 2 sided tape and added in some black pop dots to complete this card.

Card Recipe:

Stamp:  Sunny Days Ahead – P004 (High Hopes Rubber Stamps)

Inks: Memento – Tuxedo Black, Tim Holtz Distress Ink – Carved Pumpkin

Paper: Copic Marker X-Press It Blending Card, Lauderdale – BasicGrey, Life of the Party – BasicGrey

Tools: MISTI – Most Incredible Stamping Tool, 3M VHB – 2 sided tape

Image coloured with Copic Markers:

Sky: B01, B00, B000

Grass: YG17, YG13, YG03, YG01

Sun: Y38, Y35, Y08, R22, R20, Clear – Wink of Stella

Bug: Y17, BG000, BV000, Clear – Wink of Stella

Frog: G07

Flowers: V06, V04

Hope: B24, B23, B21

Victory: BV02, BV01, BV00

Faith: R85, R83, R81

Courage: R37, R27, R24

Corners: G07, YG13, V06, V04, Y38, Y35

Hope everyone stays healthy and safe and I hope you like this week’s card.

Have a fantastic week!

Here’s something else to brighten your day!!!

Over on the High Hopes Website there is a Store Wide sale, save 20% off right now when you use the coupon Code Love at the checkout!

You can find lots of inspiration from the Design Team Divas at the High Hopes blog, and the High Hopes Rubber Stamps Facebook Fan page plus you can also follow us on
Instagram, Twitter and Pinterest.


Birthday Girl! We Need To Put the Shades On!


Sharing a birthday card today that I made using Sunny Shades Set – SC4988 (AI Art Impressions) for both the image and sentiment.

To make this card, I used my MISTI to get a nice clean stamped image using Memento – Tuxedo Black and Copic Marker X-Press It Blending Card. Next I die-cut out the stamped image and background papers using my Cuttlebug and My Creative Time – Stitched Squares Inside and Out. I then inked around the edges using Tim Holtz Distress Ink – Picked Raspberry and Tim Holtz Distress Inks – Peacock Feathers.

I mounted the background paper from Doodle Bug Designs Inc. – Sugar Shoppe – 6″ x 6″ paper pad onto a card base of 5.5″ x 4.25″. Then, I popped up the next layer using 3M VHB – 2 sided tape. I mounted the main coloured image onto some Hotpink cardstock and then cut a narrow edge around it. Lastly, I popped up it up with 3M VHB – 2 sided tape.

Card Recipe:

Stamp and Sentiment: Sunny Shades Set – SC4988 (AI Art Impressions)

Inks: Memento – Tuxedo Black, VersaMark, Tim Holtz Distress Ink – Picked Raspberry

Embossing Powder: Ranger Embossing Powder White – Extra Fine Detail

Paper: Copic Marker X-Press It Blending Card, Doodle Bug Designs Inc. – Sugar Shoppe – 6″ x 6″ paper pad, Hotpink cardstock

Die Cuts:  My Creative Time – Stitched Squares Inside and Out

Tools: MISTI – Most Incredible Stamping Tool, Cuttlebug, 3M VHB – 2 sided tape

Image coloured with Copic Markers:

Skin: E000, E00, E04, E11, E21, R29, R24, R22, R20

Hair Combos: E47, E44, E43, E18, E08, YR18, YR14, E29, E25, E21, E15, YR23, Y21

Blouses, Earrings and Shoes: BG18, BG13, BG11, Y19, Y15, Y13

Pants: B26, B23, B21

Boots: E27, E25, E23

Blouse 1, Earrings and Shoes:  R89, R85, R83, R81, RV01, RV000

Blouse 2, Earrings and Shoes: Y17, Y15, Y13

Blouse 3, Earrings and Scarf: YR21, YR20, YR16, YR14, YR12

Blouse 4 and Jacket: BG15, BG13, BG11, V09, V06, V04

Glasses: BG05, BG02, BV01, BV00, Gelly Roll Sakura #5 Pen

Background: B04, B02, B01, B00, C2, C1, C0

Hope you like it and have a great week!