Tag Archive | Rabbit

Sweater Weather!!!


I went to an amazing Ugly Sweater crop this week at The Scrap Club and I thought it would be fun to make a Christmas card for a few of the ladies using New Sweater Weather and New Ugly Sweater Stencil by Kraftin’ Kimmie Stamps.

To make my cards this week, I began with a card base of Hammermill – Premium Colour 100 lb. cardstock, cut and scored to be 5.5″ x 4.25″. Hammermill – Premium Colour 100 lb. cardstock was also cut to the same size. Kraftin’ Kimmie StampsNew Ugly Sweater Stencil were applied to the paper using blending brushes and Krafty Kolours – Flirty Flamingo, Krafty Kolours – Ocean Opulence. I wanted to keep the background soft.

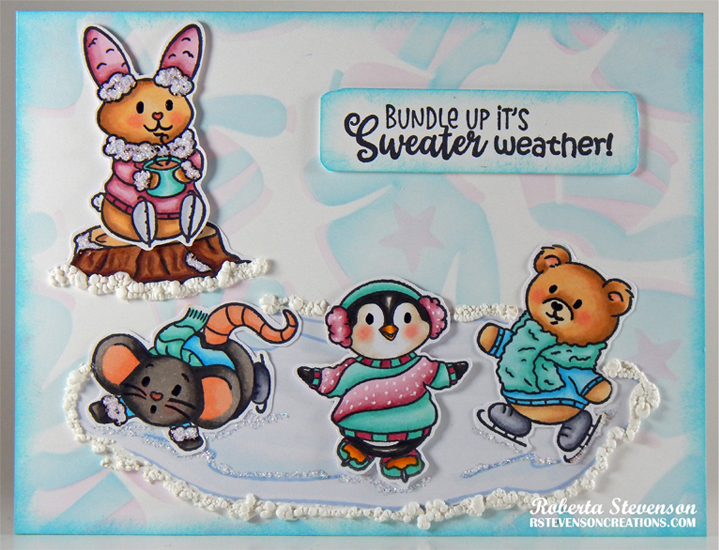
With my MISTI and Memento – Tuxedo Black ink, I stamped the images and the sentiment onto Copic Marker X-Press It Blending Card. Memento – Summer Sky ink was used to stamp the image of the pond. I coloured the images in with Copic markers and fussy cut all around them. I glued the stump and pond directly to the base. The mouse and bear were attached directly on top of the pond with glue. U-Line Double-Sided Foam Tape was attached to the bunny, penguin and sentiment and they were all popped up onto the card. Krafty Kolours – Ocean Opulence ink was applied around the sentiment before adding it to the card.

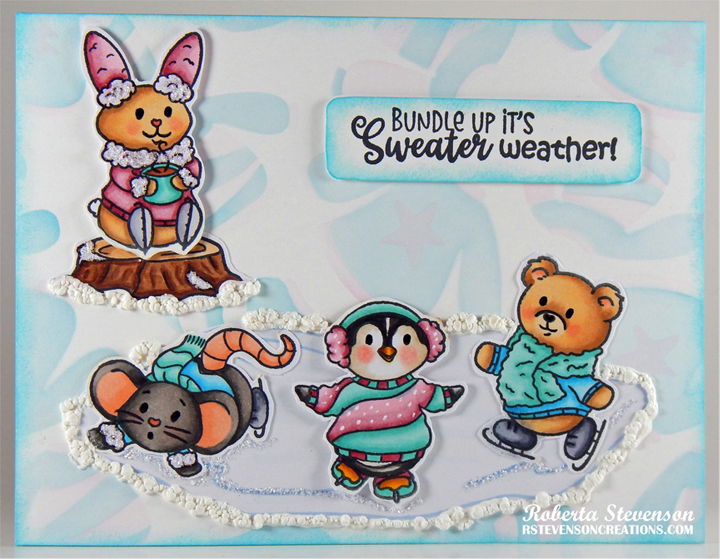
Cosmic Shimmer Fluffy Stuff was applied around the stump and the pond and then heat embossed with a Marvy Uchida – Embossing Heat Tool. Lastly, I added Stickles – Diamond for the snow on the top and side of the stump and to add some sparkle to the ice.

Card Recipe:

Stamp and Sentiment: New Sweater WeatherKraftin’ Kimmie Stamps

Inks: Memento – Tuxedo Black, Memento – Summer Sky, Krafty Kolours – Flirty Flamingo, Krafty Kolours – Ocean Opulence

Paper: Copic Marker X-Press It Blending Card, Hammermill – Premium Cardstock 110 lb., Hammermill – Premium Colour 100 lb.

Stencils: Kraftin’ Kimmie StampsNew Ugly Sweater Stencil

Miscellaneous: MISTI – Most Incredible Stamping Tool, Gelly Roll Sakura #10 Pen,  U-Line Double-Sided Foam Tape, Cosmic Shimmer Fluffy Stuff, Blending Brushes

Image coloured with Copic Markers:

Mouse: W7, W5, W3, R30, R22, R02

Penguin: W9, W7, W5, W3, W00, E15, YR14, Y17, E42, E41, E40, R30, R22, Colorless Blender

Bear and Rabbit: E55, E53, E51, E50, R30, R22, R02

Penguin and Rabbit Sweater, Mug, Earmuffs: BG32, BG11, BG10, B0000, R85, R81, RV00, E13, Gelly Roll Sakura #10 Pen

Bear and Mouse Sweater and Scarves: BG32, BG11, BG10, BG02, BG01, BG000

Ice: B0000, Stickles – Diamond

Stump: E27, E25, E23, E21

Snow: B000, Stickles – Diamond

Hope you like it and have a fantastic week!

Owl Carol


Today, I’m sharing a Christmas card that I made using a retired image from Di’s Digistamps called Owl Carol.

For the base card, I used Hammermill – Premium Cardstock 110 lb. and cut it and scored it to be 5.5″ x 5.5″. For the background, I cut Hunkydory Adorable Scorable Pattern Packs – Let It Snow paper to the same size as the base card and inked around the edges and along the bottom with Tim Holtz Distress Ink – Prize Ribbon. I adhered this to the base card with double-sided tape. Washi Tape was then applied directly to the left side of the card base. Waffle Flower – Nesting Square dies and Cuttlebug were used to die cut a 4.25″ x 4.25″ piece of dark blue cardstock.  Precision Cutting Dies by Frantic Stamper Inc. “Falalalala” was used to die cut the sentiment 4 times. 3 times with the dark blue cardstock and 1 time using Recollections – Matte Gold Foil cardstock.

The image using HP High Quality Grayscale was printed onto Copic Marker X-Press It Blending Card and die cut using Cuttlebug and My Creative Time -Stitched Squares Inside and Out. The image was coloured in with Copic markers and Cosmic Shimmer Fluffy Stuff was added to the bottom of the image for the snow. Marvy Uchida – Embossing Heat Tool was applied to the snow to puff it up. Stickles – Diamond was applied to the puffy snow to add a little more sparkle and also to the top of the lantern and tree branch. Gelly Roll Sakura #10 Pen was applied in the sky to create a snowy background. Sakura Glaze – Black and Gelly Roll Sakura #5 Pen were added to the noses on the mouse and rabbit. The finished image was popped up onto the blue square cardstock using 3M – double-sided foam tape and then this was attached to the base card using U-Line Double-Sided Foam Tape. The “Falalalala” sentiments were attached together to give the illusion of being 3-D and applied to the card using liquid glue to finish it off.

Card Recipe:

Stamp: Di’s DigistampsOwl Carol

Inks: HP High Quality Grayscale, Tim Holtz Distress Ink – Prize Ribbon

Paper: Copic Marker X-Press It Blending Card, Hammermill – Premium Cardstock 110 lb., Hunkydory Adorable Scorable Pattern Packs – Let It Snow, Recollections – Matte Gold Foil cardstock

Die Cuts: Waffle Flower – Nesting Square dies, My Creative Time -Stitched Squares Inside and Out, Precision Cutting Dies by Frantic Stamper Inc. “Falalalala”, My Creative Time -Stitched Squares Inside and Out

Miscellaneous: U-Line Double-Sided Foam Tape, Stickles – Crystal, Gelly Roll Sakura #10 Pen, Gelly Roll Sakura #5 Pen, Sakura Glaze – Black, Cosmic Shimmer Fluffy Stuff, Marvy Uchida – Embossing Heat Tool, 3M – double-sided foam tape, Stickles – Diamond

Image coloured with Copic Markers:

Owl: C1, C0, E23, YR15, YR12

Mouse: W7, W5, W3, W2, R30, R24, R02, Sakura Glaze – Black, Gelly Roll Sakura #5 Pen

Mouse Scarf: BG72, BG57, BG32, BG11

Rabbit: E55, E53, E51, R30, R02, C0, C00, Sakura Glaze – Black, Gelly Roll Sakura #5 Pen

Rabbit Scarf: G16, YG25, YG21

Guitar: E55, E53, E51, E35, E33

Tree Branch: E29, E25, E23

Lantern and Candle: R46, R14, R08, YR16, Y08, Y00, C8, C6, C4

Sky: B99, B97, B95, B93

Snow: Cosmic Shimmer Fluffy Stuff, Stickles – Diamond

Hope you like it and have a great week!

Added into Challenge:

Challenge #81 – Anything Goes with a Featured Critter

Sweetest Wishes!!


Today, I’m sharing a Christmas card from the new KLM Designs October release called Christmas Bunny – Candy Cane.  This stamp set also comes with 2 other sentiments, “Wishing you a December full of candy cane wishes and mistletoe kisses” and “All I want for Christmas is my two front teeth”.

To make the card, I first imported the image and sentiment into Microsoft Word and printed everything out onto Copic Marker X-Press It Blending Card using my HP Printer. Using my Cuttlebug and Creative Expressions – Festive Collection Peeking Snowflake dies, I die cut around the image and at the same time, die cut a larger oval out of Recollections – Silver Foil Cardstock from the same die set. The image was coloured in with Copic markers. Gelly Roll Sakura #10 Pen was used to create the snow in the sky and also to add some highlights to the eyes. For the snow surrounding the bunny on the ground, Cosmic Shimmer Fluffy Stuff was applied and then I added in some glitter while it was still wet. Then snow was heated from the bottom of the image and then on top using a Marvy Uchida – Embossing Heat Tool to puff it up. Stickles – Diamond was then applied to add in some more glitter. Stickles – Diamond was also applied to the hat brim and pompom.

The sentiment frame was die cut with my Cuttlebug and My Creative Time – Stitched Zig Zag Ties. The sentiment was cut to the size of 2.5″ x 7/8″ and then using a We R Memory Keepers – Crop-A-Dile Corner Chomper, I used the 1/8″ corner. With a B000 Copic marker, I applied it over the entire sentiment piece to give it a hint of colour. The image and the sentiment were attached to the Silver die cuts using U-Line Double-Sided foam tape. Creative Expressions – Festive Collection – Pearly Snowflake Border was used to die cut the snowflakes out of Lawn Fawn – Sparkle Cardstock in “Pixie Dust”.

The card was now ready to assemble. I cut the base card from Hammermill – Premium Colour 100 lb. cardstock to the size of 9″ x 8″ and then scored it at 4″ and folded it in half. Reminisce Snowflake Ridge – Snow Day paper was cut to 9″ x 4″ and applied to the base card using double-sided tape. Liquid glue was applied to the back of the snowflake border and it was attached to the top of the card. Double-sided tape was added to the silver oval and sentiment border and they were both applied directly to the base of the card. Lastly, I added in some sparkle dots from Your Next Stamp and inked around the entire card with a finger dauber and Tim Holtz Distress Ink – Blueprint Sketch.

Card Recipe:

Stamp and Sentiments: Christmas Bunny – Candy Cane (KLM Digital Designs)

Inks: HP Printer Grayscale, Tim Holtz Distress Ink – Blueprint Sketch

Paper: Copic Marker X-Press It Blending Card, Hammermill – Premium Colour 100 lb., Lawn Fawn – Sparkle Cardstock in “Pixie Dust” (8.5″ x 11″), Reminisce Snowflake Ridge – Snow Day, Recollections – Silver Foil Cardstock (8.5″ x 11″)

Dies: Creative Expressions – Festive Collection Peeking Snowflake, Creative Expressions – Festive Collection – Pearly Snowflake Border, My Creative Time – Stitched Zig Zag Ties

Miscellaneous: Marvy Uchida – Embossing Heat Tool, U-Line Double-Sided foam tape, Stickles – Diamond, Your Next Stamp – Sparkle dots.

Image coloured with Copic Markers:

Bunny: E33, E31, E30, C1, C0, R46, R30, R14, R08, R02, E25, E23, Y17, 100, C1, C00, Gelly Roll Sakura #10 Pen

Hat, Holly and Berries: R59, R37, R35, BG96, G99, G94, G82, C1, Stickles – Diamond

Candy Cane: R46, R14, R08, C1, C00

Sky: B06, B05, B04, B02

Snow: Stickles – Diamond, Cosmic Shimmer Fluffy Stuff

Hope you like it and have a great week!

You can find more cards to inspire you at KLM Designs, KLM Digital Design Team and KLM Digital Designs on the Facebook Fan page from the rest of our design team.

Sweet Note of Thanks!


Today I’m sharing a Thank-you card using Your Next StampMusic Bunny – CYNS262. I was recently on a cruise and we met some new wonderful couples that sat at the tables next to ours and we exchanged information. Unknown to us until the final evening, the couple that sat directly beside us was Steven Gilliland and his wonderful wife Diane. Steven happens to be a very well known acclaimed author and public speaker. My husband and I were so happy when Steven sent us a few of his books, “Making a Difference” and a “Cherry On Top”. Steven had personally autographed them to us as well. What a kind and awesome gesture and it was very much appreciated. We are currently reading his books and just love them. As a thank you for their kind generosity, I sent them this card from my husband and I.

To create the card, I began with a card base of 5.5″ x 5.5″ using Hammermill – Premium Colour 100 lb. cardstock. I cut Recollections – Matte Gold Foil cardstock to be the same size as the base card and applied double-sided tape to it. This was adhered directly to the base card. Next, I cut a piece of Hammermill – Premium Colour 100 lb. cardstock to the size of 5.25″ x 5.25″. I sprayed some water onto the paper and then using Kraftin’ Kimmie – Musical Melodies stencil I placed it on top of the paper and ran it through my Cricut Die Cutting machine to emboss the paper. Once the paper was dry, I placed the stencil over top of the paper again and this time, using Tim Holtz Distress Ink – Black Soot and a blending brush, I coloured in the musical notes. I also inked around the edges with the same ink and a mini dauber.

Using my Cuttlebug and PinkFresh Studio – Essentials – Blanket Stitched Square 4″ dies, I die cut Copic Marker X-Press It Blending Card. The main image was stamped onto this die cut using Memento – Tuxedo Black ink and my MISTI. I coloured in the image and created my own background. Once this was completed, I put the image back into my MISTI and stamped the sentiment using Versa Fine – Onyx Black ink. Ranger – Clear Super Fine Detail embossing powder was applied over top of the ink and then heat embossed with a Marvy Uchida – Embossing Heat Tool. The little notes were added with Versa Fine – Onyx Black ink and a miniature stamping block. I just chose several notes and stamped them randomly around the image. I felt like the image was still missing something, so I decided to take my Copic black marker (100) and using the lines from the die cut as a guide, coloured in every second stripe. I thought this made it look like a piano keyboard. Lastly, My Creative Time – Stitched Squares Inside and Out 4.5″ were used to die cut Recollections – Matte Gold Foil cardstock.

The card was now ready to assemble. I added U-Line double-sided pop-up tape to the back of the music square, gold square and image. Each of them were popped onto each other and centred onto the base card.

Card Recipe:

Stamp: You’re Next StampMusic Bunny – CYNS262

Inks: Memento – Tuxedo Black, Tim Holtz Distress Ink – Black Soot, Versa Fine – Onyx Black

Paper: Copic Marker X-Press It Blending Card, Hammermill – Premium Colour 100 lb., Recollections – Matte Gold Foil cardstock

Dies: PinkFresh Studio – Essentials – Blanket Stitched Square, My Creative Time – Stitched Squares Inside and Out

Stencil: Kraftin’ Kimmie – Musical Melodies

Embossing Poweder: Ranger – Clear Super Fine Detail

Miscellaneous: U-Line double-sided tape, Marvy Uchida – Embossing Heat Tool, MISTI – Most Incredible Stamping Tool, Sakura Glaze – Black pen

Image coloured with Copic Markers:

Rabbit: C3, C2, C1, C0, C00, R30, R02

Mice: W3, W2, W1, R30, R02, (Eyes and Nose – Sakura Glaze – Black pen)

Ribbon: R59, R37, R35

Flower: B29, B26, B23, Y17, Y11

Piano: W9, W7, W5, C9

Piano Chair: W9, W7, W5, R59, R37, R35

Floor: E49, E34, E29, E27, E25, E23

Wall: BG32, BG11, BG10

Border: 100

Hope you like it and have a great week!

Beautiful Blessings!!


It’s Wednesday, and this week, I made an Easter card using High Hopes Rubber Stamps Easter Gnome – SLF034  for the main image and Beautiful Blessings – FDG030  for the sentiment. I love to colour gnomes and was so excited when I saw this adorable character in the High Hopes Rubber Stamps new “This and That” Spring Release.

To make my card this week, I began with a card base of Hammermill – Premium Colour 100 lb. cardstock, cut and scored to be 5.5″ x 4.25″. I cut Forever In Time – Viola cardstock to be the same size as the base card and attached it using double-sided tape. Echo Park – Welcome Easter cardstock and Forever In Time – Sky cardstock were die cut using My Creative Time – Rectangle Frame Layers and my Cuttlebug. I trimmed the Forever In Time – Sky cardstock to 2″. Both pieces were inked with Tim Holtz Distress Ink – Evergreen Bough around all edges. I applied the smaller piece to the centre of the egg background and then applied U-Line Double-sided tape and popped it up onto the base background.

Using PinkFresh Studio – Essentials: Folk Edge Squares, I die cut Copic Marker X-Press It Blending Card cardstock. The image was then stamped onto it with my MISTI and Memento – Tuxedo Black ink. I stamped the sentiment onto Copic Marker X-Press It Blending Card cardstock and die cut it with My Creative Time – Bunch of Fun Circle Dies. The image and frame around it were coloured in with Copic Markers.

The remainder of the card was now ready to finish being assembled. I applied U-Line double-sided tape to the back of the image and sentiment and popped them up onto the egg background. Lastly, I added in a few YNS Gumdrops to complete the card.

Card Recipe:

Stamps: Easter Gnome- SLF034 (High Hopes Rubber Stamps)

Sentiment: Beautiful Blessings – FDG030 (High Hopes Rubber Stamps)

Inks: Memento – Tuxedo Black, Tim Holtz Distress Ink – Evergreen Bough

Paper: Copic Marker X-Press It Blending Card, Hammermill – Premium Colour 100 lb., Echo Park – Welcome Easter (6″ x 6″), Forever In Time – Sky, Forever In Time – Viola

Die Cuts: My Creative Time – Rectangle Frame Layers, My Creative Time – Rectangle Frame Dies, My Creative Time – Bunch of Fun Circle Dies, PinkFresh Studio – Essentials: Folk Edge Squares

Tools: MISTI – Most Incredible Stamping Tool, U-Line double-sided tape, Cuttlebug, YNS GumDrops

Image coloured with Copic Markers:

Skin: E21, E11, E04, E00, E000

Beard: C5, C4, C3, C1, C0

Hat and Clothing: BG34, BG32, BG15, BG11, BG10, V15, V12, V01, V000

Boots: E33, E31, E30, E27, E25, E23, E21

Bunny and Bunny Ears: C3, C1, C0, RV11, R20

Carrot and Stem: E08, YR18, YR14, YR12, Y08, G14, G07, YG23, YG11, YG03

Grass: YG17, YG13, YG03

Background: Y00, G00, B000

Border around Square Frame Circle: V12

Hope you like it and have a fantastic week!

You can find lots of inspiration from the Design Team Divas at the High Hopes blog, and the High Hopes Rubber Stamps Facebook Fan page plus you can also follow us on
Instagram, Twitter and Pinterest.

Time to Celebrate!!


Today, I’m sharing a Christmas card using Dreamerland Crafts stamps called Let’s Celebrate – D19074 for the main image and Christmas Snow Scene – M18313 for the background. For the sentiment, I used Holiday Sentiments Set 001 – D163001


To make this card I used a base of 5.5″ x 4.25″ using Hammermill – Premium Colour 100 lb. cardstock. My Cuttlebug and My Creative Time – Rectangle Frame Layers Die were used to die-cut Copic Marker X-Press It Blending Cardstock. Using the background stamps, I stamped the background using my MISTI and Memento – Summer Sky ink. I coloured in the sky, trees and house with Copic markers and then added some snow using Gelly Roll Sakura #8 Pen. Once this was done, I added Gina K Designs – Glitz Glitter Gel – Iridescent to the remainder of the die cut for the sparkling snow. I added a little bit more where the boys feet would land and set it aside to dry. Once again, I used my MISTI and Memento – Tuxedo Black ink and stamped the main images. I coloured them in with Copic markers and then applied Ranger – Emboss It Pen Clear to the fur trims for the hats and clothing. I applied WOW! Sparkling Snow Embossing Glitter to the inked areas and then heat embossed everything with my Marvy Heat Embossing Tool. For the pompoms, I applied Cosmic Shimmer Fluffy Stuff and then heat embossed the liquid for it to puff up. For the present, I added some gold swirls using a Pental Sunburst Metalic Med Gel Pen. Then I fussy cut around the images leaving a thin white border. I stamped the sentiment using my MISTI and Lawn Fawn – Peacock Ink on to the base card. Then I stamped it again, this time using Versamark ink and then added Ranger – Clear Super Fine Detail embossing powder and heat embossed it.

The card was now ready to assemble. Using double-sided tape, I attached the background to the scalloped border. I added 3M double-sided tape to the back of the scalloped border and popped it up onto the base card. Using 3M double-sided tape, I popped up the main image and present onto the background. A little more of the Stickles – Diamond was added to snow where his feet are to complete the card.

Card Recipe:

Stamps: Let’s Celebrate – D19074 – Dreamerland Crafts, Christmas Snow Scene – M18313 – Dreamerland Crafts

Sentiment: Holiday Sentiments Set 001 – DS163001 – Dreamerland Crafts

Inks: Memento – Tuxedo Black, Versamark, Lawn Fawn – Peacock Ink, Memento – Summer Sky ink

Paper: Copic Marker X-Press It Blending Card, Hammermill – Premium Colour 100 lb., Hot Buy – Recollections – Jewel Tones

Die Cuts: My Creative Time – Rectangle Frame Layers, Gina Marie Designs – Nested Scalloped Stitched Rectangles

Stickles: Diamond

Embossing Powder: WOW! Sparkling Snow Embossing Glitter, Cosmic Shimmer Fluffy Stuff, Ranger – Clear Super Fine Detail embossing powder

Tools: MISTI – Most Incredible Stamping Tool, Cuttlebug,  Marvy Heat Embossing Tool, Sakura Glaze – Black, Gelly Roll Sakura #8 Pen, Gelly Roll Sakura #5 Pen, 3M VHB – 2 sided tape and Pental Sunburst Metalic Med Gel Pen

Image coloured with Copic Markers:

All Eyes and Small Noses:  Sakura Glaze – Black pen, Gelly Roll Sakura #5 Pen

Skin: E21, E11, E00, E000, R30, R22, R20

Hair: E47, E44, E43

Clothing and Hat: B37, B14, B12

Mitts: YG67, YG63, YG61

Boots: C8, C6, C4, C2, C1

Bear: E57, E55, E53, E51

Pig: E95, E93, R00, R000

Rabbit: C2, C1, C00, R30, R20

Present and Bow: BG09, BG05, BG02, BG01, E15, Y38, Y15, Y08

House: E40, E41, E30, E18, E15, Y04

Trees: G99, G21, YG67, YG17

Sky: B04, B02, B01, B00

Hope you like it and have a great week!

You can find more cards to inspire you at Dreamerland Crafts and Pointer Scrapbooking on the Facebook Fan pages from the rest of our design team.

Merry and Bright!!


Today, I’m sharing a light up Christmas card using Dreamerland Crafts stamps called Lets Decorate Our Home – D18037 and for the sentiment Holiday Sentiments Set 003. It’s never too early to start making Christmas cards and here’s hoping that this card will brightens someone’s day this coming Christmas.

To make this card I used a base card of 5.5″ x 4.25″ using Hammermill – Premium Colour 100 lb. cardstock. For the background paper, I used my Cuttlebug and My Creative Time – Rectangle Frame Dies to die cut American Crafts – “Holiday” paper. The edges were inked with Tim Holtz Distress Inks – Peacock Feathers and then I adhered the background to the base card using double-sided tape. Using my MISTI and Memento – Tuxedo Black ink, I stamped the main image onto Copic Marker X-Press It Blending Card and coloured it in with Copic markers. I added some Stickles – Diamond to the pompom on the hat and fur at the top of the little girl’s boots. For the fluffy snow, I used Cosmic Shimmer Fluffy Stuff and sprinkled on some DecoArt Glamour Dust while it was still wet. Using my Marvy Heat Embossing Tool, I heated up the liquid for it to puff up and look like sparkling snow. I poked holes in the card where I wanted the blue lights to go. I applied some tissue paper over the holes on the back of the image to diffuse the lights. Using Versamark ink and my MISTI, I stamped the sentiment and then applied Ranger Embossing Powder White – Extra Fine Detail. This too was heated with my Marvy Heat Embossing Tool. Lastly, added some snowflakes using a Gelly Roll Sakura #10 Pen. I then set the coloured image aside.

It was now time to set up the bright blue lights for the house using Chibi Lights, copper tape and a battery. I cut out an another rectangle slightly smaller than the coloured image. Placing the coloured image over top of the smaller rectangle, I used a pencil for the placement of the lights on the roof. For the placement of the battery, I used the remote in the girl’s hands as a guide. After mapping out the route for the lights, I place the copper tape down and added 3 blue Chibi Lights to the “+” and “-” paths leading back to the battery. The set up was tested to make sure the lights would come on. Once this was completed, I used 3 layers of 3M VHB – 2 sided tape around the 3 sides of the battery to pop the image up high enough off of the card so that the battery would only light up the lights when someone pressed down on it. To keep the card even all the way around, I added 3 layers of 3M VHB – 2 sided tape to the remainder of the smaller rectangle. The image was then attached to the smaller rectangle. I added some double-sided tape to the back of the smaller rectangle and adhered it directly to the card to finish it off.

Card Recipe:

Stamp: Lets Decorate Our Home – D18037 – Dreamerland Crafts

Sentiment: Holiday Sentiments Set 003 – Dreamerland Crafts

Inks: Memento – Tuxedo Black, Tim Holtz Distress Inks – Peacock Feathers, Versamark

Paper: Copic Marker X-Press It Blending Card, Hammermill – Premium Colour 100 lb., American Crafts – “Holiday” 6″ x 6″ (15.2 x 15.2 cm)

Die Cuts: My Creative Time – Rectangle Frame Dies

Stickles: Diamond

Embossing Powder: Ranger Embossing Powder White – Extra Fine Detail

Tools: MISTI – Most Incredible Stamping Tool, Cuttlebug, Forever in Time – Pop-Dot Tape, Cosmic Shimmer Fluffy Stuff, DecoArt Glamour Dust, Marvy Heat Embossing Tool, Sakura Glaze – Black, Gelly Roll Sakura #10 Pen, Chibi Lights

Image coloured with Copic Markers:

Skin: E21, E11, E04, E00, E000, R30, R20 (Eyes – Sakura Glaze – Black)

Hair: E47, E44, E43

Hat, Scarf and Boots: BG72, BG57, BG32, BG11

Coat: R59, R37, R35

Pants and Boot Soles: E25

Dog: E27, E25, E23 (Eyes and Nose – Sakura Glaze – Black)

Rabbit: E35, E33, E31 (Eyes and Nose – Sakura Glaze – Black)

House: E57, E55, E53, Y06, Y02

Roof: C5, C4, C3, C2, C1

Lights: Y17, Y02, B000

Snow: B60, B000, B0000, Cosmic Shimmer Fluffy Stuff, DecoArt Glamour Dust

Sky: B99, B97, B95

Hope you like it and have a great week!

You can find more cards to inspire you at Dreamerland Crafts and Pointer Scrapbooking on the Facebook Fan pages from the rest of our design team.

Hoppy Valentine’s Day


It’s Wednesday, and this week I’m sharing a Valentine’s Card featuring Bunny Love – S054 from (High Hopes Rubber Stamps) for the main image and Hoppy Valentines – F092 (High Hopes Rubber Stamps) for the sentiment. Love this adorable image and it can be used for so many different occasions, Valentine’s, which I’ve used here, Easter or even for an Anniversary card.

To create the card this week, I stamped the main image and sentiment onto Copic Marker X-Press It Blending Card using Memento – Tuxedo Black ink and my MISTI. I coloured in the main image with Copic Markers. Then I fussy cut around it. The sentiment was die cut using Whimsy Stamps – Quick Strips Die Set – WSD330.

To create the base I began with AC Cardstock – Christmas (6″ x 6″). Then I die cut K&Company – Kelly Panacci – KP Valentine – 30-599338 paper using My Creative Time -Stitched Squares Inside and Out. For the smaller heart, I used K&Company – Kelly Panacci – KP Valentine – 30-599345 paper and Sizzix Framelets by Stephanie Barnard – 562676 – Hearts Dotted dies. I also used the same dies to cut the larger heart using Recollections – Christmas Noel paper. I inked around all of the cut images with Tim Holtz Distress Ink – Aged Mahagony and also Tim Holtz Distress Ink – Barn Door.

To assemble the card, the large square was attached directly to the base using double side tape. All of the remaining layers were popped up using 3M VHB – 2 sided tape.

Card Recipe:

Stamp: Bunny Love – S054 from (High Hopes Rubber Stamps)

Sentiment: Hoppy Valentines – F092 (High Hopes Rubber Stamps)

Inks: Memento – Tuxedo Black, Tim Holtz Distress Ink – Barn Door, Tim Holtz Distress Ink – Aged Mahagony

Paper: Copic Marker X-Press It Blending Card, K&Company – Kelly Panacci – KP Valentine – 30-599345, K&Company – Kelly Panacci – KP Valentine – 30-599338, AC Cardstock – Christmas, Recollections –

Die Cuts: My Creative Time -Stitched Squares Inside and Out, Sizzix Framelets by Stephanie Barnard – 562676 – Hearts Dotted, Whimsy Stamps – Quick Strips Die Set – WSD330, Recollections – Christmas Noel

Tools and Miscellaneous: MISTI – Most Incredible Stamping Tool, Sakura Glaze – Black, 3M VHB – 2 sided tape

Image coloured with Copic Markers:

Bunnies: BV23, BV20, B60, E43, E42, E40, R85, R83, R81, Sakura Glaze – Black (Eyes)

Hope you like it and have a fantastic week!

You can find lots of inspiration from the Design Team Divas at the High Hopes blog, and the High Hopes Rubber Stamps Facebook Fan page plus you can also follow us on
Instagram, Twitter and Pinterest.

Babies Are Sweet Beginnings!!!


It’s Wednesday, and this week I’m sharing a Baby Card featuring Sweet Beginnings – S169 from (High Hopes Rubber Stamps). I love this adorable stamp and I also have a few nieces that are pregnant right now. We are all looking forward to seeing pictures of the new little one’s when they are born. Once Covid19 is over, hopefully, we will be able to travel again and see them in person.

To create the card this week, I stamped the image onto Copic Marker X-Press It Blending Card using my MISTI and Memento – Tuxedo Black ink. I fussy cut around the image and then coloured it in with Copic Markers.

I created a card base made from Hammermill – Premium Colour 100 lb. paper, folded to 5.5″ x 4.25″. For the background paper, I cut a piece the same size as the base from Echo Park – Hello Baby – It’s a Girl. I attached this directly to the base with double-sided tape and then inked around the edges using Tim Holtz Distress Ink – Spun Sugar. I popped up the coloured image using 3M VHB – 2 sided tape. Lastly, I added some little embellishments from Forever In Time – Painted Wood Buttons – Patchwork Elephants to finish off the card.

Card Recipe:

Stamp: Sweet Beginnings – S169 (High Hopes Rubber Stamps)

Inks: Memento – Tuxedo Black, Tim Holtz Distress Ink – Spun Sugar

Paper: Copic Marker X-Press It Blending Card, Hammermill – Premium Colour 100 lb., Echo Park – Hello Baby – It’s a Girl (6″x6″)

Embellishments: Forever In Time – Painted Wood Buttons – Patchwork Elephants – SE083C

Tools and Miscellaneous: MISTI – Most Incredible Stamping Tool, Sakura Glaze – Black, 3M VHB – 2 sided tape

Image coloured with Copic Markers:

Banner: R85, RV13, RV11, RV10

Bear: E29, E25, E23, E21, R30, R02, Y35, Y18, Y13, Sakura Glaze – Black – Eyes and Mouth

Bunny: BV23, BV20, B60, R22, R20, BG49, BG23, BG15, BG10, BG11, YG41, G00, G000, Sakura Glaze – Black – Eyes

Kitten: N8, N5, N3, N1, V17, V15, V04, V01, Sakura Glaze – Black – Eyes and Nose

Hope you like it and have a fantastic week!

You can find lots of inspiration from the Design Team Divas at the High Hopes blog, and the High Hopes Rubber Stamps Facebook Fan page plus you can also follow us on
Instagram, Twitter and Pinterest.

Easter Masterpiece!


It’s Wednesday, and this week I used High Hopes Rubber Stamps Bunny Masterpiece – S063 for the main image and Egg-Stra Special -G243 for the sentiment. These little bunnies are getting prepared for Easter. I remember making painted eggs every year in the kitchen with my mom and brothers as a child. Do you have an Easter tradition of painting eggs too?

To create the card I coloured in the image and then popped it up using 3M VHB – 2 sided tape. I also popped up the sentiment. I found some old cardstock and cut out some of the little eggs and then edged around each of them with various Tim Holtz colours listed below. The card is 6″ x 6″.

Card Recipe:

Stamp:  Bunny Masterpiece – S063 (High Hopes Rubber Stamps)

Sentiment: Egg-Stra Special -G243 (High Hopes Rubber Stamps)

Inks: Memento – Tuxedo Black, Tim Holtz Distress Inks – Dusty Concord, Spun Sugar, Wilted Violet, Evergreen Bough, Shaded Lilac and Fossilized Amber

Paper: Copic Marker X-Press It Blending Card, Recollections – Blue Ombre Cardstock, Recollections – Purple Ombre Cardstock, Recollections – Easter Printed Cardstock

Die Cuts: My Creative Time -Stitched Squares Inside and Out

Tools: MISTI – Most Incredible Stamping Tool, Cuttlebug, 3M VHB – 2 sided tape

Image coloured with Copic Markers:

Bunnies: C3, C2, C1, C0, R30, R02, RV04

Overalls: B26, B23, B21, V09, V06, V04, BV04, BV02, BV01, BV000

Egg: Y08, Y06, Y02, BG13, BG11, BG10, RV04, RV02, RV00, G02, G00, G000, B41, B34, B32

Paintbrushes: N4, N0, E27, E23, BG13, BG11, BG10, B34, B41

Grass: G17, G14, G07

Sky: B02, B01, B00, B000

Hope you like it and have a fantastic week!

You can find lots of inspiration from the Design Team Divas at the High Hopes blog, and the High Hopes Rubber Stamps Facebook Fan page plus you can also follow us on
Instagram, Twitter and Pinterest.


Wishing You the Sweetest Things!


Welcome Back Dreamerland Craft Fans!

Today, I’m sharing Dreamerland Craft Stamps Coordinating Die & Clear Stamp Package (D172906) for Character Stamp D172006 Love The Music From My Guitar and Love The Music From My Guitar – D172006! This little boy loves his guitar and all of the animals love his music.

To make his card, I stamped all of the images using my MISTI, Memento – Tuxedo Black ink and Copic Marker X-Press It Blending Card. I coloured in all of the images using Copic markers and then used my Cuttlebug and all of the die cuts from Coordinating Die & Clear Stamp Package (D172906) for Character Stamp D172006 Love The Music From My Guitar (Dreamerland Crafts Clear Stamps). I also die cut the sentiment at the same time and stamped it with Versa Fine – Onyx Black and then heat embossed it using Marvy Uchida – Embossing Heat Tool and Ranger – Clear Super Fine Detail embossing powder..

I was now ready to do the background. To achieve this I cut several die cuts using Monte Mart A4 Watercolour Book paper, Lawn Cuts – Simple Stitched Hillside Borders – Lawn Fawn and Your Next Stamp – Stitched Rectangle Die Set (YNSD214).

For the sky I used several Tim Holtz Blue inks in various shades listed below using a stencil that I had created from Avery Elle – Custom Steel Dies – Made in the USA – D-05-01 PiercedCloudsDie. For the grass I used various shades of Tim Holtz green inks – (see below).

I ran all of the die cuts and the back 2 layers of grass through Xyron Creative Station. Then I set them all aside.

I was now ready to assemble my card. I layered the first 2 die cuts onto the main die cut and then popped up the bottom grass cut with 3M VHB – 2 sided tape. I then added on the characters that I made stickers out of for easy assembly. I popped up the upper half of the little dog with 3M VHB – 2 sided tape. Once the scene was completed I mounted it onto 5.25″ x 4.25″ white cardstock.

Card Recipe:

Stamps and Sentiment: Coordinating Die & Clear Stamp Package (D172906) for Character Stamp D172006 Love The Music From My Guitar (Dreamerland Crafts Clear Stamps), Love The Music From My Guitar – D172006 (Dreamerland Crafts)

Inks: Memento – Tuxedo Black, Versa Fine – Onyx Black

Clouds: Tim Holtz Distress Ink – Blueprint Sketch, Tim Holtz Distress Ink – Salty Ocean, Tim Holtz Distress Inks – Broken China

Grass: Tim Holtz Distress Ink – Mowed Lawn, Tim Holtz Distress Ink – Bundled Sage, Tim Holtz Distress Ink – Twisted Citron, Tim Holtz Distress Inks – Peeled Paint

Embossing Powder: Ranger – Clear Super Fine Detail embossing powder

Paper: Copic Marker X-Press It Blending Card, Mont Mart A4 Watercolour Book paper – Acid Free – 190 GSM, Recollections – White Cardstock

Die Cuts:  Your Next Stamp – Stitched Rectangle Die Set (YNSD214), Coordinating Die & Clear Stamp Package (D172906) for Character Stamp D172006 Love The Music From My Guitar (Dreamerland Crafts Clear Stamps), Avery Elle – Custom Steel Dies – Made in the USA – D-05-01 PiercedCloudsDie

Tools: MISTI – Most Incredible Stamping Tool, Cuttlebug, 3M VHB – 2 sided tape, Marvy Uchida – Embossing Heat Tool

Image coloured with Copic Markers:

Skin: E000, E00, E04, E11, E21, R22, R20

Hair: E47, E44, E43

Shirt: BG49, BG45, BG34

Pants: B26, B23, B21

Guitar: E99, E97, E93, E51, E35, E33, E31, YR27

Bird: B04, B02, B00, Y38

Dog: E35, E34, E33, E31

Rabbit: C7, C5, C3, R30, R02

Cat: W9, W7, W5

Pig: E93,E04, R20, R00, R000, E44, E04

Background: B04, B02, B00

Hope you like it and have a great week!

You can find more cards to inspire you at Dreamerland Crafts on the Facebook Fan page from the rest of our design team.