Today I’m sharing Basketball Player (KLM Digital Designs) image from the September release. When creating this card, I thought of my younger brother who used to eat, sleep and dream about basketball all the time when he was young. You barely ever saw him without a basketball in his hand. He was always on the basketball court, shooting hoops or playing games. He actually excelled in a lot of sports and won the trophy for all around athlete in High School. Of course, that was many, many, many years ago. LOL!
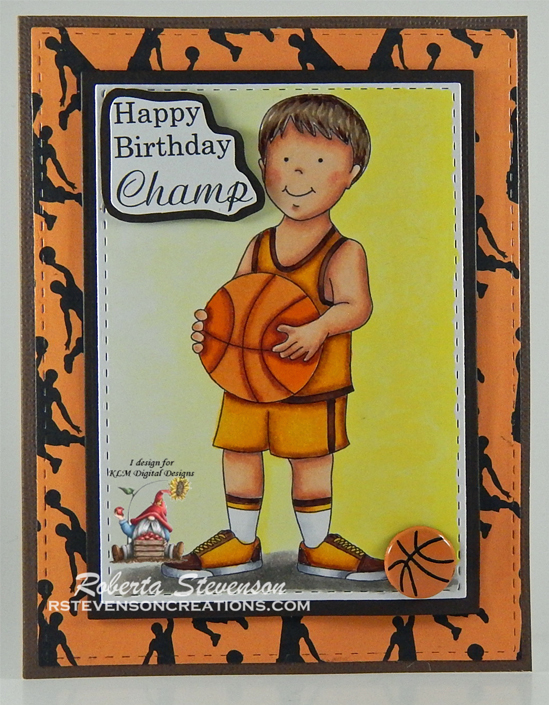
I printed out the main image onto Copic Marker X-Press It Blending Card using my HP Printer. The image was then die cut with my Cuttlebug and My Creative Time – Rectangle Frame Dies Layers and then coloured in with Copic markers. For the sentiment, I brought the original digital image into Microsoft Word and then used the developer tools to crop it so that it went into 3 lines to fit my image better. Then I printed it out and fussy cut around it. The sentiment was then layered onto some chocolate brown cardstock and fussy cut again.
For the basketball background paper, I downloaded from the site listed below and then printed it out on my printer. I die cut it with My Creative Time – Rectangle Frame Dies then glued directly onto the The Paper Studio – Primary Base Colours 5.5″ x 4.25″ cardstock base. The main image was adhered directly to the chocolate brown cardstock. I added a small basketball brad and then popped up the entire image onto the background using 3M VHB – 2 sided tape. The sentiment was also popped up.
Card Recipe:
Stamp and Sentiment: Basketball Player (KLM Digital Designs)
Inks: HP Printer Grayscale
Paper: Copic Marker X-Press It Blending Card, http://www.printablepapertreats.com/slam-dunk-silhouette-digital-papers, The Paper Studio – Primary Base Colours
Die Cuts: My Creative Time – Rectangle Frame Dies, My Creative Time – Rectangle Frame Layers
Tools: 3M VHB – 2 sided tape, Cuttlebug
Image coloured with Copic Markers:
Skin: E000, E00, E04, E11, E21, R22, R20
Hair: E47, E44, E43
Clothing and Shoes: E29, E27, E25, E23, E15, YR24, Y35, Y115
Basketball: E08, YR18, YR16, YR12
Shadow: W5, W3, W1
Background around boy: Y04, Y02, Y00, Y000
Hope you like it and have a great week!
You can find more cards to inspire you at KLM Designs, KLM Digital Design Team and KLM Digital Designs on the Facebook Fan page from the rest of our design team.