Tag Archive | Memento – Tuxedo Black

Little Nutty Buddy


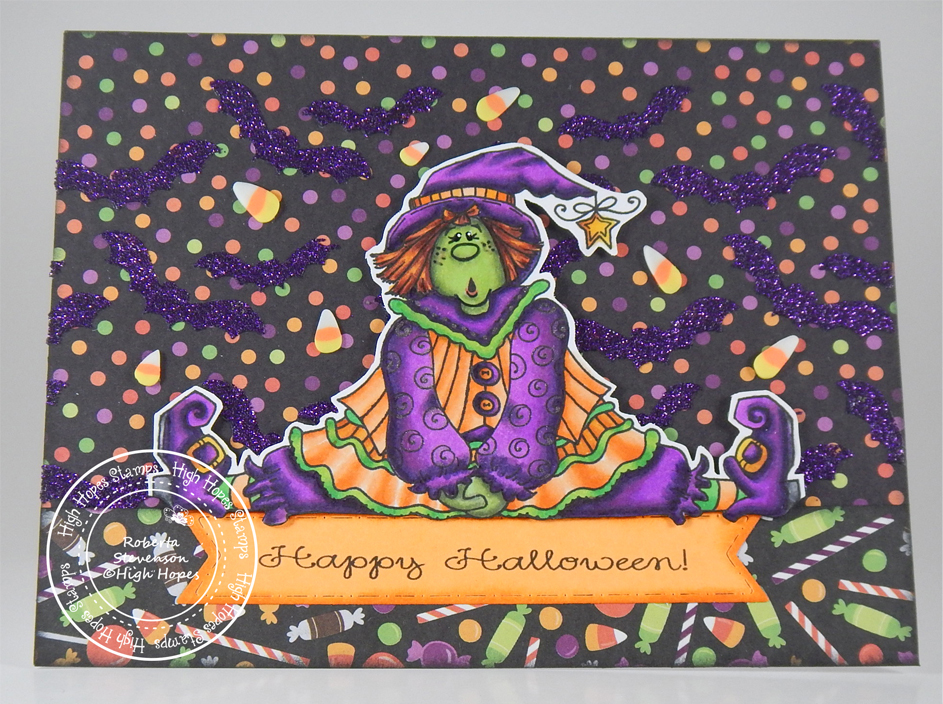
It’s Wednesday, and this week I’m sharing a card featuring Little Nutty Buddy – M150 from (High Hopes Rubber Stamps) with the sweet sentiment Happy Fall Y’all – G086 (High Hopes Rubber Stamps). My husband and I went on a wonderful nature walk this past weekend through the forest to see to falls. It was very beautiful seeing the fall colours and the little squirrels running around gathering acorns for their winter supply of food, just like little Nutty Buddy.

To create the card this week, I began with base card 5.25″ x 4.25″ from The Paper Studio – Primary Base Colours. I inked around all of the edges with Tim Holtz Distress Inks – Ground Espresso. The scalloped circles were die cut using my Cuttlebug and Spellbinders Nestabilities – Petite Scalloped Circles – Large. For the larger circle – AC Cardstock – Autumn was used and then inked around with the same ink used on the base card. The background acorn paper was die cut using My Creative Time – Rectangle Frame Dies. Both of the background papers are from Your Next Stamp – Fabulous Fall collection. I inked around the patterned die cuts with Tim Holtz Distress Ink – Spiced Marmalade.

The sentiment was stamped with Memento – Tuxedo Black ink and then Nellie Snellin Die – MFD 007 was used to cut it out. I then cut the border part of the die cut off and just left the oval centre. This was inked with Tim Holtz Distress Ink – Spiced Marmalade. 2 Kraftin’ Kimmie – Holiday Dots were added on both sides.

I stamped the main image onto Copic Marker X-Press It Blending Card using my MISTI and Memento – Tuxedo Black ink. It was coloured in with Copic Markers. Then I put it through my Brother Scan and Cut to create the thin white border around the image.

To assemble the card, I attached the main background and large scalloped circle directly to the base using 2-sided tape. The sentiment, smaller scalloped circle and image were popped up with 3M VHB – 2 sided tape.

Card Recipe:

Stamp: Little Nutty Buddy – M150 (High Hopes Rubber Stamps)

Sentiment: Happy Fall Y’all – G086 (High Hopes Rubber Stamps)

Inks: Memento – Tuxedo Black, Tim Holtz Distress Ink – Spiced Marmalade, Tim Holtz Distress Inks – Ground Espresso

Paper: Copic Marker X-Press It Blending Card, The Paper Studio – Primary Base Colours, AC Cardstock – Autumn, Your Next Stamp – Fabulous Fall – 6″ x 6″

Die Cuts: My Creative Time – Rectangle Frame Dies, Nellie Snellin Die – MFD 007, Spellbinders Nestabilities – Petite Scalloped Circles – Large

Tools and Miscellaneous: MISTI – Most Incredible Stamping Tool, Cuttlebug, Kraftin’ Kimmie – Holiday Dots, Brother Scan and Cut

Image coloured with Copic Markers:

Squirrel: E99, E97, E55, E53, E51, E11, E08, YR18, YR15, R22, R02, 100

Acorns: E15, YR27, YR24, YR15, Y19, E55, E53, E51, E27, E25, E23

Hope you like it and have a fantastic week!

You can find lots of inspiration from the Design Team Divas at the High Hopes blog, and the High Hopes Rubber Stamps Facebook Fan page plus you can also follow us on
Instagram, Twitter and Pinterest.

Reading Away The Afternoon!


Today, I’m featuring a CAS card I made using Reading Away The Afternoon – D19043  from Dreamerland Crafts.  These 2 little friends are enjoying a wonderful day just relaxing and sharing time together! There’s nothing like holding a real book in your hands. I know that today there a lot of e-books, but I’m old fashioned and still love to sit back and relax and hold onto a real book. How about yourself? Do you prefer a real book or e-books?

To make this card I used a white base card from “Studio g” of 5″ x 5″. The sentiment was stamped directly to the base using my MISTI, Versa Fine – Onyx Black and Kraftin’ Kimmie – Reading Lexi stamp. The sentiment was then embossed with Ranger – Clear Super Fine Detail embossing powder and Marvy Uchida – Embossing Heat Tool was used to heat set the embossing powder.

The background and image were die cut using my Cuttlebug and Essentials by Tattered Lace Dies – Easel Slider dies. I adhered the larger die cut directly to the base using double-sided tape.

I stamped the image onto the smaller die-cut and then stamped it again on some Post-it note to create a mask. Tim Holtz Distress Ink – Salty Ocean was used along with stencils I created from Avery Elle – Pierced Cloud Die. Then the grass was added in. To create texture on the grass, I used some rubbing alcohol and a piece of old rag with some ridges on it.

Once the background was completed, I coloured in the main image with Copic markers. The grass had also been coloured in with the same markers. The image was then popped up onto the base using 3M VHB – 2 sided tape.

Card Recipe:

Stamp:  Reading Away the Afternoon – D19043 (Dreamerland Crafts)

Sentiment: Kraftin’ Kimmie – Reading Lexi

Inks: Memento – Tuxedo Black, Tim Holtz Distress Ink – Salty Ocean, Versa Fine – Onyx Black

Paper: Copic Marker X-Press It Blending Card, Studio g – AC0225, Green Cardstock

Die Cuts: Avery Elle – Custom Steel Dies – Made in the USA – D-05-01 PiercedCloudsDie, Essentials by Tattered Lace Dies – Easel Slider

Embossing Powder:  Ranger – Clear Super Fine Detail embossing powder

Tools: MISTI – Most Incredible Stamping Tool, Cuttlebug, Marvy Uchida – Embossing Heat Tool, 3M VHB – 2 sided tape

Image coloured with Copic Markers:

Face: E21, E11, E04, E00, E000

Hair: E47, E44, E43

Shirt:  YG97, YG95, G24, E23

Pants: B26, B24, B21

Boots: E27, E25, E23, E21

Rabbit: N0, R30, Colorless  Blender

Books: BG15, BG13, BG11, R08, R05, R02, BG02, BG01, BG00, C2, C1, C0

Tree: E57, E55, E37, E35, E34, E25, E23

Grass: YG17, YG13, YG03, YG01

Sky: Tim Holtz Distress Ink – Salty Ocean, Avery Elle – Custom Steel Dies – Made in the USA – D-05-01 PiercedCloudsDie

Hope you like it and have a great week!

You can find more cards to inspire you at Dreamerland Crafts and Pointer Scrapbooking on the Facebook Fan pages from the rest of our design team.

Happy Thanksgiving!!


Sharing a card I made today using It’s Turkey Day (Kraftin’ Kimmie Stamps)! I just love these adorable characters and especially the turkey!!! Who couldn’t love this little guy. LOL! Today is Thanksgiving Day in Canada! Happy Thanksgiving everyone! Hope you all enjoy a safe and wonderful holiday.

To make this card, I started with a white card base of 5.5″ x 4.25″. I cut Copic Marker X-Press It Blending Card to the same size and then used my MISTI and Memento – Tuxedo Black Ink to stamp all of the images. The images were all coloured in with Copic markers.

The sentiment was first stamped with Kraftin’ Kimmie – Mossy Meadows Ink using my MISTI and then again with VersaMark ink. I added some Ranger – Clear Super Fine Detail embossing powder and heat embossed the powder with Marvy Uchida – Embossing Heat Tool. I added a border to the top and bottom of the card using PhotoPlay – Mad 4 Plaid Fall paper, cut at 5.5″ x .5″ each. I adhered the finished image to the base using double-sided tape. To finish off the card, I added in Kraftin’ Kimmie – Pastel Dots.

Card Recipe:

Stamp and Sentiment: It’s Turkey Day (Kraftin’ Kimmie Stamps)

Inks: Memento – Tuxedo Black, Kraftin’ Kimmie – Mossy Meadows Ink, VersaMark ink

Embossing Powder: Ranger – Clear Super Fine Detail embossing powder

Paper: Copic Marker X-Press It Blending Card, PhotoPlay – Mad 4 Plaid Fall paper 6″ x 6″

Tools: MISTI – Most Incredible Stamping Tool, Kraftin’ Kimmie – Pastel Dots, Marvy Uchida – Embossing Heat Tool

Image coloured with Copic Markers:

Skin: E53, E51, E50, R20

Hair: E47, E44, E43

Lady: E08, YR18, YR14, YR12, B04, B02, B00, C9, C7, C5, E87, E84, E81

Man and Hat:E87, E84, E81, E43, E42, E41, E15, C9, C7, C5, Y35, Y19, Y08, G05, G03, G00

Turkey: R59, R29, YR16, YR14, YR12, Y38, Y35, Y32, Y15, R02, R000, E25, E23, E21

Pumpkin: E08, YR18, YR14, YR12, E87, E84, E81

Ground: E29, E25, E23, E21

Hope you like it and have a great week!

Happy Fall Y’All


It’s Wednesday, and this week I’m sharing a card featuring Fall Joy – T041 from (High Hopes Rubber Stamps) with the sweet sentiment Happy Fall Y’All – G290 (High Hopes Rubber Stamps). These racoons are having a blast playing in the leaves. We used to do that too when we were little. So much fun. I love seeing all of the beautiful fall colours. Such a wonderful time of the year.


To create the card this week, I stamped the main image and then coloured it in with Copic Markers. Using My Creative Time – Rectangle Frame Dies, My Creative Time – Rectangle Frame Layer Dies and my Cutttlebug, I die cut the main image and the background layers.

For the base card 5.25″ x 4.25″, I used The Paper Studio – Primary Base Colours. The backing behind the main images is from AC Cardstock – Autumn. I attached the main image to this piece using double-sided tape. The plaid paper is from PhotoPlay – Gnome for the Holidays Thanksgiving. Once this background paper was die-cut, all of the edges were inked with Tim Holtz Distress Ink – Carved Pumpkin. This was then applied directly to the base with double-sided tape.

To complete the assembly, I added 3M VHB – 2 sided tape on the back of the first layers and popped them up onto the bottom 2 layers. The sentiment was stamped with Memento – Tuxedo Black in and I fussy cut around it. I ran this through my Xyron Create a Sticker and then layered it onto some Orange cardstock. Then I fussy cut around it again and ran it through my Xyron as well. Then I inked around the edges with the same Tim Holtz ink I used earlier. I placed it over the main image and used 2 very small pieces of 3M VHB – 2 sided tape where it went over the edges of the main image.

Card Recipe:

Stamp: Fall Joy – T041 (High Hopes Rubber Stamps)

Sentiment: Happy Fall Y’All – G290 (High Hopes Rubber Stamps)

Inks: Memento – Tuxedo Black, Tim Holtz Distress Ink – Carved Pumpkin

Paper: Copic Marker X-Press It Blending Card, The Paper Studio – Primary Base Colours, AC Cardstock – Autumn, PhotoPlay – Gnome for the Holidays Thanksgiving

Die Cuts: My Creative Time – Rectangle Frame Layers, My Creative Time – Rectangle Frame Dies

Tools and Miscellaneous: MISTI – Most Incredible Stamping Tool, Cuttlebug, Xyron Create a Sticker

Image coloured with Copic Markers:

Racoons: E49, E44, E31, W8, W6, W4, W2, W0, R02, PrismaColor Premiere Pencils – Black (PC935), 90% Gray (PC1076), 70% Gray (PC1056),  30% Gray (PC1052), Chocolate (PC1082)

Trees: E49, E37, E25, E23

Leaves: YG93, YG61, YG25, YG06, YG03, R14, R08, R05, R02, YR68, YR15, YR14, YR12, Y19, Y08

Hope you like it and have a fantastic week!

You can find lots of inspiration from the Design Team Divas at the High Hopes blog, and the High Hopes Rubber Stamps Facebook Fan page plus you can also follow us on
Instagram, Twitter and Pinterest.

Sending Warm Hugs


Sharing a card I made today for a challenge using Super Cool Pals  from Kraftin’ Kimmie Stamps. I really love anything Christmas and winter related and who couldn’t resist this adorable snowman and little fox?

To make my card, I started out by stamping the image using my MISTI and Memento Tuxedo Black ink onto Copic Marker X-Press It Blending Card. I coloured the image with Copic markers and then fussy cut around it. I die cut the background paper using My Creative Time – Rectangle Frame Dies. It’s from Stampin Up’, but I received it in a Mystery Box, so I’m not sure what paper pack it comes from. Then I tore up some Recollections – Christmas Inkjet Printable Glitter Paper and taped it to the bottom of the panel.

The snowflake was die cut using Hot Buy Craft Smart – Holiday Glitz Glitter Paper 12″ x 12″ and Tim Holtz – Sizzix Thinlets – Paper Snow Flakes. I ran the paper and my finished coloured image through my Xyron Creative Station and also the Holiday Glitz paper was put through it as well before I die cut it. This allowed me to make stickers out of both items. For the sentiment, I used my MISTI, Versa Fine – Onyx Black and then embossed it with Ranger – Clear Super Fine Detail embossing powder. This was then heat embossed with my Marvy Uchida – Embossing Heat Tool. Once this was done, I die-cut the sentiment with Lifestyle Crafts Cutting Dies – Nesting Circles and edged all around it with Kraftin’ Kimmie – Lovely Lagoon Ink. I also edged all around the snowy background with the same ink.

For the assembly, I started out using the base from Recollections -Christmas Cards and Envelopes set at 5.5″ x 4.25″. Using double-sided tape, I  adhered the snowy background to the base. Then I added my main image and snowflake. The sentiment was popped up using some 3M VHB – 2 sided tape and Stickles – Diamond glitter was added to parts of the snow to finish the card off.

Card Recipe:

Stamp and Sentiment: Super Cool Pals (Kraftin’ Kimmie Stamps)

Inks: Memento – Tuxedo Black, Kraftin’ Kimmie – Lovely Lagoon Ink, Versa Fine – Onyx Black

Embossing Powder: Ranger – Clear Super Fine Detail embossing powder

Paper: Copic Marker X-Press It Blending Card, Hot Buy Craft Smart – Holiday Glitz Glitter Paper 12″ x 12″, Recollections – Christmas Cards and Envelopes Set, Recollections – Christmas Inkjet Printable Glitter Paper – 8.5 x 11″

Die Cuts: Tim Holtz – Sizzix Thinlets – 661599 – Paper Snow Flakes, Lifestyle Crafts Cutting Dies – Nesting Circles, My Creative Time – Rectangle Frame Dies

Tools: MISTI – Most Incredible Stamping Tool, Cuttlebug, 3M VHB – 2 sided tape, Marvy Uchida – Embossing Heat Tool, Stickles – Diamond, Xyron Creative Station

Image coloured with Copic Markers:

Fox: E99, E97, E15, E08, C2, C1, C0, R24, R02, R00

Snowman: C0, BV20, B000, R08, YR18, YR16, YR14

Vest: BG49, BG45, BG34, BG32

Hat and Flower: BG49, BG45, BG34, BG32, C10, C8, C6, R39, R37, R35, G07, G05

Scarf: G09, G07, G05, R59, R39, R37, R35

Hope you like it and have a great week!

Dreams Take Flight!!


Today, I’m featuring a card I made using Embrace Your Dream – D19039  from Dreamerland Crafts. My dad always dreamed of flying and he would build all kinds of model airplanes. Then one day he decided to build a real plane with the assistance of his brother and a friend. It took them a long time, but in the end it was a beautiful plane and the best part was that we were all taken for rides in it. It’s an experience we will never forget. So just as my dad followed his dreams, he taught us all to follow our dreams as well. If you dream about something long enough, eventually it will become a reality for you. So never be afraid to follow your dreams.


To make this card I used a white base card of 4.25″ x 5.5″. The background was die cut using My Creative Time – Rectangle Frame Die Layers – MCT-D274 and my Cuttlebug. The paper is from Doodlebug Design Inc. – I Love Travel. Once die cut, the edges were inked around using Tim Holtz Distress Ink – Salty Ocean. I also used this colour to do the clouds in the sky on the image. I adhered the background to the base using glue so that I could move it around to fit better.

The sentiment was stamped using my MISTI, VersaMark ink and Ranger Embossing Powder White – Extra Fine Detail and the stamp from Kraftin’ Kimmie – Sky’s The Limit. The powder was then heat embossed with Marvy Uchida – Embossing Heat Tool. It was die cut using My Creative Time – Sentiment Label Dies.

The image was die cut using My Creative Time – Bunch of Fun Circle Dies from Copic Marker X-Press It Blending Card. The circle behind the main image was die cut with My Creative Time – More Stitched Circles MCT-D136 from black cardstock. I coloured in the entire image with Copic markers and then created a mask. I added in the clouds and used a small piece of old rag and some rubbing alcohol to create some texture in the grass.

To assemble the card, I ran the main image through Xyron Creative Station to make like a sticker and so that it would lay completely flat on the black circle. 3M VHB – 2 sided tape was used to pop up the main image and sentiment to complete the card.

Card Recipe:

Stamp:  Embrace Your Dream – D19039 (Dreamerland Crafts)

Sentiment: Kraftin’ Kimmie – Sky’s The Limit

Inks: Memento – Tuxedo Black, Tim Holtz Distress Ink – Salty Ocean, VersMark

Paper: Copic Marker X-Press It Blending Card, Doodlebug Design Inc. – I Love Travel (6 x 6), Black cardstock White cardstock

Die Cuts: My Creative Time – Bunch of Fun Circle Die, Avery Elle – Custom Steel Dies – Made in the USA – D-05-01 PiercedCloudsDie, My Creative Time – Rectangle Frame Die Layers – MCT-D274, My Creative Time – Sentiment Label Dies – MCT-D139, My Creative Time – More Stitched Circles MCT-D136

Embossing Powder: Ranger Embossing Powder White – Extra Fine Detail

Tools: MISTI – Most Incredible Stamping Tool, Cuttlebug, Marvy Uchida – Embossing Heat Tool, Xyron Creative Station, 3M VHB – 2 sided tape

Image coloured with Copic Markers:

Face: E21, E11, E04, E00, E000

Hair: E47, E44, E43

Jacket:  E37, E35, E34, E33

Pants: E87, E84, E81

Boots: N8, N6, N4, E53, E51, E50

Goggles: E37, E35, E33

Scarf and Helmet: E33, E31, E30

Gloves: E79, E77, E74

Airplane: C5, C3, C1, C0, Y08, Y04

Grass: YG17, YG13, YG03, YG01

Sky: Tim Holtz Distress Ink – Salty Ocean, Avery Elle – Custom Steel Dies – Made in the USA – D-05-01 PiercedCloudsDie

Hope you like it and have a great week!

You can find more cards to inspire you at Dreamerland Crafts and Pointer Scrapbooking on the Facebook Fan pages from the rest of our design team.

Gnome – Merry Christmas!


It’s Wednesday, and this week I’m featuring a Christmas card I made using the image Flying Gnome – TLF008 and sentiment Sm Christmas Script – F051 from (High Hopes Rubber Stamps).  I just love colouring these adorable little gnomes. Also, it’s always good to make Christmas cards a little at a time throughout the year so that you are not rushing to get them all done in December. LOL! Have you started making your Christmas cards yet this year?

To create the card this week, I first used the die cut from Creative Expressions by Sue Wilson – Festive Collection – Pointsettia Mini Background – CED3049 to cut some Copic Marker X-Press It Blending Card using my Cuttlebug. I stamped the main image and then coloured it with Copic Markers. I started off doing the sky first as I didn’t want any of the Reds smearing into it. (This happens sometimes if you are not careful.) Once the image was all coloured in, I used Sakura Glaze – Black and Gelly Roll Sakura #8 Pen to increase the intensity of the eye on the bird. I outlined the entire image with Pigma Micron 03 black marker to make it stand out more against the sky. Lastly, I used a mixture of Gelly Roll Sakura #8 Pen and Gelly Roll Sakura #10 Pen to create the snow and stars in the sky.

For the base of the card, I began with a standard white card base of 4.25″ x 5.5″. I cut another piece of white cardstock the same size and applied the red shimmer topping on it using Crafts – Sparkling Stickers – 02-3068629. I used the same die cut listed above to cut out the intricate design using my Cuttlebug and the gold paper from Hot Buy Craft Smart – Holiday Glitz Glitter Paper. I had put the gold paper through my Xyron Creative Station before I die cut it. This made it easier to just peel and stick onto the base.

For the sentiment, I die cut some spare red cardstock using Craftin Desert Diva’s – Flag Banner Dies. Using my MISTI and VersaMark ink, I stamped the sentiment onto the die cut and embossed it using Ranger Super Fine Gold Embossing powder. This was heated with my Marvy Uchida – Embossing Heat Tool. The image and the sentiment were both popped up with 3M VHB – 2 sided tape to complete the card.

Card Recipe:

Stamp: Flying Gnome – TLF008 (High Hopes Rubber Stamps)

Sentiment: Sm Christmas Script – F051 (High Hopes Rubber Stamps)

Inks: Memento – Tuxedo Black, VersaMark

Paper: Copic Marker X-Press It Blending Card, Hot Buy Craft Smart – Holiday Glitz Glitter Paper 12″ x 12″, Crafts – Sparkling Stickers – 02-3068629

Die Cut: Creative Expressions by Sue Wilson – Festive Collection – Pointsettia Mini Background – CED3049, Craftin Desert Diva’s – Flag Banner Dies (Retired)

Embossing Powder: Ranger Super Fine Gold

Tools and Miscellaneous: MISTI – Most Incredible Stamping Tool, Cuttlebug, Pigma Micron 03 black marker, Xyron Creative Station, Marvy Uchida – Embossing Heat Tool

Image coloured with Copic Markers:

Skin: E21, E11, E04, E00, E000

Beard: W5, W4, W3, W2, W1, W0, W00

Hat and Outfit: R59, R39, R37, R35, YG97, YG95, YG93, G43

Cardinal Bird: R37, R35, R24, R22, R17, R14, R08, R05, R02, R000, YR15, YR12, C3, N10, N8, Gelly Roll Sakura #8 Pen, Sakura Glaze – Black

Leaves and Holly: R59, R37, R24, YG97, YG95, YG93, YG05, G43

Shoe: E34, E33, E31

Sky: B99, B97, B95, B93, Gelly Roll Sakura #8 Pen, Gelly Roll Sakura #10 Pen

Hope you like it and have a fantastic week!

You can find lots of inspiration from the Design Team Divas at the High Hopes blog, and the High Hopes Rubber Stamps Facebook Fan page plus you can also follow us on
Instagram, Twitter and Pinterest.


Birthday Belle!


It’s Wednesday, and this week I’m sharing a CAS card featuring Birthday Belle – T076 from (High Hopes Rubber Stamps) with the sweet sentiment Bummer – H263 (High Hopes Rubber Stamps). Our birthday girl this week isn’t too keen on having another birthday to remind her how old she is, but she is still having fun blowing out all of the candles. LOL! I decided to colour her outfit and cake pink, because I remember how much my grandmother loved that colour.

To create the card this week, I stamped the main image and then coloured it in with Copic Markers. My Creative Time -Stitched Squares Inside and Out die and my Cutttlebug were used to cut out the main coloured image and the hot pink background paper.

For the base card I cut some yellow cardstock 10″ long by 5″ high. It was then scored and folded in half to be 5″ x 5″. All of the edges for the base card and die-cuts were then inked around using the various Tim Holtz Distress inks listed below. I mounted the hot pink cardstock directly to the base using double-sided tape. Then the main image was popped up with 3M VHB – 2 sided tape. Finally, to finish it off, I used some crafty dots by Crafts.

Card Recipe:

Stamp: Birthday Belle – T076 (High Hopes Rubber Stamps)

Sentiment: Bummer – H263 (High Hopes Rubber Stamps)

Inks: Memento – Tuxedo Black, Tim Holtz Distress Ink – Picked Raspberry, Tim Holtz Distress Ink – Fossilized Amber, Tim Holtz Distress Ink – Evergreen Bough

Paper: Copic Marker X-Press It Blending Card, Hot Pink Cardstock, Yellow Cardstock

Die Cuts: My Creative Time -Stitched Squares Inside and Out

Tools and Miscellaneous: MISTI – Most Incredible Stamping Tool, Cuttlebug, Crafts Stickers – 02-3010802

Image coloured with Copic Markers:

Skin,Lips and Eyeshadow: E21, E11, E04, E00, E000, R22, R20, YG09, YG06, YG03

Hair: N5, N3, N1

Blouse and Cake Icing and Earring Pinks: RV09, RV06, RV04, RV02, RV00, RV000

Cake Flowers, Leaves and Trim : G17, G14, G07, Y38, Y19, Y18, Y04, BG32, BG13, BG10

Balloons: BG34, BG18, BG15, BG10, RV09, RV06, RV04, RV00, Y38, Y19, Y04, Y00

Candles: BG34, BG13, BG10, YR14, Y19, Y04, Y00

Hat: RV09, RV06, RV02, BG34, BG10

Hope you like it and have a fantastic week!

You can find lots of inspiration from the Design Team Divas at the High Hopes blog, and the High Hopes Rubber Stamps Facebook Fan page plus you can also follow us on
Instagram, Twitter and Pinterest.


Witchy Poo’s Happy Hallowe’en!!!


It’s Wednesday, and Sitting Witchy Poo from (High Hopes Rubber Stamps) is back again to celebrate a Happy Hallowe’en and wondering what to do with all her candy.  My husband and I just LOVE Hallowe’en! We try to decorate our yard every year for the little ghosts and goblins who come to visit and we give out lots and lots of candy. Our front lawn gets turned into a grave yard for a day with spooky black cats, crows, skeletons, and more. On the porch we put out all of the animated little toys and of course the talking skeletons playing poker at the Bistro table. LOL! The children just love it and so do the parents! LOL!

To create the card this week, I stamped the main image and then coloured it with Copic Markers listed below. I fussy cut around Witchy Poo leaving just a little bit of white around the top of her body, but going directly to the line for the bottom of her. Flag Banner Dies from Craftin’ Desert Diva’s (restired) were used for the die cut and then the sentiment was stamped onto it. Tim Holtz Distress Ink – Carved Pumpkin was applied around the edges to create a frame around the orange cardstock.

To create the background, Pebbles – Boo! paper was used. I wanted to add something a little extra so I pulled out my Kraftin’ Kimmie – Bats and Moons Stencil and applied Nuvo Glimmer Paste – Amethyst Purple! I just love the way it turned out. The bottom piece of cardstock was cut at 1″ x 5.5″. Tim Holtz Distress Ink – Black Soot was used to go around all of the edges of the top and bottom piece.

Once everything was dry my card was ready to be assembled. I began with a standard white card base of 4.25″ x 5.5″. I mounted the coloured circles and bats cut at the same size directly on top of the base with 2-sided tape. I did the same with the candy on the very bottom. The image and the sentiment were both popped up with 3M VHB – 2 sided tape. Finally, to cover some of my paste boo-boos, I added in some candy corn from Dress My Craft – Dessert Mix.

Card Recipe:

Stamp: Sitting Witchy Poo – S151 (High Hopes Rubber Stamps)

Sentiment: Happy Halloween – H232 (High Hopes Rubber Stamps)

Inks: Memento – Tuxedo Black, Tim Holtz Distress Ink – Carved Pumpkin, Tim Holtz Distress Ink – Black Soot

Paper: Copic Marker X-Press It Blending Card, Pebbles – Boo! (6×6 in / 15.2×15.2 cm), Orange cardstock, White Cardstock

Die Cut: Craftin Desert Diva’s – Flag Banner Dies (Retired)

Stencil: Kraftin’ Kimmie – Bats and Moons

Tools and Miscellaneous: MISTI – Most Incredible Stamping Tool, Cuttlebug, Nuvo Glimmer Paste – Amethyst Purple, Dress My Craft – Dessert Mix

Image coloured with Copic Markers:

Skin: BG96, BG93, BG90, YG23, G40

Hair: E18, E08, YR18, YR14

Hat, Blouse, Pantaloons: V17, V09, V06, V04

Vest, Dress and Hat Band: YR68, YR65, YR18, YR15, YR12, YR00

Socks: YR18, YR15, YR12, YG09, YG07

Shoes: V17, V09, V06, V04, N6, N4, N2, E15, Y38, Y35, Y15

Star: E15, Y38, Y35, Y15

Hope you like it and have a spooktacular week!

You can find lots of inspiration from the Design Team Divas at the High Hopes blog, and the High Hopes Rubber Stamps Facebook Fan page plus you can also follow us on
Instagram, Twitter and Pinterest.


Happy Trick or Treating!


It’s Wednesday, and today I’m sharing a CAS card using Witchy Poo with Kitty Frame – P120 (High Hopes Rubber Stamps) for the main image and Trick or Treat Greeting – H231 (High Hopes Rubber Stamps) for the sentiment. Witchy Poo and Kitty are looking out to see all of the wonderful little trick or treaters coming to visit them for their treats! What are you dressing up as this year?

To make the card, I started with a 5.5″ x 4.25″ cards base. My Mind’s Eye – Dolled Up – 6″ x 6″ was cut to the same size and adhered to the base card with double-sided tape. Tim Holtz Distress Ink – Walnut Stain ink was used to edge across the bottom of the card. The image was stamped and then coloured in with Copic Markers. I used my Brother Scan and Cut to cut around the image and then used a black marker to go around all of the edges.

The sentiment was stamped and then die cut with Essentials by Tattered Lace Dies – Easel Slider. Tim Holtz Distress Ink – Carved Pumpkin and a black marker were used to ink all of the 4 sides of the sentiment.

The coloured image and sentiment were popped up onto the card using 3M VHB – 2 sided tape and some stickers were add for embellishments.

Card Recipe:

Stamp: Witchy Poo with Kitty Frame – P120 (High Hopes Rubber Stamps)

Sentiment: Trick or Treat Greeting – H231 (High Hopes Rubber Stamps)

Inks: Memento – Tuxedo Black, Tim Holtz Distress Ink – Carved Pumpkin, Tim Holtz Distress Ink – Walnut Stain

Paper: Copic Marker X-Press It Blending Card, My Mind’s Eye – Dolled Up – 6″ x 6″, Orange Cardstock

Die Cut: Essentials by Tattered Lace Dies – Easel Slider

Tools: MISTI – Most Incredible Stamping Tool, Cuttlebug, Hallowe’en Stickers – HCM0001F, HCM0001C, HCM0001A, Brother Scan and Cut

Image coloured with Copic Markers:

Skin: BG96, BG93, BG90, YG23, G40, R22, R20

Hair: E18, E08, YR18, YR14

Hat and Dress: V25, V17, V15, V09, V06, V04, YR68, YR65, YR18, YR15, YR12, YR00, Gelly Roll Sparkle Pen for Swirls

Cat: C9, C7, C5, C3, YG09, YG07, YG03, Y02, R22, R02, R00

Moon and Stars: V17, V15, V09, V06, V04

Window Background: E15, Y38, Y35, Y15, Y06

Window Frame: E29, E25, E23

Hope you like it and have a spooktacular week!

You can find lots of inspiration from the Design Team Divas at the High Hopes blog, and the High Hopes Rubber Stamps Facebook Fan page plus you can also follow us on
Instagram, Twitter and Pinterest.


Friends Together


Welcome Back Dreamerland Craft Fans!

Today, I’m sharing an inspirational card that I made using Mix and Match Clear Stamps – DCS 19096 to create the little scenes and also for the sentiment. I wanted to show a variety of scenes that you could make with this cute set and so for the first time for me ever, I created this little flip card.

Panel 1 – Bears hugging in the rain.

Panel 2: The rain has stopped and there is a beautiful rainbow for the little couple.

Panel 3 – The sun has come out and is now beaming.

Panel 4: I just love this adorable sentiment and it finishes off the little story of the 2 little bears hugging each other through all of the different types of weather.

Here is the flip card in action.


To make this card I used a base card of 4.25″ x 5.5″. DCWV – Pocket Blossom was cut to the same size and using double-sided tape was attached to the base card. Then, Tim Holtz Distress Ink – Salty Ocean was used to ink around all of the edges. I die cut X-Press It Blending Card using my Cuttlebug and dies from Lawn Fawn – Flippin’ Awesome. I used the largest square of the die set in order to have more room to create the scenes. The larger square was die cut using Recollection – White paper using My Creative Time – Rectangle Frame Dies. The die-cut for the mechanism of the Flip Card was also from Lawn Fawn – Flippin’ Awesome. So easy to use. I love this die set.

I created a mask of the bears so that I could add in the different elements on each panel. All of the images were coloured in with Copic Markers. For the rain, Memento – Bahama Blue ink was used. For the sunbeams, Kraftin’ Kimmie – Summer Sunshine, Kraftin’ Kimmie – Yummy Yellow and Kraftin’ Kimmie – Starburst Stencil were used.

Versa Fine – Onyx Black ink was used to stamp the sentiment and then Ranger – Clear Super Fine Detail embossing powder was applied. Marvy Uchida – Embossing Heat Tool was used to heat up the embossing powder.

Once all of the panels were completed, I die cut the sparkly blue paper using Lawn Fawn – Flippin’ Awesome – Add-On dies. The flipping mechanism was then attached to the sparkling blue paper. This was then attached directly to the base of the card.

Card Recipe:

Stamps and Sentiments:  Mix and Match Clear Stamps – DCS 19096 (Dreamerland Crafts)

Inks: Memento – Tuxedo Black, Versa Fine – Onyx Black, Kraftin’ Kimmie – Summer Sunshine, Kraftin’ Kimmie – Yummy Yellow, Memento – Bahama Blue, Tim Holtz Distress Ink – Salty Ocean

Paper: Copic Marker X-Press It Blending Card, DCWV – Pocket Blossom –  12″X12″ (30.5cmx30.5cm), Craft Thick Glitter Paper – 02-3022270

Die Cuts: My Creative Time – Rectangle Frame Dies, Lawn Fawn – Flippin’ Awesome, Lawn Fawn – Flippin’ Awesome – Add-On

Stencil: Kraftin’ Kimmie – Starburst Stencil

Tools: MISTI – Most Incredible Stamping Tool, Cuttlebug, Marvy Uchida – Embossing Heat Tool

Image coloured with Copic Markers:

Bears: E55, E53, E51, E35, E34, E33, E31, E29, E27, E25, E23, R20, R02, R00

Sky:  B01, B00, B000, B000

Hearts and Umbrella: R39, R37, R24, Pental Sunburst Metalic Med Gel Pen

Rainbow: V17, V15, V20, YR18, YR16, YR15, Y15, Y08, Y04

Clouds: B60, C0, Colorless Blender

Flowers: Y38, Y35, E15

Hope you like it and have a great week!

You can find more cards to inspire you at Dreamerland Crafts and Pointer Scrapbooking on the Facebook Fan pages from the rest of our design team.

Birthday Message For You!


Welcome Back Dreamerland Craft Fans!

Today, I’m sharing a birthday card that I made using a combination of Dreamerland Crafts stamps.  A Special Message For You – D16001 was used for the boy image and sentiment, Mailbox & Wall – Mix & Match Collection – M18301 and  Window & Gate – Mix & Match Collection – M18302 were used to create the background. I just love how these stamps came together to help me to create this scene.


To make this card I used a base card of 6″ x 6″. I die cut X-Press It Blending Card using my Cuttlebug and dies from Creative Expression Craft Dies by Sue Wilson – Noble Dies – Double Pierced Squares – Set B. I used the square die that was about 5.75″ x 5.75″.

Next, I created a mask of each of the stamps I was going to use to create the scene. The boy was stamped first and then I placed the mask over top of him. Next was the gate, then the brick wall and the foliage.  I added the masks after stamping each piece. Lastly, I stamped the 2 windows. All masking was removed at this point.

To create the main building brick wall, I used Kraftin’ Kimmie Stencil – Brick Wall. Using my magentic mat, small magnets were used to hold the stencil down over the image. Then Copic markers were used to create the texture of the brick. Once all of the brick was done, C4 and C2 were used to fill in the spaces in between. I drew in the sidewalk using a combination of C0 – C5 markers.

After all of the main colouring was done, Tim Holtz Distress Ink – Blueprint Sketch was used to stamp the sentiment. Then, because I was using my MISTI, it was easy to then re-ink the sentiment with Versamark ink and then emboss it with Ranger – Clear Super Fine Detail embossing powder. Marvy Uchida – Embossing Heat Tool was used to heat up the embossing powder.

Card Recipe:

Stamps:  A Special Message For You – D16001 (Dreamerland Crafts), Mailbox & Wall – Mix & Match Collection – M18301 (Dreamerland Crafts), Window & Gate – Mix & Match Collection – M18302 (Dreamerland Crafts)

Sentiment: A Special Message For You – D16001 (Dreamerland Crafts)

Inks: Memento – Tuxedo Black, Tim Holtz Distress Ink – Blueprint Sketch, Versamark

Embossing Powder: Ranger – Clear Super Fine Detail embossing powder

Paper: Copic Marker X-Press It Blending Card

Die Cuts: Creative Expression Craft Dies by Sue Wilson – Noble Dies – Double Pierced Squares – Set B

Stencil: Kraftin’ Kimmie – Brick Wall Stencil

Tools: MISTI – Most Incredible Stamping Tool, Cuttlebug, Marvy Uchida – Embossing Heat Tool

Image coloured with Copic Markers:

Skin: E000, E00, E04, E11, E21, R22, R20

Hair:  E47, E44, E43

Shirt: YG97, YG95, G21

Pants: B26, B23, B21

Boot: E29, E27, E25, E23, E21

Main Building Brick Wall: E37, E35, E08, E04, C4, C2, Kraftin’ Kimmie – Brick Wall Stencil

Lower Brick Wall: E53, E51, E44, E43, E34, E31, E30, BV23, BV20

Gate: E39, E37, E34, E31

Foliage and Flowers: YG17, YG13, YG03, YG01, G07, V17, V15

Window and Ledgings: E44, E43, E31, E30, E27, E25, E23, E21, E42, E41, E40

Sidewalk: C4, C3, C2, C1, C0

Hope you like it and have a great week!

You can find more cards to inspire you at Dreamerland Crafts and Pointer Scrapbooking on the Facebook Fan pages from the rest of our design team.

Missed Your Birthday!! Tusk! Tusk!


I was late sending out a friends card recently, so today I’m sharing a card I made using (Kraftin’ Kimmie Stamps) Long in the Tooth!, Turtle-y Awesome! and Oceans of Love. For the background, I used Kraftin’ Kimmie Stencils Krafty Scenery 3 and Basics Stencil. I just love these little images and thought this cute sentiment was perfect for a belated birthday.

To create this card, I cut Hammermill – Premium Colour 100 lb. paper at 5.5″ x 4.25″. I created the background clouds using Tim Holtz Distress Ink – Salty Ocean and Kraftin’ Kimmie – Basics Stencil. The ocean and waves were created using Kraftin’ Kimmie – Krafty Scenery 3 and Krafty Kolours – Lovely Lagoon and Tim Holtz Distress Ink – Salty Ocean. The white caps were created using Copic Opaque White. The sun was also created using the same stencil using Krafty Kolours – Summer Sunshine. The sand was created using a mixture of the 2 stencils and Krafty Kolours – Sandy Shores. The images were coloured with Copic markers and then I used my Brother Scan and Cut to die cut them out. I went around each one of the images with a black marker and then ran them through my Xyron’s and placed them onto the background. I used some pop-dots to adhere the seashells to the card.

Card Recipe:

Stamps: Long in the Tooth! (Kraftin’ Kimmie Stamps), Turtle-y Awesome! (Kraftin’ Kimmie Stamps), Oceans of Love (Kraftin’ Kimmie Stamps)

Sentiment: Long in the Tooth! (Kraftin’ Kimmie Stamps!

Inks: Memento – Tuxedo Black, Versa Fine – Onyx Black, Krafty Kolours – Sandy Shores, Krafty Kolours – Lovely Lagoon, Krafty Kolours – Summer Sunshine, Tim Holtz Distress Ink – Salty Ocean

Embossing Powder: Ranger – Clear Super Fine Detail embossing powder

Paper: Copic Marker X-Press It Blending Card, Hammermill – Premium Colour 100 lb.

Stencils: Kraftin’ Kimmie – Krafty Scenery 3, Kraftin’ Kimmie – Basics Stencil

Tools: MISTI – Most Incredible Stamping Tool, Brother Scan and Cut, Xyron Create a Sticker, Xyron Creative Station

Image coloured with Copic Markers:

Walrus: E81, E49, E47, E44, E43, E42, E41, E40

Crab: YR18, YR16, YR14

Little Duck and Shovel: Y08, Y04, Y02, R39, R37, R35, B26, B24

Seashell Small: Spectrum Noir Sparkle – Tangerine, Spectrum Noir Sparkle – Cotton Candy

Starfish: Spectrum Noir Sparkle – Tangerine

Tops of Waves and Shore: Copic Opaque White

Hope you like it and have a great week!

Birthday Wishes!!


Welcome Back Dreamerland Craft Fans!

Today, I’m sharing a birthday card that I made using Dreamerland Crafts stamp Together for the Holidays – DS19048 for my main image and Birthday 08 – DS17059 (Dreamerland Crafts) for the sentiment.


To make this card I used a base card of 4.25″ x 5.5″. I die cut X-Press It Blending Card using my Cuttlebug and die cut from Papercraft Inspirations. Then I stamped the image using Memento – Tuxedo Black ink and my MISTI. The original stamp also has snowflakes. I removed them for this card. I coloured in the image with Copic markers and then I used the same die cut to make the frame using Crafts – Sparkling Stickers – 02-3068629. I also used the same paper for my base background colour.

I used Your Next Stamp – Stitched Rectangle Die Set to die cut Echo Park Paper Co. – Happy Birthday Girl paper and then inked around the edges using Tim Holtz Distress Ink – Fossilized Amber. Next, I stamped the sentiment using Versa Fine – Onyx Black ink and my MISTI. I used Ranger – Clear Super Fine Detail embossing powder and then heat embossed the powder with Marvy Uchida – Embossing Heat Tool. Then I adhered this to the base of the card. Lastly, I used 3M VHB – 2 sided tape to pop up the image and added a few pop dots from Kraftin’ Kimmie to complete the card.

Card Recipe:

Stamp:  Together For the Holidays – DS19048 (Dreamerland Crafts)

Sentiment: Birthday 08 – DS17059 (Dreamerland Crafts)

Inks: Memento – Tuxedo Black, Versa Fine – Onyx Black, Tim Holtz Distress Ink – Fossilized Amber

Embossing Powder: Ranger – Clear Super Fine Detail embossing powder

Paper: Copic Marker X-Press It Blending Card, Echo Park Paper Co. – Happy Birthday Girl 6″ x 6″, Crafts – Sparkling Stickers – 02-3068629

Die Cuts: Your Next Stamp – Stitched Rectangle Die Set (YNSD214), Papercraft Inspirations

Tools: MISTI – Most Incredible Stamping Tool, Cuttlebug, Marvy Uchida – Embossing Heat Tool, 3M VHB – 2 sided tape, Kraftin’ Kimmie – Under Water Dots

Image coloured with Copic Markers:

Skin: E000, E00, E04, E11, E21, R22, R20

Hair:  E47, E44, E43, E41

Dress: BG18, BG15, BG13, BG11, BG10

Bear: E35, E33, E31, E29, E27, E25, E23, Sakura Glaze – Black Pen

Present: BG15, BG13, BG11, Y08, Y04, Y00

Swing: E35, E33, E31, E17, E15

Hope you like it and have a great week!

You can find more cards to inspire you at Dreamerland Crafts and Pointer Scrapbooking on the Facebook Fan pages from the rest of our design team.

Have A Beary Special Day!


Welcome Back Dreamerland Craft Fans!

Today, I’m sharing a birthday card that I made with Dreamerland Crafts stamp called With My Love – D19024. This little bear is on his way to wish someone a “Beary Good Birthday”!


To make this card I used a base card of 4.25″ x 5.5″. I stamped the image onto Copic Marker X-Press It Blending Card using Memento – Tuxedo Black ink and my MISTI. I coloured in the image and background with Copic markers and then used my Brother Scan and Cut to cut around it.

I cut out at rectangle 4.25″ x 5.5″ from Hammermill – Premium Colour 100 lb. paper and then I used various dies and Tim Holtz inks to create the background. I have listed them below. I had die cut templates using the dies which makes it really easy to create the backgrounds.

I stamped the sentiment from Jaded Blossom – Forest Friends using Versa Fine – Onyx Black ink and my MISTI onto some Turquoise Cardstock. I used Ranger – Clear Super Fine Detail embossing powder and then heat embossed the powder with Marvy Uchida – Embossing Heat Tool. Next, I edged around the background sentiment outer edges with Tim Holtz Distress Ink – Peacock Feathers. I went around the main image outline with Copic Markers – B000 and YG03. Then, I popped up the image with 3M VHB – 2 sided tape and added in some balloons which I die-cut using Your Next Stamp – Mini Balloon Trio Die Set and drew little strings from them.

Card Recipe:

Stamp:  With My Love – D19024 (Dreamerland Crafts)

Sentiment: Jaded Blossom – Forest Friends

Inks: Memento – Tuxedo Black, Versa Fine – Onyx Black, Tim Holtz Distress Ink – Mermaid Lagoon, Tim Holtz Distress Ink – Mowed Lawn, Tim Holtz Distress Inks – Peeled Paint, Tim Holtz Distress Ink – Crushed Olive, Tim Holtz Distress Inks – Peacock Feathers

Embossing Powder: Ranger – Clear Super Fine Detail embossing powder

Paper: Copic Marker X-Press It Blending Card, Crafts – Sparkling Stickers – 02-3068629, Hammermill – Premium Colour 100 lb.

Die Cuts: Your Next Stamp – Mini Balloon Trio Die Set (YNSD241), Avery Elle – Custom Steel Dies – Made in the USA – D-05-01 PiercedCloudsDie, Lawn Fawn – Grassy Hillside Borders

Tools: MISTI – Most Incredible Stamping Tool, Cuttlebug, Marvy Uchida – Embossing Heat Tool, 3M VHB – 2 sided tape

Image coloured with Copic Markers:

Bear: E33, E31, E30, E29, E27, E25, E23, R22, R20

Balloon: R59, R37, R35, R24

Hope you like it and have a great week!

You can find more cards to inspire you at Dreamerland Crafts and Pointer Scrapbooking on the Facebook Fan pages from the rest of our design team.

BBQ King


Sharing a birthday card I made using Good In The Woods Accessories and Good in the Woods (Kraftin’ Kimmie Stamps) for the images. A friend of mine is a BBQ King and has won multiple awards for his prowess at BBQing. I thought these stamps matched him perfectly.

To make the card I started with a base of 5.5″ x 4.25″ white cardstock. Next, I cut the background paper from Your Next Stamp Designer Paper Pad – For the Boys at the same size. I adhered it to the base with double-side tape and then edged around the entire card with Kraftin’ Kimmie – Stormy Sky ink.

I die-cut Copic Marker X-Press It Blending Card using my Cuttlebug and Your Next Stamp – Stitched Rectangle Die Set. I stamped the images onto the die cut using my MISTI and Memento – Tuxedo Black Ink. Next I coloured in the image with Copic Markers and then ran it through my Xyron Creative Station. I adhered this to some red cardstock and created a thin border around it. Lastly, I popped up the image using 3M VHB – 2 sided tape and applied it on top of the background paper.

Card Recipe:

Stamps:  Good in the Woods Accessories (Kraftin’ Kimmie Stamps), Good in the Woods (Kraftin’ Kimmie Stamps)

Inks: Memento – Tuxedo Black, Kraftin’ Kimmie – Stormy Sky

Paper: Copic Marker X-Press It Blending Card, Your Next Stamp Designer Paper Pad – For the Boys – 6″ x 6″

Die Cuts: Your Next Stamp – Stitched Rectangle Die Set (YNSD214)

Stencil: Kraftin’ Kimmie – Wonderful Waves

Tools: MISTI – Most Incredible Stamping Tool, Cuttlebug, 3M VHB – 2 sided tape, Xyron Creative Station

Image coloured with Copic Markers:

Skin: E21, E11, E04, E00, E000

Hair: E29, E25, E21

Apron and Shoes: E37, E35, E33

Shirt: YG95, YG991, E52, E51, E50

Socks: C1, C0, Colorless Blender

BBQ and Meat: Y08, R24, YR16, E99, E97, E35, E19, E18, E17, E15, E09, E08, R39, R37, R24, C10, C7, C4

Spatula: C5, C3, C1, E55, E53, E51

Sky: B02, B01, B00, B000, Colorless Blender

Lawn: YG17, YG13, YG03, YG01

Hope you like it and have a great week!

Enjoy Your Special Day!


Welcome Back Dreamerland Craft Fans!

Today, I’m sharing a birthday card that I made using Dreamerland Crafts stamps called A Restful Afternoon – D19014 for the main image. For the sentiments I used a combination of Birthday 07 – DS17058 and Birthday 08 – DS17059. These 2 friends are sharing a nice peaceful afternoon in the sun just relaxing. What a wonderful way to spend a gorgeous day in the sun.


To make this card I used a base card of 4.25″ x 5.5″. I die cut the rectangle using Copic Marker X-Press It Blending Card using my Cuttlebug and Your Next Stamp – Stitched Rectangle Die Set. Then I stamped the image using Memento – Tuxedo Black ink and my MISTI. The grass border was stamped with Memento – New Sprout. I coloured in the image and background with Copic markers.

For the background paper, I used Recollections – Petite Floral and green cardstock. I stamped the sentiments using Versa Fine – Onyx Black ink and my MISTI. I used Ranger – Clear Super Fine Detail embossing powder and then heat embossed the powder with Marvy Uchida – Embossing Heat Tool. Next, I edged around all of the background pieces with Tim Holtz Distress Ink – Mowed Lawn. I layered the image directly onto the green cardstock. Then, I popped up the image with 3M VHB – 2 sided tape and added a few Kraftin’ Kimmie – Springy Dots.

Card Recipe:

Stamp and Sentiment:  A Restful Afternoon – D19014 (Dreamerland Crafts), Birthday 08 – DS17059 (Dreamerland Sentiments Clear Stamps), Birthday 07 – DS17058 (Dreamerland Sentiments Clear Stamps)

Inks: Memento – Tuxedo Black, Versa Fine – Onyx Black, Memento – New Sprout, Tim Holtz Distress Ink – Mowed Lawn

Embossing Powder: Ranger – Clear Super Fine Detail embossing powder

Paper: Copic Marker X-Press It Blending Card, Recollections – Petite Floral (12 x 12 in – 30.4 x 30.4 cm), Green Cardstock

Die Cuts: Your Next Stamp – Stitched Rectangle Die Set (YNSD214)

Tools: MISTI – Most Incredible Stamping Tool, Cuttlebug, Marvy Uchida – Embossing Heat Tool, 3M VHB – 2 sided tape, Kraftin’ Kimmie – Springy Dots

Image coloured with Copic Markers:

Bear: E53, E51, E50, E29, E27, E25, E23, R22, R20

Pig:  E93, E44, E43, R22, R20, R00, R000

Lounge Chairs: BG18 BG15, BG13, BG11

Books: B05, B04, B02, V06, V04, V01, C1

Drinks and Table: YR09, YR07, YR04, Y08, Y06, Y02, B05, C3, C1, C0, Colorless Blender

Sky: B01, B00, B000

Grass: YG17, YG13, YG05, YG03

Hope you like it and have a great week!

You can find more cards to inspire you at Dreamerland Crafts and Pointer Scrapbooking on the Facebook Fan pages from the rest of our design team.

You are Mer-Mazing!


Sharing a card I made today using You are Mer-Mazing (Kraftin’ Kimmie Stamps) for the images and sentiments. For the background I used Kraftin’ Kimmie – Mermaid Scales Stencil.

To make this card, I first created the background using some texture paste mixed with Kraftin’ Kimmie – Mermaid Melody and Kraftin’ Kimmie – Lovely Lagoon Inks. Once it was all dry, I used my brushes with the same 2 colours to fill in all of the white on the background. Just love how this turned out.

I stamped my images using Memento – Tuxedo Black onto Copic Marker X-Press It Blending Card using my MISTI to get nice clean images. The images were then coloured in with Copic markers and I added some Wink of Stella – Clear to the fins, bikini top and starfish in the mermaids hair. To finish off the card, I fussy cut around all of the images and them popped them up on the background using 3M VHB – 2 sided tape. As a final touch, I added 3 Kraftin’ Kimmie – Springy Dots that lead up to the sentiment from the Seahorse.

Card Recipe:

Stamp and Sentiment:  You are Mer-Mazing (Kraftin’ Kimmie Stamps)

Inks: Memento – Tuxedo Black, Versa Fine – Onyx Black, Kraftin’ Kimmie – Mermaid Melody, Kraftin’ Kimmie – Lovely Lagoon

Embossing Powder: Ranger – Clear Super Fine Detail embossing powder

Paper: Copic Marker X-Press It Blending Card, Recollections – Blue Ombre Cardstock

Stencil: Kraftin’ Kimmie – Mermaid Scales

Tools: MISTI – Most Incredible Stamping Tool, Cuttlebug, 3M VHB – 2 sided tape, Wink of Stella – Clear, Kraftin’ Kimmie – Springy Dots

Image coloured with Copic Markers:

Skin: E21, E11, E04, E00, E000

Hair: E99, E09, YR24, YR14, Y21

Fin: B99, B18, B16, B14, B12, BG49, BG45, G23, YG41, Clear – Wink of Stella

Starfish: Y38, Y19, Y13, E31

Seahorse: BV20, BV13, BV11, V01, V000, C0, BG13, BG11, BG10

Hope you like it and have a great week!

Never Grow Old!


Welcome Back Dreamerland Craft Fans!

Today, I’m sharing an anniversary card that I made using Dreamerland Crafts stamps called We Will Never – D19077. My husband has always been my best friend and we are often told that we are still kids at heart. So, this sentiment and stamp were the perfect combination for us.


To make this card I used a base card of 4.25″ x 5.5″. I die cut a heart out of Copic Marker X-Press It Blending Card using my Cuttlebug and Sizzix Framelets by Stephanie Barnard – 562676 – Hearts Dotted. Then I stamped the image using Memento – Tuxedo Black ink and my MISTI. I coloured in the image and background of the heart with Copic markers.

For the background, I used Stampin’ Up! – Have a Cuppa paper. I stamped the sentiment using Versa Fine – Onyx Black ink and my MISTI. I used Ranger – Clear Super Fine Detail embossing powder and then heat embossed the powder with Marvy Uchida – Embossing Heat Tool. I then coloured the top half with Tim Holtz Distress Ink – Worn Lipstick and Tim Holtz Distress Ink – Evergreen Bough. Next, I edged around all of the background pieces with Tim Holtz Distress Ink – Evergreen Bough. I layered the centre background cardstock onto the base first and then the next 2 layers directly on top of it. Lastly, I popped up the image with 3M VHB – 2 sided tape and added a few pop dots from Kraftin’ Kimmie.

Card Recipe:

Stamp and Sentiment:  We Will Never – D19077 (Dreamerland Crafts)

Inks: Memento – Tuxedo Black, Versa Fine – Onyx Black, Tim Holtz Distress Ink – Worn Lipstick, Tim Holtz Distress Ink – Evergreen Bough

Embossing Powder: Ranger – Clear Super Fine Detail embossing powder

Paper: Copic Marker X-Press It Blending Card, Stampin’ Up! – Have a Cuppa – 6″ x 6″

Die Cuts: Sizzix Framelets by Stephanie Barnard – 562676 – Hearts Dotted

Tools: MISTI – Most Incredible Stamping Tool, Cuttlebug, Marvy Uchida – Embossing Heat Tool, 3M VHB – 2 sided tape, Kraftin’ Kimmie – Rainy Day Dots, Kraftin’ Kimmie – Hearts Krafty Dots

Image coloured with Copic Markers:

Skin: E000, E00, E04, E11, E21, R22, R20, C3 (Glasses)

Hair:  E47, E44, E43, E15, Y38, Y21, YR23

Skirt and Pants: B26, B23, B21

Shirt and Vest: G46, G43, G40, E29, E27, E25, E23

Boots: E57, E55, E53, E51

Heart: BG57, BG45, BG34, R85, R83, R81, C3, C2, C1

Hope you like it and have a great week!

You can find more cards to inspire you at Dreamerland Crafts and Pointer Scrapbooking on the Facebook Fan pages from the rest of our design team.

Day Wrapped in Happiness


Welcome Back Dreamerland Craft Fans!

Today, I’m sharing a birthday card that I made using Dreamerland Crafts stamps called You Are A Blessing – D19085 for the main image and  Birthday Sentiments 002 – DS163007. This little girl looks so peaceful sitting on her swing with her sweet companion next to her.


To make this card I used a base card of 4.25″ x 5.5″. I die cut a square out of Copic Marker X-Press It Blending Card using my Cuttlebug and My Creative Time – Stitched Squares Inside and Out. Then I stamped the image using Memento – Tuxedo Black ink and my MISTI. I coloured in the image with Copic markers and then drew in the tree, grass, clouds and sky.

I stamped the sentiment using VersaMark ink and my MISTI. I used Ranger Embossing Powder White – Extra Fine Detail and then heat embossed the powder with Marvy Uchida – Embossing Heat Tool. I layered the sentiment onto aqua cardstock and the coloured image onto purple cardstock and then popped up both the image and the sentiment with 3M VHB – 2 sided tape.

Card Recipe:

Stamps:  You Are A Blessing – D19085 (Dreamerland Crafts)

Sentiment: Birthday Sentiments 002 – DS163007 (Dreamerland Crafts)

Inks: Memento – Tuxedo Black, VersaMark

Embossing Powder: Ranger Embossing Powder White – Extra Fine Detail

Paper: Copic Marker X-Press It Blending Card, White Card Stock, Purple cardstock, Aqua Cardstock

Die Cuts: My Creative Time – Stitched Squares Inside and Out

Tools: MISTI – Most Incredible Stamping Tool, Cuttlebug, Marvy Uchida – Embossing Heat Tool

Image coloured with Copic Markers:

Skin: E000, E00, E04, E11, E21, R22, R20

Hair:  E47, E44, E43

Dress: V09, V06, V04

Cat: C10, C8, C5

Swing and Tree: E37, E35, E33

Grass and Leaves: YG13, YG11, G24

Sky and Clouds: B01, B00, B000, B000, B60, C0, Colorless Blender

Book: BG13, BG11, C0

Hope you like it and have a great week!

You can find more cards to inspire you at Dreamerland Crafts and Pointer Scrapbooking on the Facebook Fan pages from the rest of our design team.